Dahua NVR Troubleshoot All Series - NVR IPCAMERA SECURITY
FAQ Guide How To NVR Troubleshooting

Dahua NVR Troubleshoot All Series

Table of Contents

Alarm signal can not be disarmed

• Alarm setup is not correct
• Alarm output has been open manually
• Input device error or connection is not correct
• First Factory default the system to try to clear it


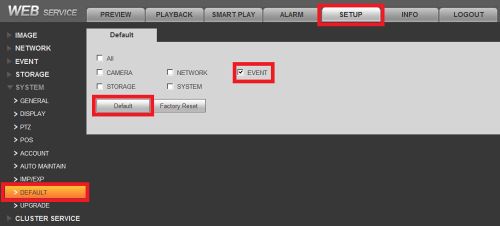
1. To begin troubleshooting please reset all events by logging into your NVR/DVR/HCVR/Tribrid and going to Setup>System>Default and check only the event box and select default. This will clear all of your event
data for all cameras connected on this NVR/DVR/HCVR/Tribrid and on the connected themselves. To be specific this feature will disable all Video Detect, IVS, Face Detect, Audio Detect options on the camera. If this fixes your alarm signal then your alarm setup on the camera was not setup correctly. Don't forget that if you were using motion detect for recording you will need to re-enable these features.
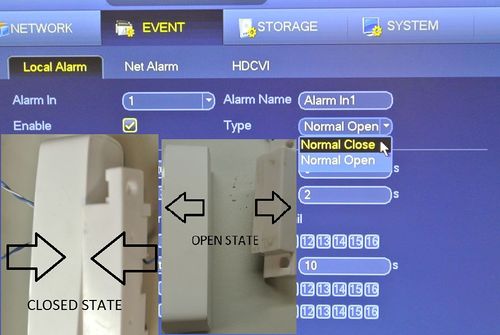
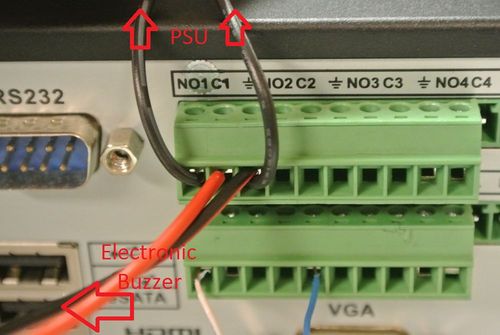
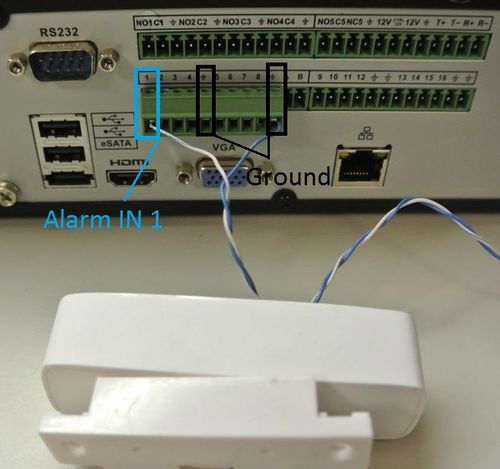
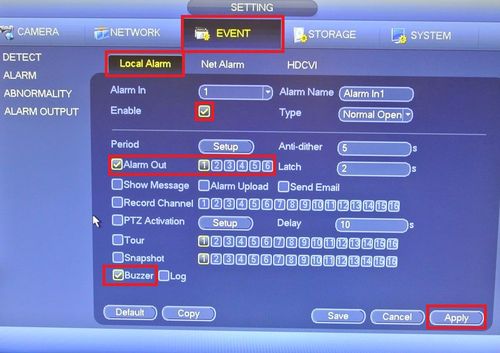
AlarmDisarm001.jpg


2. If this didn't fix the problem then you need to check the wiring on the back of your NVR/DVR/HCVR/Tribrid for your alarm input and output. Alarm inputs are set to NO (normally open) by default. In case you have a
sensor that is open all the time, you might want to set the input to NC (normally closed). For an in-depth on how to wire and setup physical alarm inputs and outputs please visit:

How To Connect Electronic Buzzer Tutorial
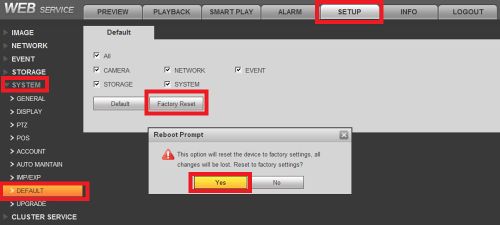

3. If this didn't fix the problem, perform a factory reset on your NVR/DVR/HCVR/Tribrid Recorder in Setup>System>Default, click factory reset, and then yes.

AlarmDisarm002.jpg

Alarm function is null

If you are experiencing a nonfunctional or non working alarm then you might want to consider that the alarm was setup incorrectly.

.

Resources for Alarm Systems

• Reset your event options: Unable to Disarm Alarm
• How the alarm functions are setup on an NVRHow to Connect Electronic Buzzer

Possible Problems:

Here are also some possible problems that may have occurred upon setup:

• Alarm is not setup correctly (event settings can be incorrect)

ElectBuzzer012.jpg

.

• Alarm cable connection is not correct (check your connections)

ElectBuzzer010.jpg

ElectBuzzer009.jpg

.

• The alarm input signal might not be correct, the alarm input supplies a low voltage (< 2.0 VDC). If you are supplying a voltage in excess of that to show a closed or open signal then you will need to wire a resistor into the circuit to get the proper voltage to the alarm input pin out.
• There are two loops connect to one alarm device, which will send a false signal or keep the circuit open (check your wiring).
• The protection zone that the intruder is entering has not been enabled (in the IVS rules setup, and IVS event) the arm function or the intruder has enough knowledge to disable the system. See Intrusion Detect for more details.
• The siren output device is incorrect on the back of the recorder and does have the warning function setup correctly. Make sure the siren wired into NO1 and C1 correspond with alarm out 1 when configuring your setup.

ElectBuzzer011.jpg

• If the detector (alarm input) is not working when there is an alarm outage, you might have wired your alarm input into your alarm output or input. (check your wiring)
• The detector (i.e. door sensor, PIR sensor) might not be in the proper position and can not detect the corresponding zone (reset the angle of the sensor)
• The recording system can not generate an alarm when there is something wrong with the alarm signal transmission system (the service is disabled, there is malicious attack and etc)
• The device is not working, resulting from non-schedule maintenance of the alarm system (has someone worked on the system recently?)

Please Be Advised

Sometimes it is best to call the engineer who setup your alarm system if you do not know what you are doing, as tampering with some systems can set off subsequent systems.

The displayed video is not full in the monitor.

Please do the following:

1. Check your physical connections from the system to the monitor.

2. Check your aspect ratio.

3. If a VGA connection, ensure the screws are tight.

4. For the VGA connection, 25 feet or less is recommended for high resolution and 50 feet for lower resolution.

5. If a DVI connection, also ensure the screws are tight.

6. For the DVI connection, Up to 15 feet at high resolutions (above 1280×1024), or up to 50 feet at lower resolutions (1280×1024 and below)

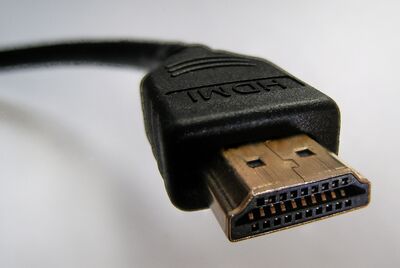
7. If a HDMI connection, 1080p monitor is recommended.

8. For the HDMI connection, less than 50 feet is highly recommended with 25 feet or less is preferred.

9. If a DP connection, make sure the monitor is at least 1080p.

10. On the monitor check the current resolution setup. If the current setup is 1920*1080, then you need to set the monitor resolution as 1920*1080 or 1080P capable.

11. Monitor is incapable of displaying the device recorders resolution output.

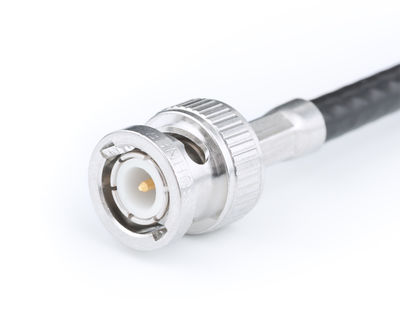
Coaxial with BNC connector

BasicsTestImage1.jpg

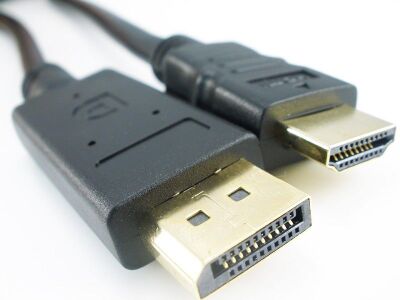
HDMI (High-Definition Multimedia Interface) Connector

Videocon1.jpg


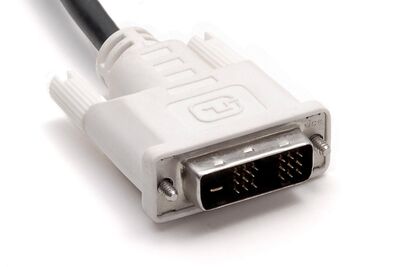
DVI (Digital Visual Interface) Connector

Videocon2.jpg


DP (Display Port) Connector

Videocon3.jpg

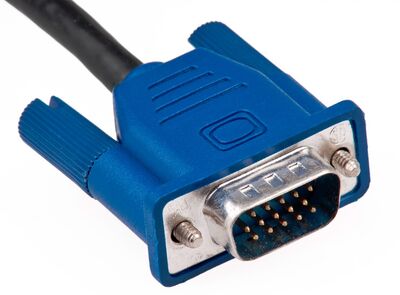
VGA (Video Graphics Array) Connector

Videocon4.jpg

Errors Found in Log

Whenever the DVR reboots an entry is created in the Log, Information>Log. In the log the entry will list “Reboot with flags” or “Reboot Symbol”. It will show a code telling you why the camera rebooted. Please see the list below:

Boot Codes

• 0x00: DVR has rebooted normally: routine maintenance reboot or a user reboot.
• 0x01: Abnormal reboot: power loss, system crash, or other undefined abnormality.
• 0x02: Log stuck.
• 0x03: Hard drive read-write slow: hard drive read-write speed has dropped significantly; hard drive capacity has seriously decreased.
• 0x04: Abnormal recording: Over 3 minutes with no stream on the recording channel.
• 0x05: Bad track: The hard drive has a bad track.
• 0x06: Abnormal reboot, decoding abnormal
• 0x06a: Video storage abnormal
• 0x06F: Restart caused by illegal access to memory. Security feature reboot for backend failed access
• 0x07: Abnormal reboot, The partition is damaged
• 0x11: Hard disk hot-swap overtime

Troubleshooting the codes

• 0x00: Check in Settings>System>Auto Maintain to ensure that the DVR is not set to reboot.
• 0x01: This one is the hardest one to diagnose. We recommend updating the firmware to the most Recent version, hard resetting the DVR, and ensuring the DVR is receiving consistent power.
• 0x02: Clear the log. Go to Information>Log and click Clear.
• 0x03: Check in Settings>Storage>HDD Manage and look at the Status. If it is not “Normal”, it is likely that there is a hard drive error and it needs to be replaced.
• 0x04: Check all of the camera connections and ensure they are powered correctly.
• 0x05: Check in Settings>Storage>HDD Manage and look at the Status. If it is not “Normal”, it is likely that there is a hard drive error and it needs to be replaced.
• 0x06: Do not decode over the system's capabilities. Check the system's datasheet
• 0x06a: Could be an issue with the drive. Check the HDD's health with S.M.A.R.T or replace the drive. Make sure firmware is up to date
• 0x06F: Too many devices connected at once. Change login credentials to limit device access.
• 0x07: Factory default the system
• 0x11: Turn the system off and make sure the drive is properly connected. Or replace the drive.

DDNS registration failed or can not access the device domain name.

DDNS (Dynamic DNS/DynDNS) is a method of automatically updating a name server in the Domain Name System (DNS), often in Not Real Time, with the active DDNS configuration of its configured hostnames, addresses or other information.

If DDNS is not working properly please try to:

.

1. Check the device to see if it is connected to the network: 


2. Verify that the device has acquired and IP address via DHCP or that a static IP has been assigned.

.

3. Ensure that you can connect to the system on via the local network: 


4. Try to access the system from another device on the network e.g. Try to open the web interface of the device from a web
browser on your local network.

.

5. Check the corresponding protocol of the DDNS is enabled:


6. Log into the DVR/NVR/CVR and navigate to the “Network” menu then look for the DDNS option and check the box to enable the service. After the service is enabled you will need to fill in the required informwation i.e. DDNS Type, Host IP Port (1~65535) Domain Mode Domain Name and Email Address if applicable


7. Check the DDNS credentials at the DDNS site and menu of the system:


8. Please confirm that log in information matches on the Dynamic DNS platform that you are using and also in the DDNS section of the recorder.

.

9. Default Google DNS server is 8.8.8.8, 8.8.5.5.


10. Use different DNS provided by your ISP.

P2P Troubleshoot

There are following possibilities:

• Check the network connections from NVR to your router.
• Check the device P2P function is enabled or not. (Main menu*>Setting*>Network*>P2P)
• Check cell phone P2P login information is correct. You will need to ensure the user name and are correct. (This is the credentials for logging into the system.)
• Check P2P SN is right or not. You can use the cell phone to scan the QR code on the device P2P interface (Main menu*>Setting*>Network*>P2P), or you can use the version information of the WEB to confirm. (For some previous series products, the device SN is the main board SN, it may result in error.)

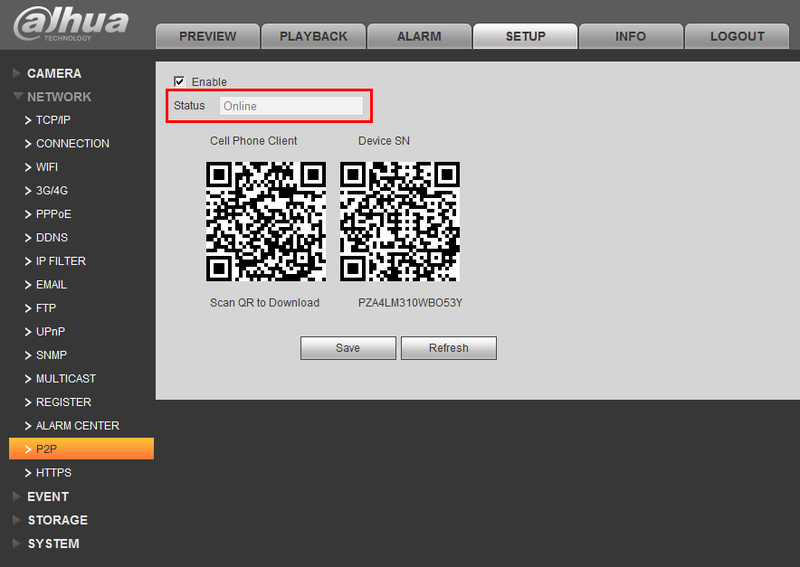
1. Check that, “P2P is enabled under, Main Menu->Setup->Network->P2P

P2PTroubleshoot1.png

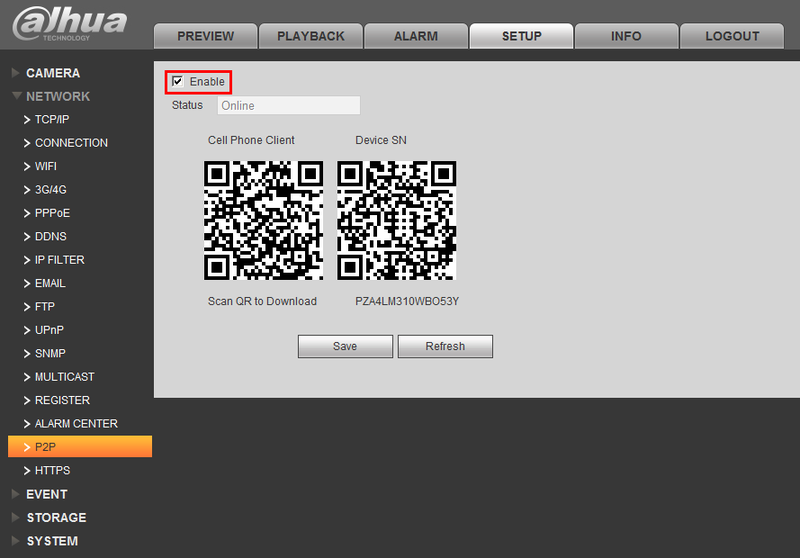
2. Check that the P2P status is, “Online”

P2PTroubleshoot2.png

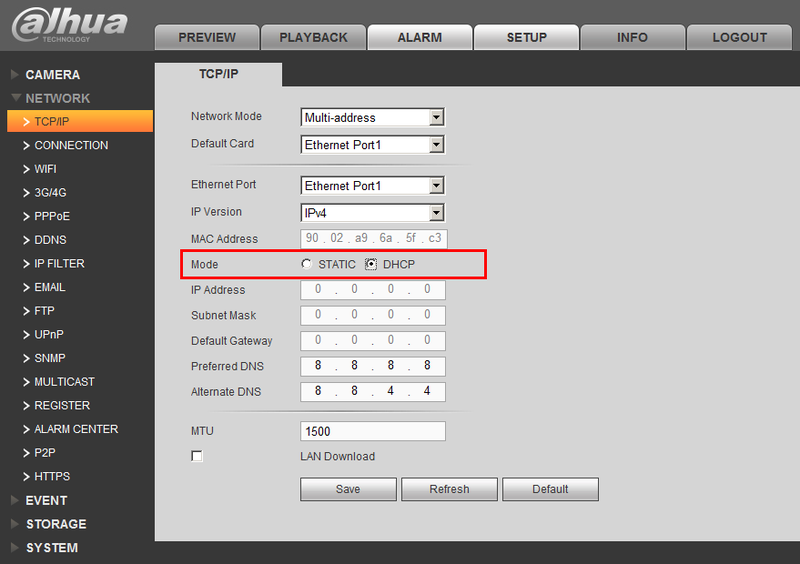
3. Enable DHCP under, Main Menu->Setup->Network

P2PTroubleshoot3.png

4. Reboot the NVR.

Unable to Login from Web Browser

• For 8 or 8.1 you make sure you IE Browser's security setting are set to low for that IP address.
• Or you can install -end software of lower version.
• It is possible that the ActiveX control has been disabled.
• No dx8.1 or higher. Please upgrade display card driver.
• Network setup or connection error.
• Password or user name is invalid.

Step by Step Instructions

1. Delete any previous version of Web Rec. How to Delete Web Rec

2. Make sure you are using Internet Explorer (Safari on OSX). Not Edge, Chrome, Firefox, or any other browser.

3. Configure Internet Explorer's security settings. How to Configure Internet Explorer's Security Settings

4. Ensure no Malware or Viruses are installed on the computer.

5. Set as a trusted site. 

6. Change credentials from Recorder if credentials are invalid.

7. Close out IE and reboot PC. 

8. If accessing outside of network, make sure device is set up for remote viewing such as DahuaDDNS or .

9. Ensure you have ” http://” in front of the domain name or IP address.

• Eg. Locally http://170.16.17.116/
• Eg. Remote access with open port number if port number is applicable http://170.16.17.116:80

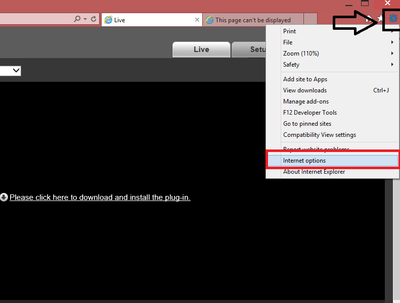
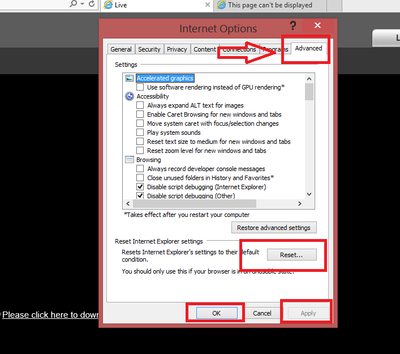
10. Set IE settings to default condition. Please see below.

• Click on settings from the IE âžž Click on “Internet Options”

Browser trouble shoot wiki.png

• Click on the Advanced tab ➞ Click Reset ➞ Click Apply ➞ Click OK. You will have to reboot your PC for the changes made.

Browser trouble shoot 2.png

11. If none of the above will work, use .

Network connection is not stable.

Explanation:

• There maybe an IP address conflict.
• There maybe a MAC address conflict.
• PC or device network card is not good.

Solution:

• Check the cable connection from the system to the router/modem
• Your router or modem maybe failing and needs to be replaced.
• Check for DHCP and static IP address.
• Check MAC address.

The video is not fluid when I view in multiple-channel mode from the client-end.

• The network bandwidth is not sufficient. The multiple-channel monitor operation needs at least 100M or higher.
• Your PC resources are not sufficient. For 16-ch remote monitor operation, the PC shall have the following environment: Quad Core, 2G or higher memory, independent displayer, display card memory 256M or higher.

There is only mosaic no video when preview or playback video file remotely.

There are following possibilities:

• Network throughput is not good.
• The PC's resources are limit.
• There is multiple-cast group setup in DVR. This mode can result in a mosaic video view. Usually we do not recommend this mode.
• There is privacy mask or channel protection setup.
• Current user has no right to monitor.
• DVR local video output quality is not good.
• Check out the Need More Recording Space Wiki article for more information on how to optimize a camera feed.

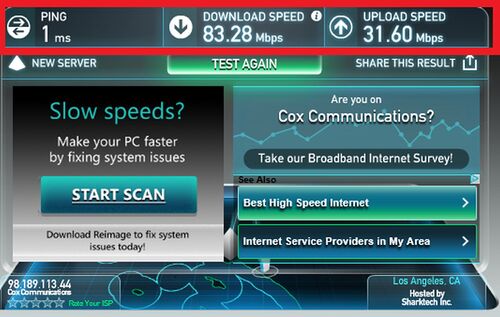
How to perform an internet speed test

1. To check your Internet connection please go to http://www.speedtest.net/

Speedtests002.jpg

2. Click Begin test, and let the test run

Speedtests003.jpg

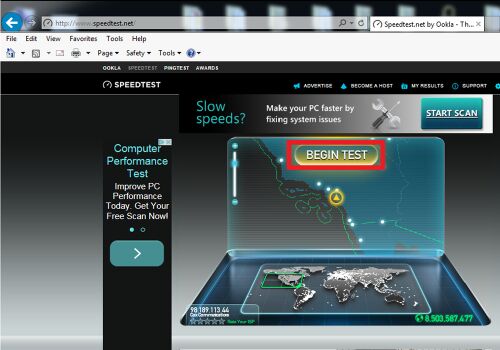
3. Compare your results next to your required internet specifications for your device(s)
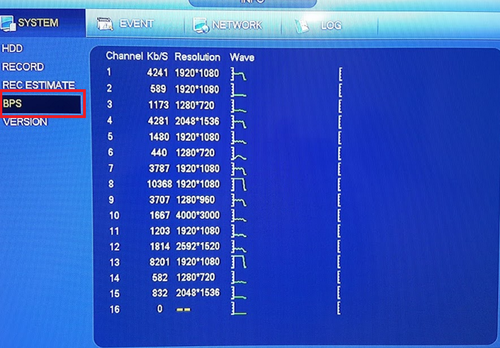
Speedtests001.jpg

System Bandwidth

You can monitor how much bandwidth the system is using. You can do this by following the the steps below.

1. From the Main Menu under Info click on “System”.

Bandwidth2.png

2. Click on “BPS”. Here you can see how much data each camera is using.

Bandwidth3.png

About the author

M.Salih ASLAN

Hello, I live in Salih Turkey. I serve in dvr, nvr, security and surveillance industry. Write to me for any comments and suggestions ..

Add Comment

Click here to post a comment