

TetherX Camera Setup Guide v2, Tether your video surveillance, alarm panels, network infrastructure and other IP or Serial devices to the cloud. Monitor the health of your sites, cloud record cameras and integrate with third party services.
The steps required to set up Samsung Cameras / DVRs and NVRs
Setting Correct Profiles
Please ensure you have 2 profiles configured on your device:
IP Cameras
Cameras are the easiest to set up and should work out of the box. If the cameras are not working for any reason, please try one of the following for the Analytics Path and Recording Path:
The above assumes profile2 is set to 720p with 15fps and profile1 is set to the maximum resolution / frame rate.
Please also ensure the RTSP port is correct (554 by default).
Multi-Sensor IP Cameras & Encoders
If your device is a multi-sensor camera or an encoder, please set the Analytics Path as follows:
Sensor # range is from 0-3 (0 = Sensor 1, 1 = Sensor 2…)
For example for PNM-9081VQ, PNM-9080VQ, PNM-9322VQP, PNM-9002VQ, or PNM-7002VD:
NVR – Network Video Recorders
To get the full list of supported profiles, you can create a tunnel to the camera and visit the following URL (replacing {PORT} with the actual tunnel port):
http://timeline.is:{PORT}/stw-cgi/media.cgi?msubmenu=videoprofilepolicy&action=view
You will see something like the following:
Channel.0.NetworkProfile=2
Channel.0.LiveProfile=2
Channel.0.RecordProfile=2
Channel.0.LiveMode=Manual
Channel.1.NetworkProfile=2
Channel.1.LiveProfile=2
Channel.1.RecordProfile=2
Channel.1.LiveMode=Manual
Please ensure the Live and Record profiles are mapped to the desired resolution/frame-rate/codec.
DVR – Digital Video Recorders
DVR recorders setup is similar to NVR setup with the following differences:
Note: If you have any issues following this process or if you would prefer the TetherX support team set this up to you, please contact us on the live chat in the bottom right of TetherX.
TetherX Camera Setup Guide v2
Can I use TetherX alongside HikConnect?
Can I use Hik-Connect on my Hikvision cameras and recorders?
Yes.
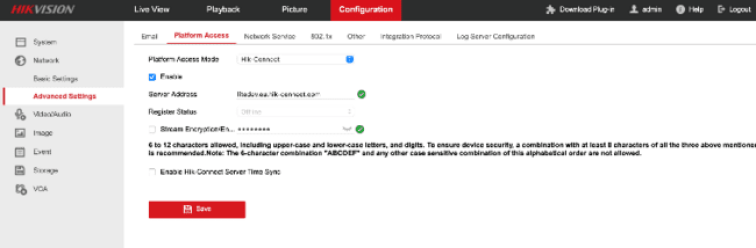
Please make sure that stream encryption is switched off under Configuration > Network > Advanced Settings:
HikConnect stream encryption uses a proprietary mechanism which is not available to third-parties. Please note TetherX will encrypt the stream to the highest standards, for more information please see our security white-paper.
Note: If you are still getting a broken stream or no live view, please try updating the camera and/or recorder firmware to the latest. There are known issues that have been addressed by Hikvision.
Live View – Technical Implementation Details
How TetherX implements live view to be compatible with all manufacturers
Introduction
The quality, latency and smoothness of live view streaming is dictated by many factors:
Some of these are self-explanatory but some are a matter of trade-offs and priorities. This document explains the constraints and the decisions taken by TetherX when it comes to live view streaming.
Available Streams from Cameras
Typically cameras will provide 2 video streams as well as the ability to request a single image. These limitations dictate what is and isn’t possible when it comes to both recording and streaming.
💡 Note: More expensive and speciality cameras will provide additional video streams and custom streams of crops/de-warps of the same image (e.g. 180 or 360 cameras).
The streams are usually accessed through RTSP and the images through HTTP. For example:
The above is just an example as this ranges wildly depending on the hardware and customer requirements.
Formats
Please note this format is not compatible with older devices and operating systems. At present (Q3 2023) support is limited to:
Transcoding vs Proxying
TetherX supports both transcoding and proxying/packaging. The differences between the two are as follows:
Transcoding is a process of taking the stream from a camera, decoding it and then re-encoding it into a different format. This is the ideal method to hit a specific requirement of Internet bandwidth and viewing size, but it is in most cases cost prohibitive as you need power hungry and expensive hardware to achieve.
For context, a TetherBox Pico capable of recording 10 cameras will only be able to record 2 if transcoding (you can enable transcoding in TetherX by editing a camera and switching to the advanced tab).
Proxying & Packaging is what is used in most cases, where the original video stream is maintained but is packaged into different containers, for example .mp4 for video recording and .ts for local and high-def live streaming (see streaming technologies below).
This means that ultimately, you are at the mercy of the camera/recorder. If you need to open 16 cameras and each one is 1mbit, but your upload speed is only 10mbit, it will simply not work because the stream size cannot be adjusted without either:
Video vs Images
TetherX use a combination of images and video to achieve different goals. It is important to understand the differences and advantages/disadvantages of each, which in turn dictate when either is used in TetherX.
The main difference between image and video compression is every image is self contained, where every video frame is part of a stream. While you may skip an image, skipping a frame in a video stream leads to parts of the image breaking / disappearing:

Systems that ignore broken/skipped data (e.g. streaming over UDP) will show a broken image while many systems will simply show a loading spinner while they wait for the next key frame (which is controlled by the key-frame interval set on the camera/recorder, typically set to 1 second, or the same number as fps, but sometimes much longer).
Because each image is self contained, it is typically 5 to 25x larger in bitrate vs video at 25 images per second. It may initially seem obvious that video should be used when accessing remotely, however there are certain important underlying trade-offs that make it a much tougher question which needs to be evaluated on a case by case basis, according to the following:
Advantages of Images
Disadvantages of Images
This leads to a much lower FPS in practice when bandwidth is kept the same.
Advantages of Video
This usually leads to a much smoother video at the same bandwidth.
Disadvantages of Video
This usually restricts how many simultaneous cameras can be viewed as it is impossible to gracefully adapt the bitrate of each stream on the fly.
Live View Streaming Technologies
TetherX uses all mainstream streaming technologies available and choses between them depending on the specific requirements and constraints:
If the device in question is limited by its performance or bandwidth, it loads the next image slower but still remains functional. This leads to a reliable live view that automatically adapts to the resources available and can sustain a virtually unlimited number of cameras viewed simultaneously. This however by design does not provide high frame-rate which viewers associate with smoothness. It also is not efficient when viewing a smaller number of cameras at higher frame-rates.
Unless transcoding, these files simply re-package the same video stream coming from the camera and therefore, if the connection speed cannot sustain all the requested streams on screen, the video will take a long time to start and will stop after the initial second, showing a loading spinner until the next video file is fully downloaded. Effectively, sufficient bandwidth is crucial.
Even with sufficient bandwidth, the typical latency can be anywhere from 2 to 5 seconds which leads to a poor experience in applications such as PTZ or Two Way Audio.
How TetherX Does It
TetherX supports most streaming technologies and switches between them depending on context.
When local streaming (the TetherBox is able to detect if you are on the same network), if we are viewing less than 10 cameras simultaneously TetherX switches to LHLS (see above) to show the primary video stream from each camera at full resolution/frame-rate (assuming your viewing device is capable of displaying this many streams). If this is not working well for you, you are presented with a toggle to switch off High-def streaming to fall back to loading images.
When full screening a camera (double tap/click a camera), we assume you want the higher quality and we switch to the full primary stream. If your connection is not able to sustain this stream, we automatically fall back to loading images.
When viewing multiple sites / cameras over Internet in record mode, we switch to image viewing but we transcode/transize the images depending on the size of each live view box on your screen. This ensures that you are able to view many simultaneous cameras, the latency is lower than video, it automatically adapts to the available bandwidth and it does not impact recording quality. This does however mean a lower fps.
When viewing multiple sites / cameras over Internet in monitor mode, we proxy the connection directly to the image provided by the camera. This leads to a further lowering of fps but ensures the TetherBox can monitor the health of and provide live view of 10x more cameras than in record mode.
Learn more about using Live View in TetherX here.
How Hikvision iVMS Does it
Because of the constrains outlined above, in order to show smooth video in iVMS (and Dahua PSS) software, if the connection speeds both on site and viewing device cannot accommodate the streams, the software temporarily reconfigures the cameras to send a lower bitrate stream while keeping the resolution the same.
💡 Note: if you happen to kill the software at this point (or lose connection), this can cause the camera to permanently record in lower quality.
Because many cameras or recorders only support a single stream at above D1 resolution, this means that not only is the live view quality reduced, but also the video being recoded which can lead to losing critical video evidence.
In our testing, limiting the connection to 5mbit 200ms upload and streaming just 4 cameras in HD resulted in blocky and usable footage being recorded on the NVR. It also took over 10 seconds to get an initial image, however the motion was smooth (25fps) once loaded.
In comparison when using images (outside of the iVMS/PSS software), the images loaded almost immediately, the image quality was significantly higher, but the frame-rate was poor (3-4fps) – still sufficient for making decisions in a control room setting, but understandably disappointing in smoothness by comparison. (Note: higher fps can still be achieved by full screening a single camera on demand).
When viewing a smaller number of cameras from the same manufacturer on a single PC or phone, it looks impressive to have smooth 25fps video on iVMS/PSS/others. However, when dealing with 100+ or even 32 cameras, from different manufacturers, different firmware versions, with multiple users, across multiple sites, with differing and fluctuating bandwidths, you begin to appreciate the trade-offs and advantages/disadvantages of each approach.
💡 Note: This approach of custom code to adjust Hikvision camera settings to achieve smoother live view is only suitable if you do not care about recording quality and you are optimising for a single manufacturer with compatible models/firmware.
TetherX is an open platform with a focus on convention over configuration, we prioritise the integrity of recorded footage above live view and we implement approaches that work across all recorders/cameras as well as viewing devices.
Uniview / UNV Camera Setup Guide (for use with TetherX)
Using TetherX with Uniview / UNV Cameras
Summary
Uniview or UNV cameras should work out of the box in most cases. However please note depending on the age of the camera and firmware versions, the RTSP path may be different.
Please try the following paths:
You can set this in the Analytics Path or Recording Path by editing your camera in TetherX:

3. Open the Advanced tab and enter the required Analytics Path and Recording Path. Please try all the paths given as examples above.
Camera Setup Checklist
Adding IP cameras to TetherX Please note your camera may have a different interface and options may be located in a different part of the interface. Please refer to the camera manual if you are not able to find the relevant option.
Network
Set a Static IP
Set camera to unused IP on 192.168.88.x network
set DNS/Gateway to 192.168.88.100
Important: Although it’s possible to configure your camera with DHCP, and TetherBox is capable of detecting any IP changes, we strongly advise against this practice for security reasons. This setting can potentially allow the camera to connect directly to the internet, raising a range of security issues. These include unauthorised access through back doors, or the risk of security holes in the camera’s firmware if it’s not updated regularly.
Video & Audio
Recording Stream (primary)
Analytics Stream (secondary)
Conditions
Audio (optional)
Date & Time
One option is to disable time from being displayed in the camera at all. You generally do this under OSD settings. If you do wish time to be displayed in the image, you need to set the following:
Add Comment