

Hisseu PoE Camera System User Guide v1, Compatible with NVR supporting Protocol On Vif, and also work with Hiseeu PoE NVR like YNVR-P-8 or Hiseeu PoE Camera System ASIN:B07HRKDD6B,B088YP8LPY, B09DV1CBXR,B0B4SCDZM7,B08XXGZVT2,B09DTZ559W, etc.
We can talk directly on phone app for asking courier to put package to a certain place you point, and hear sound from app or TV monitor connected to NVR
We could be alerted any time a person enter your property by receiving push notification from free phone APP, and the alarm light will be triggered to drive away the suspicious objects ( Note: APP has No Monthly Fees)
High Resolution 2592 X 1944 pixel to provide your vivid and clear image no matter in day or night, and IP 67 Waterproof to withstand Changeable Weather like Snowy/Rainy Day
We can customize the surveillance area or set a line for human/vehicle, and the alarm alerts will be triggered when detecting human/vehicle crossing the line or intruding the alarm area (These function may only work with Hiseeu NVR)
Version 2020-2022 PoE System FAQs in total
.
Further support, plz email us at email love@hiseeu.com
Or contact us at +1 917 688 2228
.
Important Notes:
These FAQs are only adaptable to following Models NVR Model : H5-NVR-P-8,
Camera Model: HB215-PA, HB212-PA, HB915B-PA
Mobile Phone APP: XMEye Pro PC Client :VMS
Hisseu PoE Camera System User Guide v1
Contents:
A: Forget NVR Password?
B: Add Device on PC Client Software (VMS)?
C: How to Sign up account on Mobile APP (XMEye Pro) ?
D: Add Device on Mobile Phone APP (XMEye Pro)?
E: How to enable Alarm Notifications on APP XMEye Pro?
F: Configure Offline Camera or Add a New Camera?
G: No Video Display on TV Monitor Or Blank Screen?
H: Why DVR/NVR can’t record or playback video?
.
Detail Solutions:
A: Forget NVR Password?
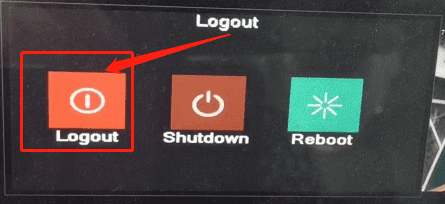
1. Please click the mouse from the home screen, and “Logo Out–>Log Out”
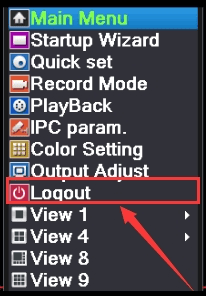

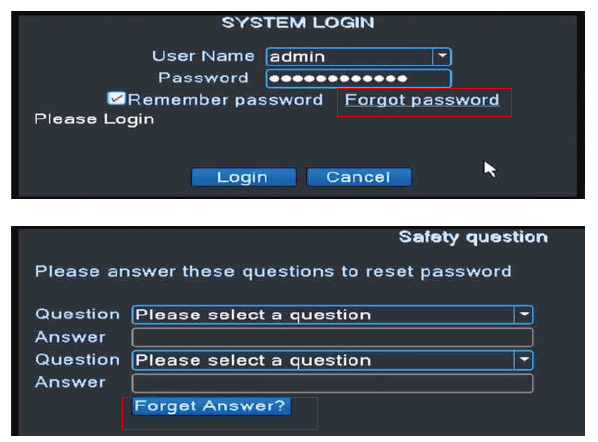
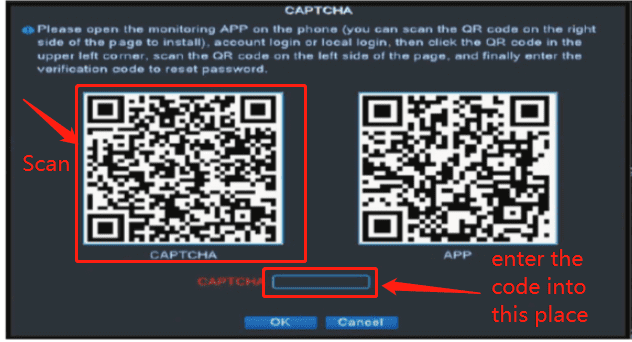
2. Right click the mouse again, click “ Main Menu”–> “Forget password –> Forget answer”, you will see the “QR Code”
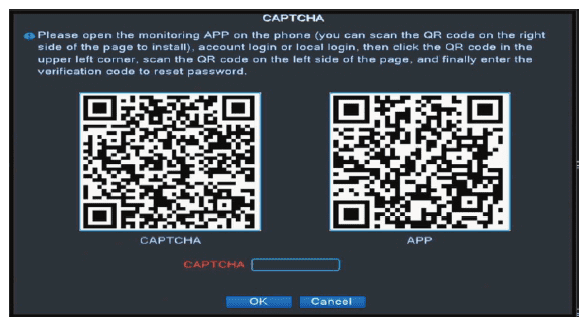
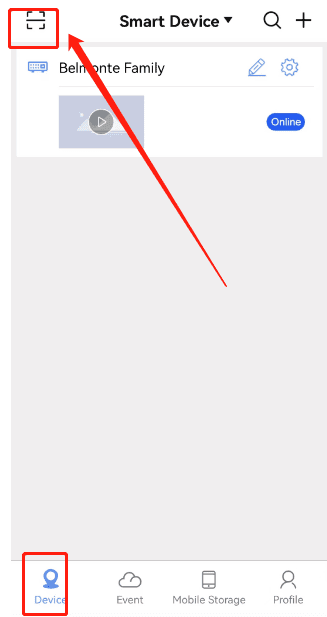
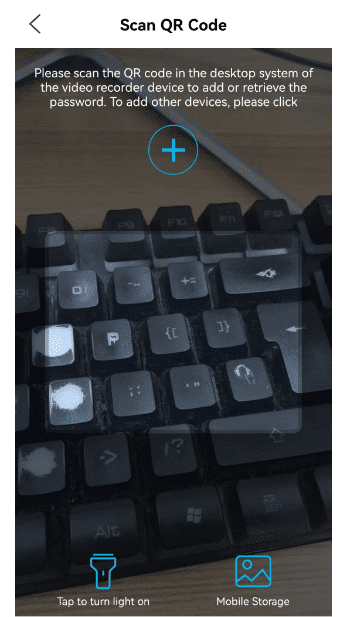
3. Please open your mobile APP “XMeye Pro”
(1)Click the Scan icon on the top left corner
(2)Scan the “CAPTCHA” on the TV monitor, then you will get a code from the mobile phone APP or from your email, and enter the code into “CAPTCHA”, so you will be able to reset the password on the Monitor connected to DVR
.
B: Add Device on PC Client Software (VMS)?
VMS download link:
For Windows (2023 newest version)
https://download.xm030.cn/d/MDAwMDE0OTM=
For Mac ( 2022 version)
https://download.xm030.cn/d/MDAwMDA2NDA=
1. Download PC Client “VMS” and installed
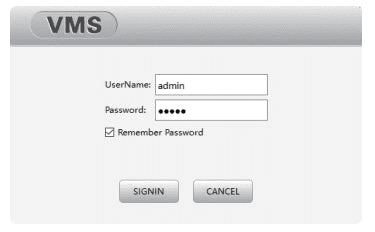
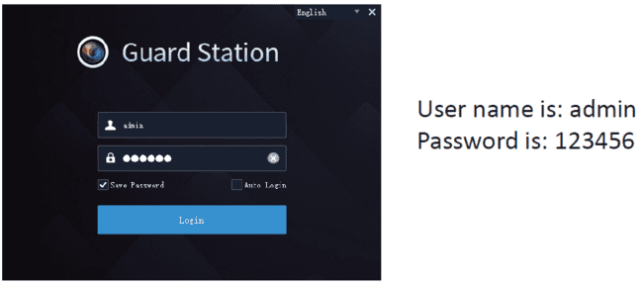
[ Need to drag the file to the desktop after installing firmware, or it would ocurred the issue of “unable to open archive file”]2. Login with the default User Name and Password. Click “SIGN IN”.
Default User name is: admin
Default Password is: admin
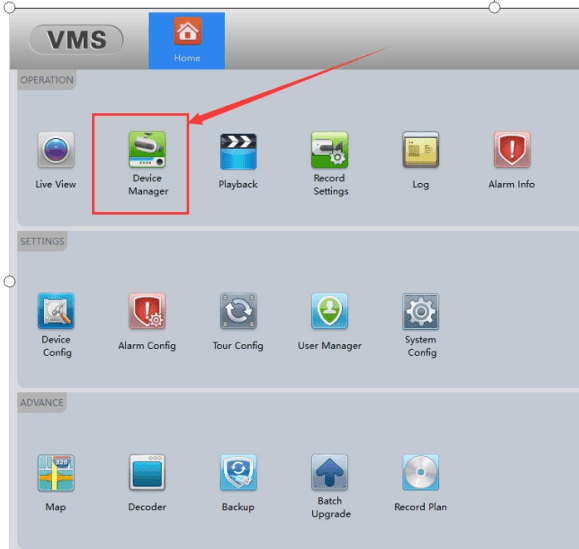
3. Navigate to “Device Manager”–>”Manual Add”
4. Login Type: Cloud ID Device Name:
Name Your Device as you like
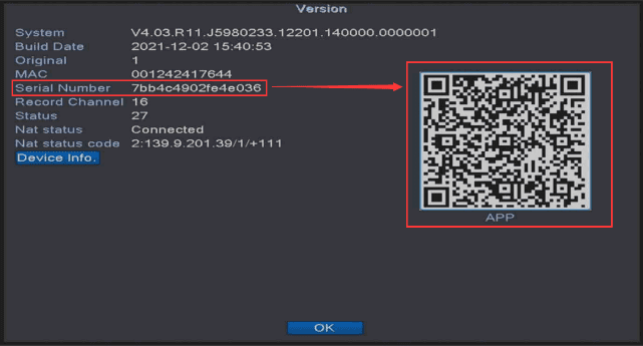
Cloud ID : Device Serial Number. We need to go to the TV Monitor connected to the NVR , and find out the information on TV Monitor UI, then right click the mouse to navigate to the path of “Main Menu–>Advanced–>Version” to find out the information “serial number”
[Note: most customers do not know how to find the serial number, so they can’t add the device to PC Client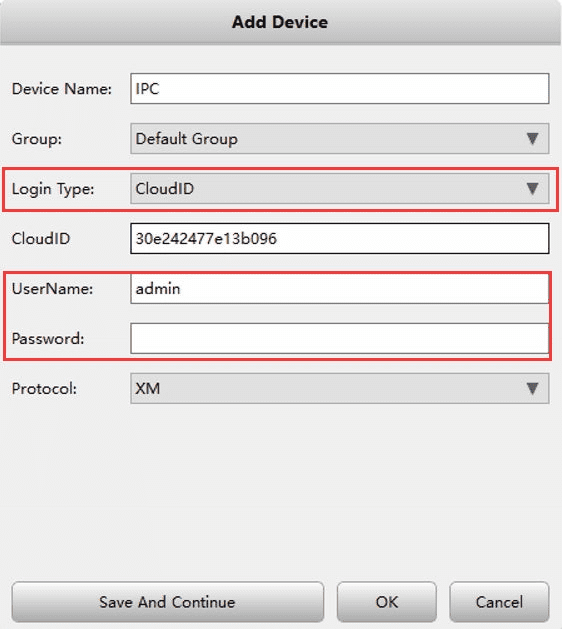
User Name and password: Input the user name and password that you created for the NVR , and we also need to find this from the Monitor UI.
[right click the mouse from “Log out–Log out”, then right click the mouse and navigate to “Main Menu”, this interface [system login] would pop up]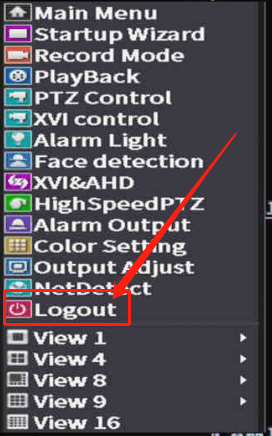

.
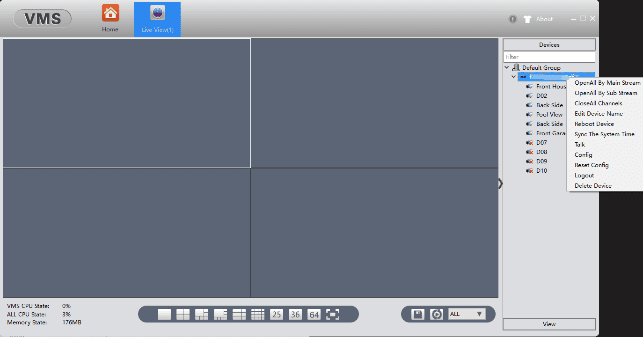
5. Navigate to “Live View”, Click on the device name(serial number), then select “Open All By Sub Stream”
.
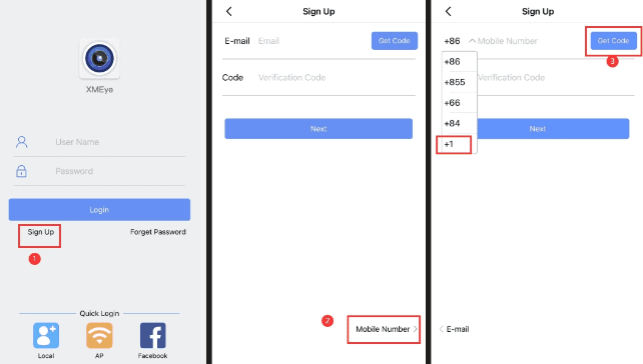
C: How to Sign up account on Mobile APP (XMEye Pro) ?
Please follow these instructions to sign up for an account via your mobile number.
1. Click on Sign Up
2. Sign Up by email or Select Mobile Number
3. Select the correct country code +1, input your mobile number and click on “Get code”
4. A code will be sent to the mobile phone number, input the verification code and continue.
.
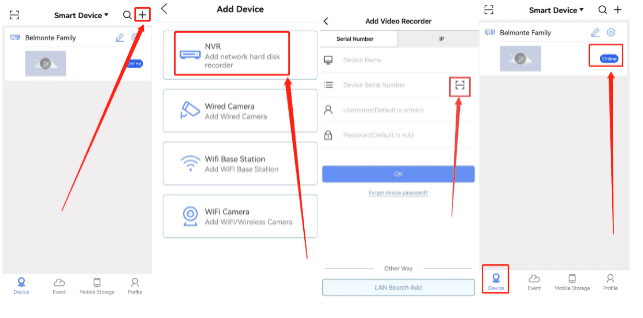
D: Add Device on Mobile Phone APP (XMEye Pro)?
Steps:
–>1. Please connect the NVR/DVR box to your Router via Network Cable; (Some customers think it can support WIFI connection, while wired systems only support wired router connection, and have to be wired to router via ethernet cable)
–>2. Go to Monitor UI Interface, and Navigate to “Main Menu > Network > Net Service”, if the “Cloud Status” shows connected, means NVR/DVR is online (Please skip step3),
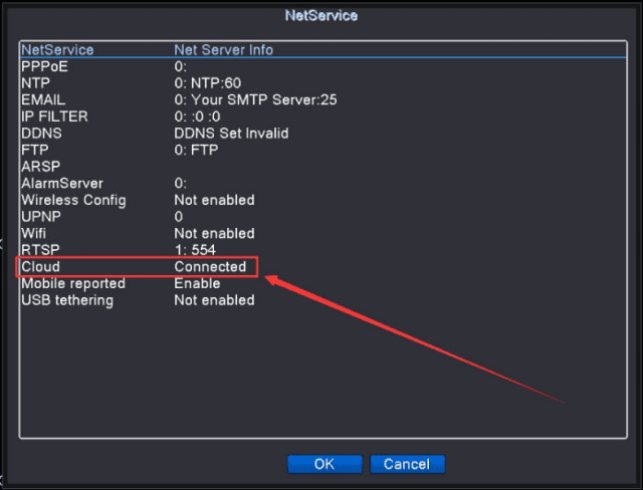
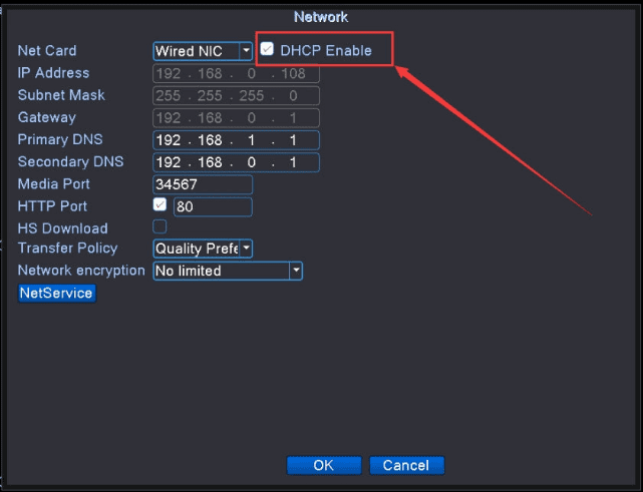
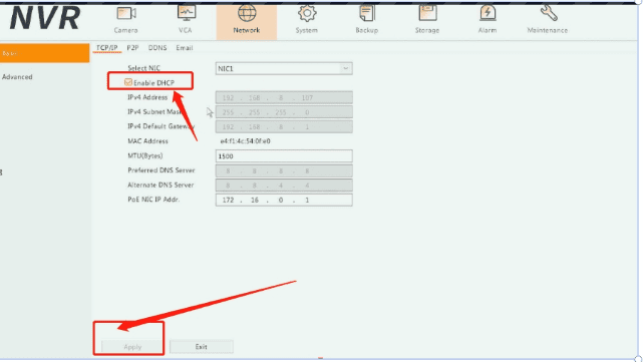
–>3. If the cloud status shows “Probing DNS”, Please Navigate to “Main Menu > Network > Check the icon of “Enable DHCP”–>Apply;
–>Reboot the DVR by unplugging the power adapter and re-plug it, then double-check the cloud status ( only cloud status shows )
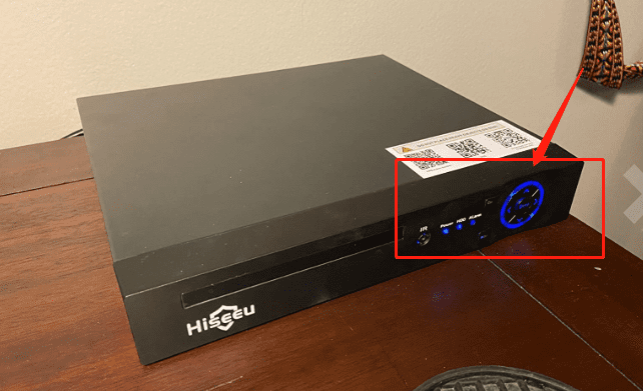
–>4. Go to your TV Monitor, navigate to “Main Menu–>Advanced–>Version”–> You will see the serial number.
The QR code contains Serial number info. We need this information after we add the device to mobile phone APP
–>5. Open the mobile APP “XMeye Pro” and register an account by your email first
–>6. Click”+” to add device–>Choose “NVR”
Device Serial Number: Click the “Scan” icon to Scan QR Code On the NVR UI Interface (Main Menu–Advanced–Version), (QR code contains username and password)
No need to input the username and password manually.
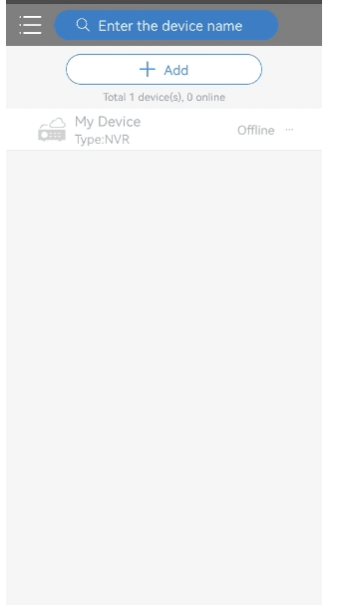
And click “OK”, and go back to the Device page on App,and you will see the device shows status:online ,
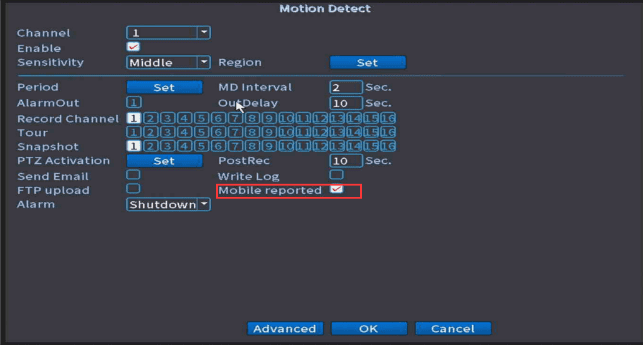
E: How to enable Alarm Notifications on APP XMEye Pro?
1.Make the Alarm setting is already set on Monitor UI Interface
2. Please right-click mouse and navigate to “Main Menu–> Alarm–>Motion Detect/Human Detect/Face Detect–> Enable “Mobile Reported”–>click “OK”
(Default Setting is for Channel 1, Please select “All” channels.)
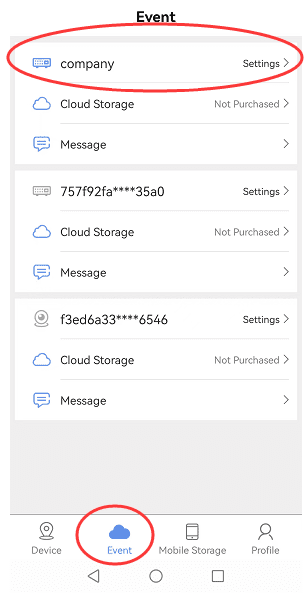
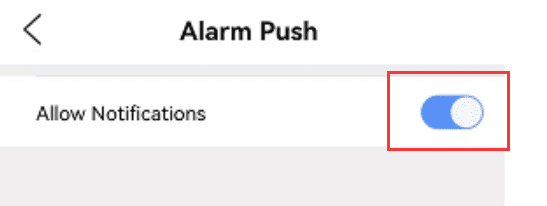
2.Open “XMeye Pro” mobile App, and navigate to “Event–>Device (the one you named)–>Enable “Allow Notifications”
.
F: Configure Offline Camera or Add a New Camera?
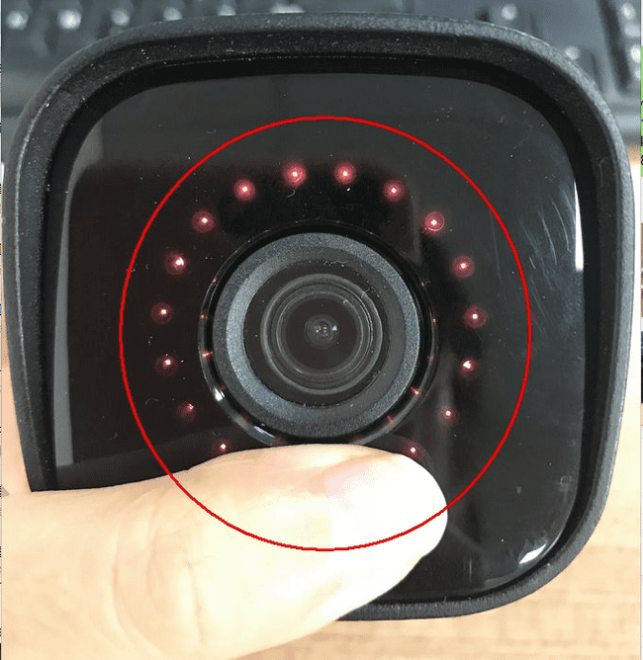
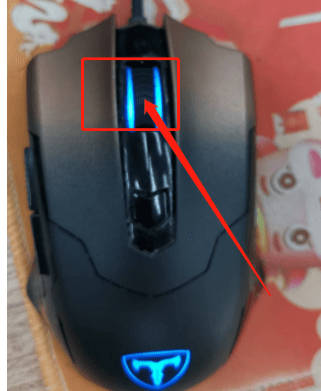
—>1. After connect the camera to NVR via network cable, if the camera power on properly, the camera’s indicator light should be blinking.(see picture attached)
.
When you cover the camera’s photocell or put the camera in dark place, the infrared LED should turn on red color.
 —>2. If camera powered on properly please follow below instructions.
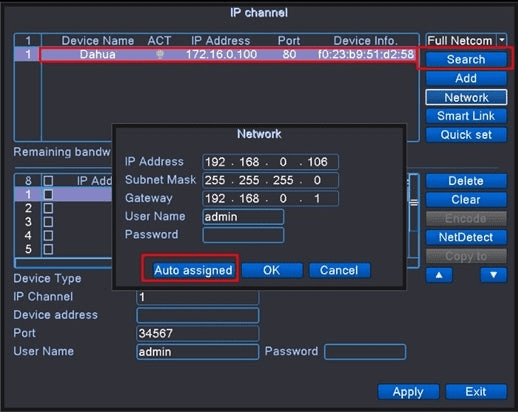
1.Right-click mouse navigate to “Quick Setup(or Channel Set) –>Cancel
2. In the second box, if any camera status is offline or not connected, please select it and click ”Delete” first
3. Click “Search”, can you see new IP address showed on the topper box?
4. Select the IP address in topper box and click Network–>Auto Assigned–>OK
5. If auto assigned successfully, please click “Add” to add the camera.
.
.
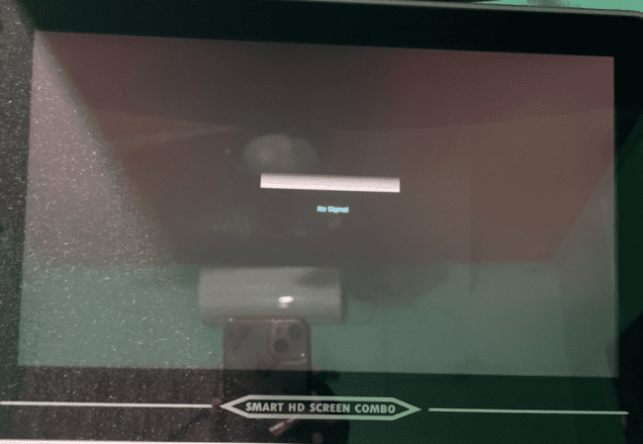
G: No Video Display on TV Monitor Or Blank Screen?
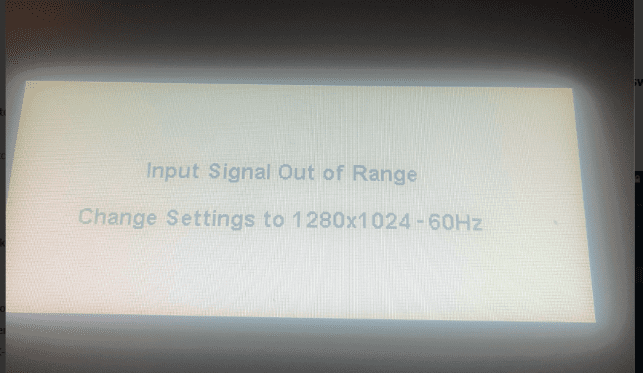
My UI Interface shows “No signal” or “Black Screen” ?
We need to divert this issue into two situations:
1.NVR Indicator light is on:
(1) Cause: The camera system’s video output resolution is 1080P. If your TV monitor resolution is below 1080P, this issue will occur.
Steps:
Please right-click and hold your mouse for over 10 seconds to see if the system can reboot or not. Or, please try to connect the system to another TV monitor with a higher resolution (above 1080P)
.
(2) Cause: The hard disk drive inside of the DVR box is broken, and use the screwdriver to open the DVR box to unplug the wires of the hard disk drive, and reboot the DVR to have a try. If the DVR box can be rebooted after unplugging the wires of the hard disk drive(HDD), which means the HDD is having an issue, and needs a replacement, plz contact email love@hiseeu.com for replacement HDD
After steps, if the thing still cann’t be resolved, which means the NVR box is broken, plz contact email love@hiseeu.com for replacement NVR box if their warranty is still 1 year
.
2.NVR Indicator light is off:

(1) Cause: The power adapter 52V 2.5 A connected to the NVR box is broken
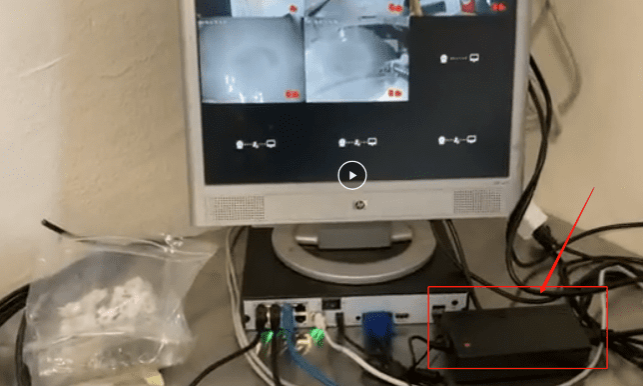
Step: Use another power supply 52V 2.5 A to power on the NVR unit to have a try ( If you do not have a spare one, can contact us to buy a new one or we send you a new one if your warranty is still under 1 year )
.
(2) Cause: The hard disk drive inside of the NVR box is broken Step: Use the screwdriver to open the NVR box to unplug the wires of the hard disk drive, and reboot the DVR to have a try. If the NVR box can be rebooted after unplugging the wires of the hard disk drive(HDD), which means the HDD is broken, and needs a HDD replacement, plz contact email love@hiseeu.com for replacement HDD
.
H:Why DVR/NVR can’t record or playback video?
.
If HDD(Hard disk drive) is having issue or something wrong with record setting, the DVR can’t record/playback the video
.
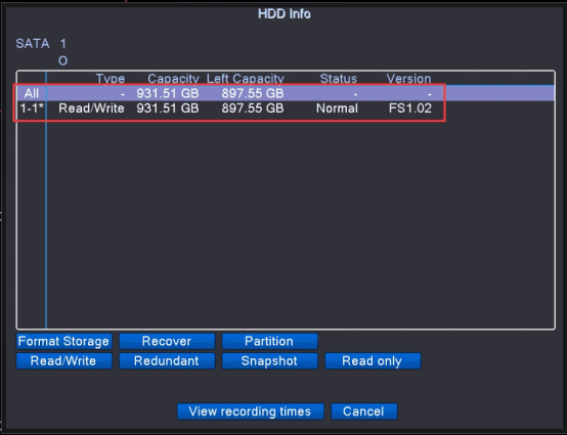
1.Check if the hard drive status is normal or error
Navigate to NVR/DVR Monitor UI Interface: Navigate to “Main Menu–>Advanced–>HDD info”
If status shows “Error” or No hard drive info , which means the hard drive is broken. (need to replace hard dirve)
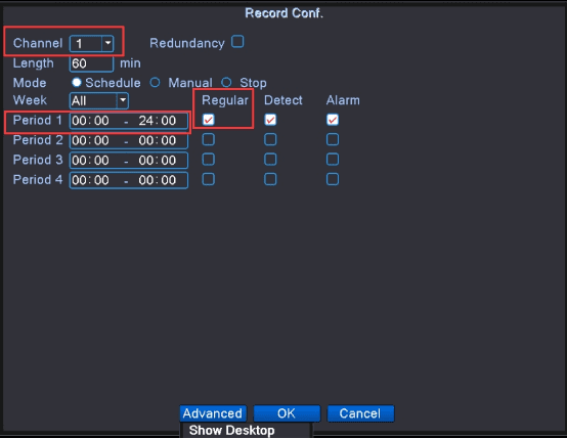
2.Check the record plan is set up for 24/7 continuous recording
Navigate to “Main Menu–>Record Conf”
Channel : select “All”
Period: “00:00-24:00”
Select “Regular”
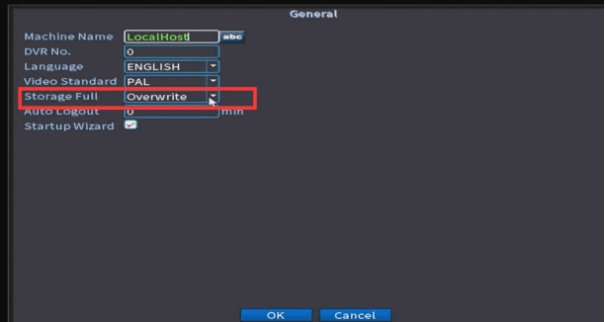
3. Please make sure the HDD was set up to “Overwrite”. (if it was set to “stop”, the system would stop recording when the storage is full)
Navigate to “Main Menu–>General–>Storage Full”
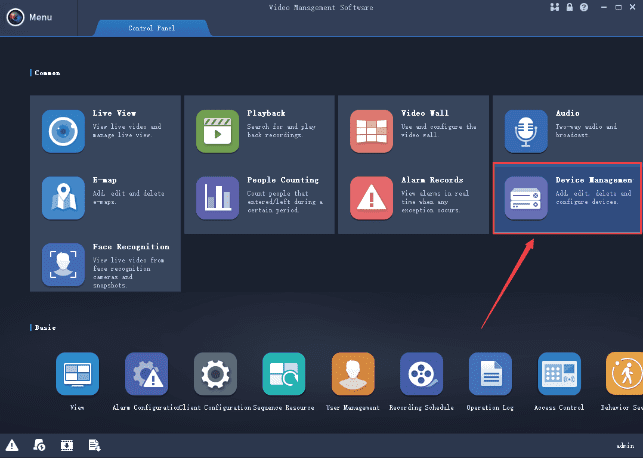
Add Device on Guard Station PC Client Software
Add device to “Guard Station” Download link: https://www.dropbox.com/sh/jeftu4sqwy4y1u8/AAD4PkyEJxg6j4H1n20PxBkZa?dl=0
.
Please sign up for the mobile APP(Guard Viewer) account and add the device first.
Download and run “Guard Station” on the PC
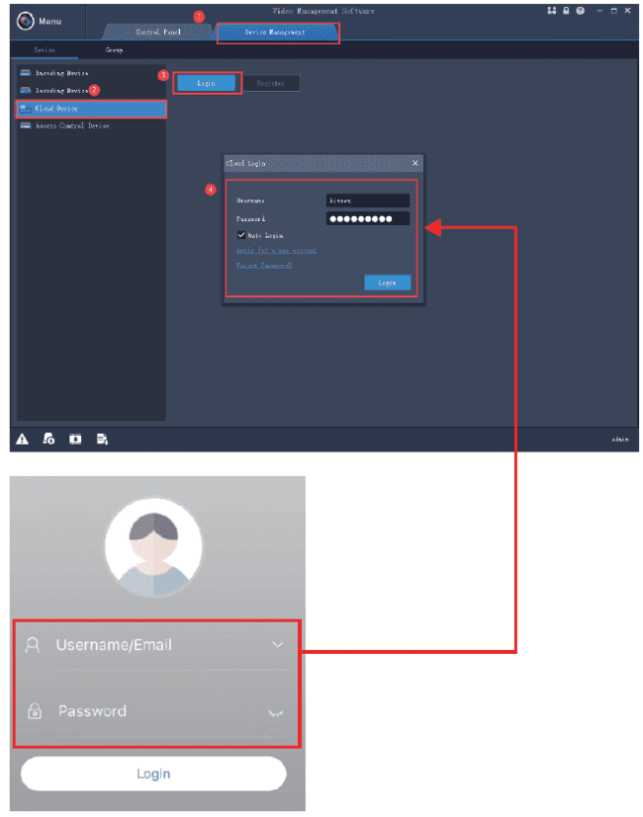
1) Please Navigate to “Device Management”> “Cloud Device”> Click on “Login”
2) Login with your APP account and password.
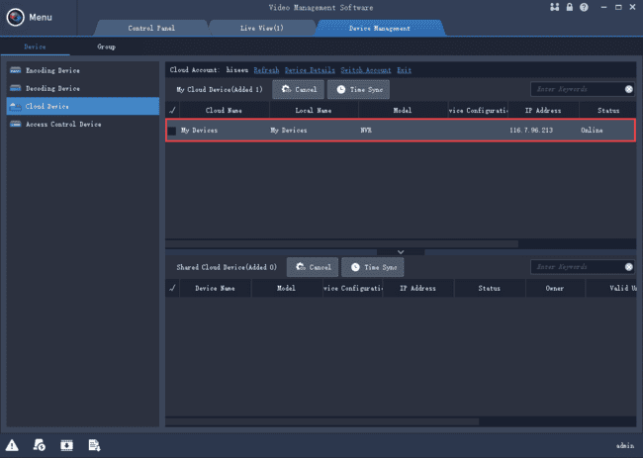
3) After Login, the device you added to the APP will list here
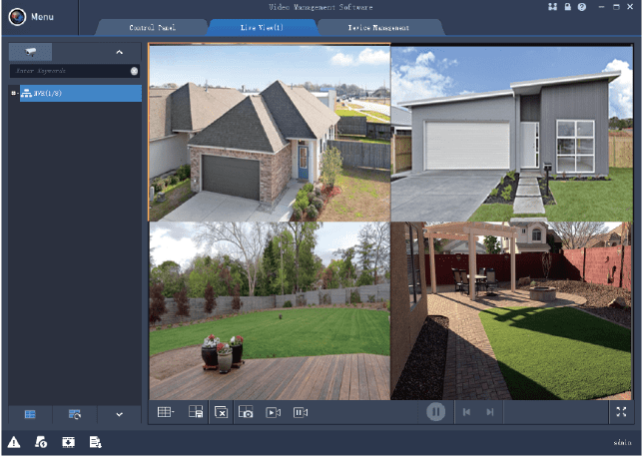
Please click on “Control Panel”> “Live View”> Double-Click Camera to load the live view video
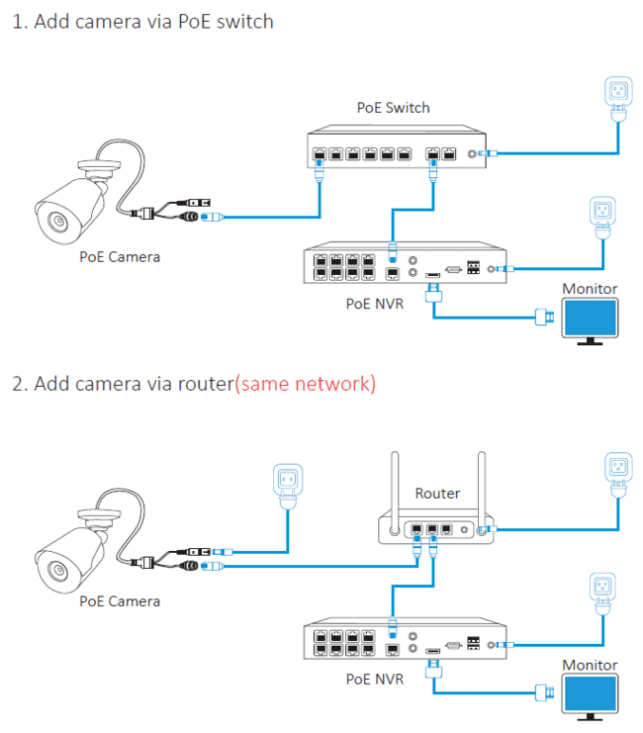
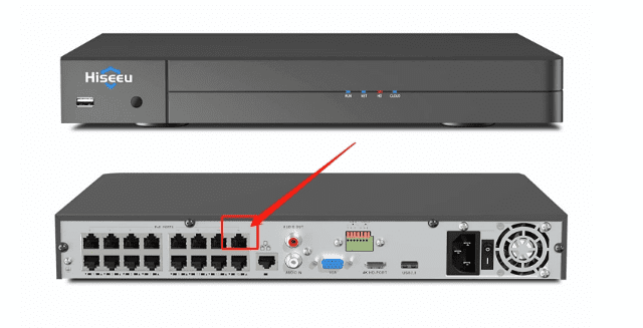
Add Cameras to NVR or PoE Switch (Router)
Add Cameras to NVR/ PoE Switch or Router
1. Add camera via NVR PoE Port
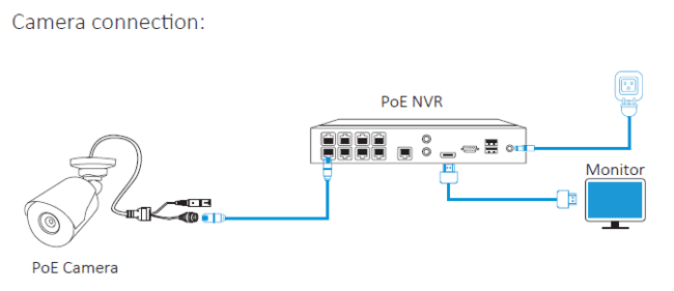
• If the camera is connected to NVR PoE port directly, the IP address
range should be modified to “172.16.0.X” (X is between 2 to 255)
Please right-click mouse and navigate to Camera
For brand new camera (password is 123456 by default), NVR will detect
and add camera automatically.
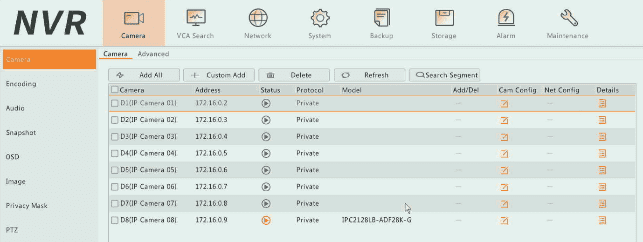
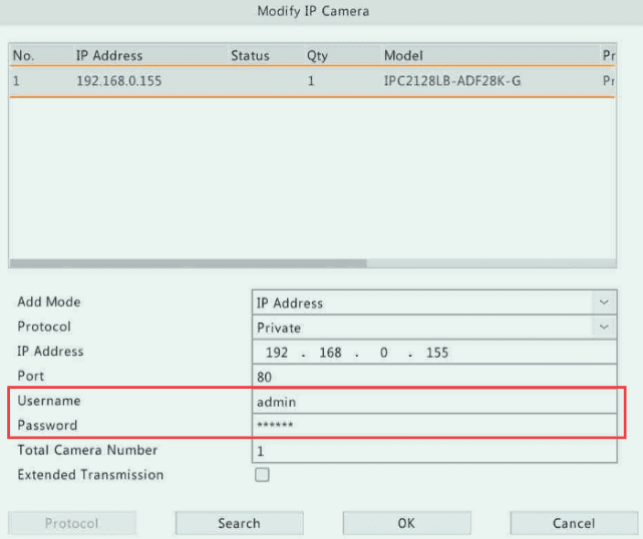
If the camera’s user name or password has been changed, you are required to input the info manually.
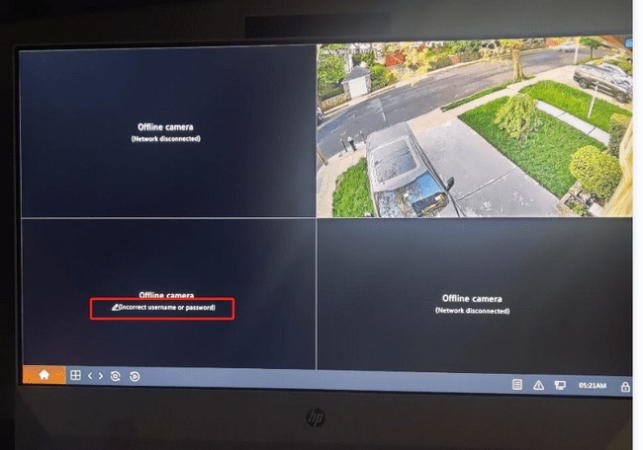
Move the mouse to the status icon , you will see the error message. “Offline [incorrect Username to Password]”
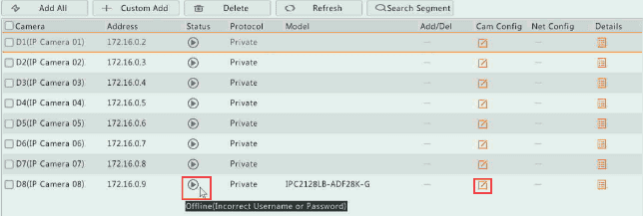
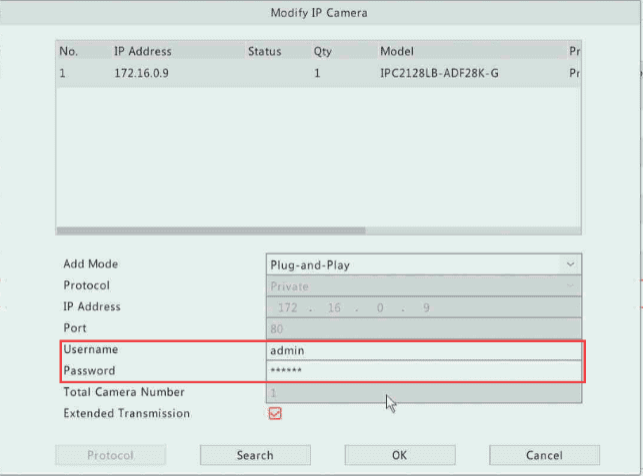
Please click on the edit icon to input password manually and click on “OK” to continue.
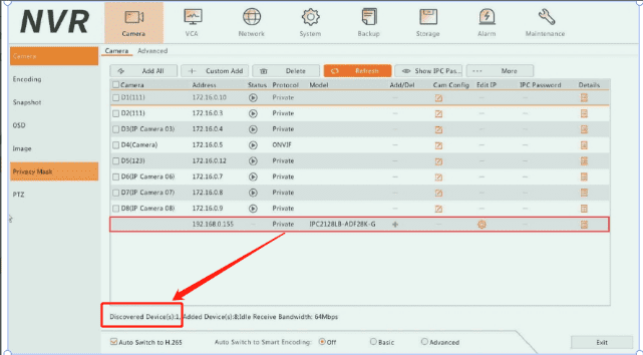
2.Add Camera to NVR via PoE Switch or Router
NVR will detect the camera under the same WLAN and list IPC here
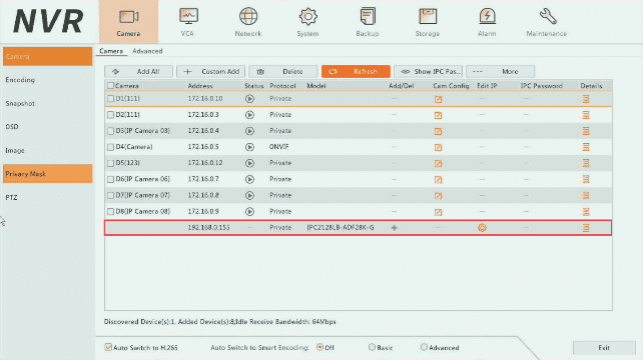
• Click on plug icon to add the camera. If the camera has default user name: admin, password: 123456.
NVR will add it automatically.
• If the camera’s password has been changed, please click on the setting icon to modify the info.
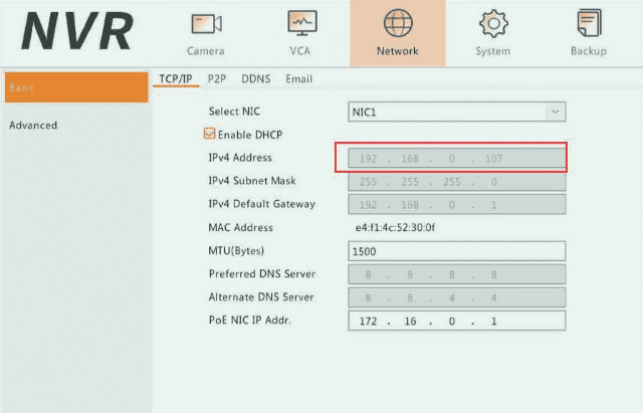
• In this situation, the camera IP address range should be the same as NVR’s IP range
(You can check NVR IP by navigating to Network>Basic> TCP/IP). If not, please contact the technician to modify the camera’s IP first.
Camera Not working
Camera not working?
1.(Port issue) Insert the camera to another port of the NVR to have a try, and wait at least 5 minutes
2. (Camera issue) Make sure if the camera infrared light will turn on red or not in the night time
3. Also plz right click your mouse to “Menu-Camera”, and take a photo of this whole page and send it to us
(Check how many cameras are discovered)
Also go back to the home screen and Check connection status, to see if it shows” Network disconnected” or “incorrect user name and password”
Device Offline on APP or NVR?
Device Offline on APP or NVR?
If the device shows offline on mobile phone app “Guard Viewer” , we need to make sure the NVR is connected to network perfectly or not
Go next to your Monitor that connected to NVR, and check out the network status
first navigate to this path first : “Menu–Network–Basic–P2P” , also check the device status is online or not,
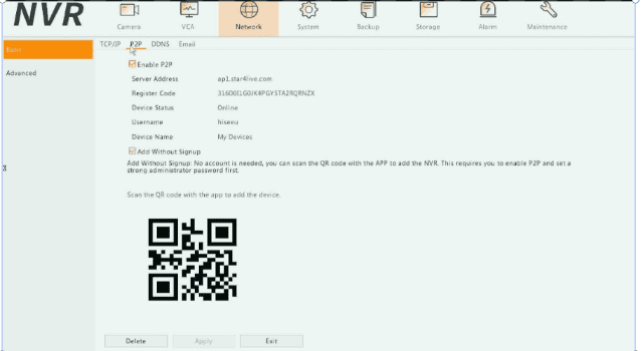
if it shows: network disconnected, plz enable the DHCP in this path ” Menu–Network–Basic-TCP/IP ” and click “Apply” . After that, go back to “P2P” and check if the device status is online or not
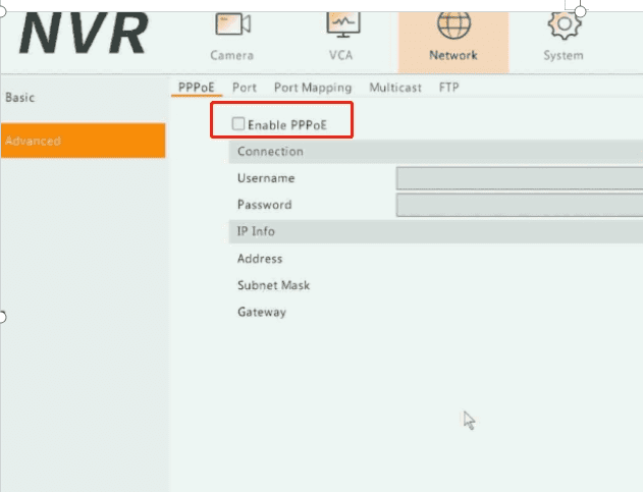
Also , please make sure the PPPOE needs to be disabled, plz navigate to “Network–Advanced–PPPoE”
Enable Alarm light on Each Camera?
Enable Alarm light on Each Camera?
.
(Alarm light would only work during the night time when the alarm was triggered)
.
1. Set up the Alarm light First Right-click your mouse to “Menu– VCA — Intrusion Detection/Crossing Line Detection– Triggered Actions” , and draw the rules for the alarm type
After you set up an alarm type (Like”Intrusion Detection”, or “Crossing Line Detection”), Click on “Alarm Linkage”, you will have the option to Enable “Alarm Light” (Spotlight is only Available During the Night)

2. Enable Alarm Light on “Triggered Action– Alarm Light” for each channel, and Click “OK”

Forget NVR Password?
If you forget your current password, please follow the instructions to reset it.
1. In the system login interface, please click on “Enter Password” > “Forgot Password”
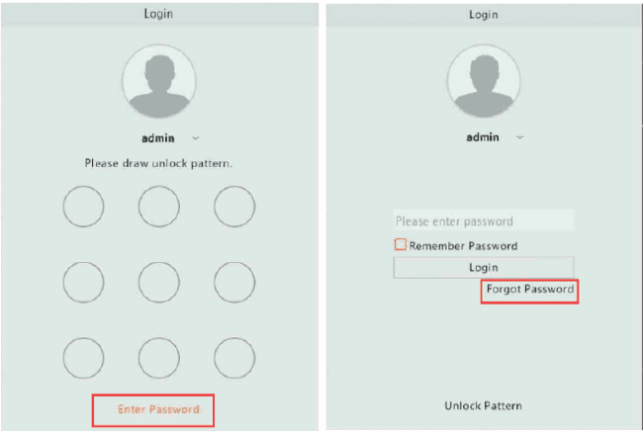
2.If you filled in your email address as a reserved email when you set up the system, you can reset the device password via the APP(Guard Viewer) by navigate to “Me–General–Forget Device Password”
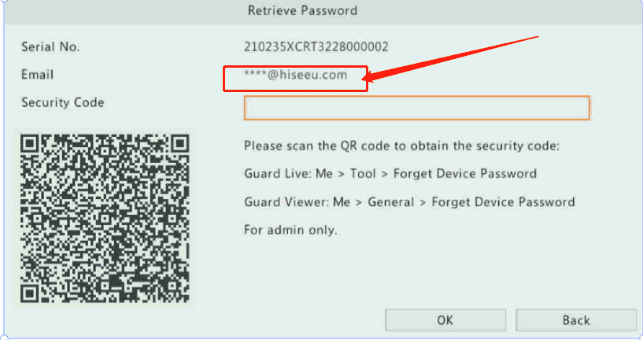
 3.Scan the above QR code by app and the security code will be sent to your email address.
4. Enter the security code from email to reset the password
Additionally, If you the email doesn’t belong to you, plz contact us at love@hiseeu.com for more support
Add Device to APP(Guard Viewer)
.
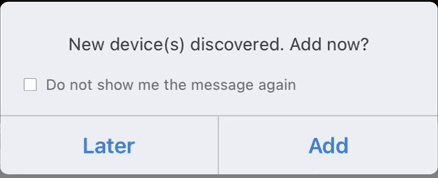
Auto add is not suggested. Please tap on “Later” if you see this message box.
.
In this situation, it will Auto Search to discover the NVR device connected to the local network. But once your mobile phone disconnects with LAN WiFi, you will not be able to view it anymore.
Please Add devices in this way
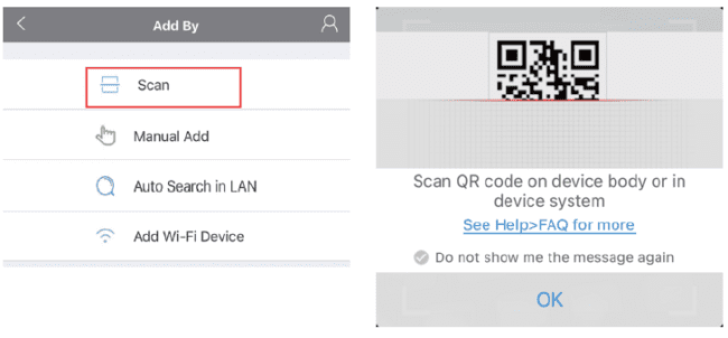
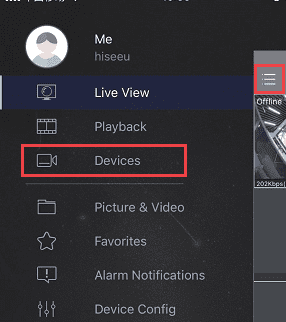
1. Please Tap on “ Menu” icon> Tap on “Devices”> “Add”,
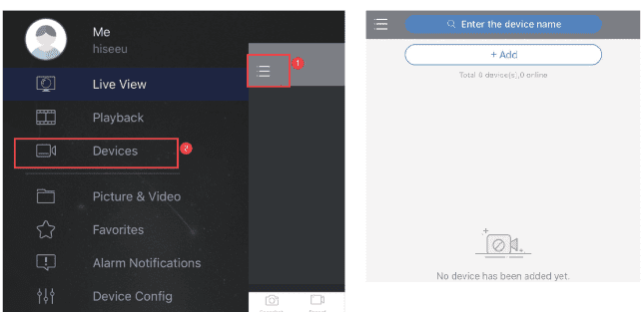
2. Tap on “Scan”> “OK” to scan the NVR QR code
3.Navigate to “Menu– Network> Basic> P2P”
• If the Device Status is “Network connected…” , means device is online and ready for remote view
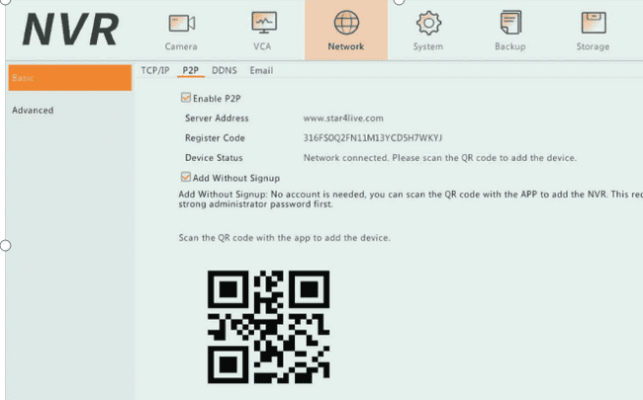
• If the Device Status is “Offline” , please check the network connection first, if the problem remains, please feel free to contact us at Love@Hiseeu.com
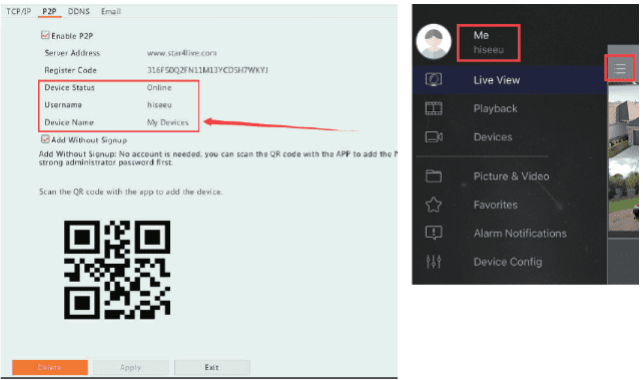
After you add the device successful, the “Device status” will be “Online”, and your APP account username will display here. • You can check your APP user name by navigate to “Me”
• If the username doesn’t belong to you, please click on “Delete” and add it again.
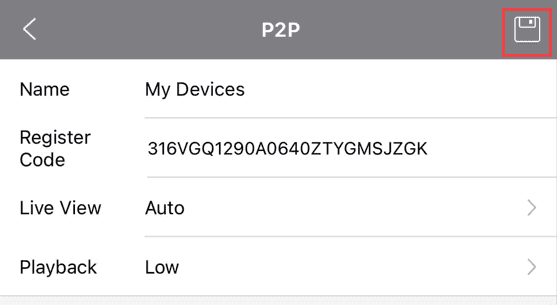
4.Add NVR by scanning device QR code and click on “save”
5. Please Tap on “Menu ” icon, Tap on “Live View” “Add”
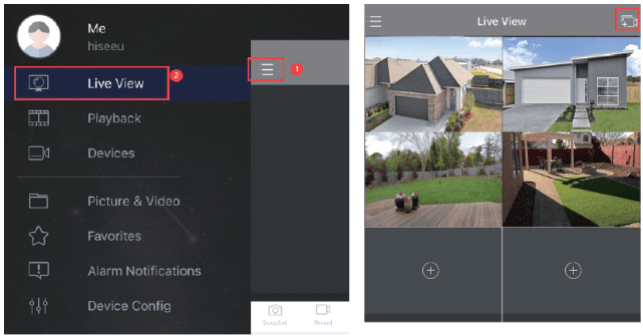
6. Select the device and tap on “Start Live View”
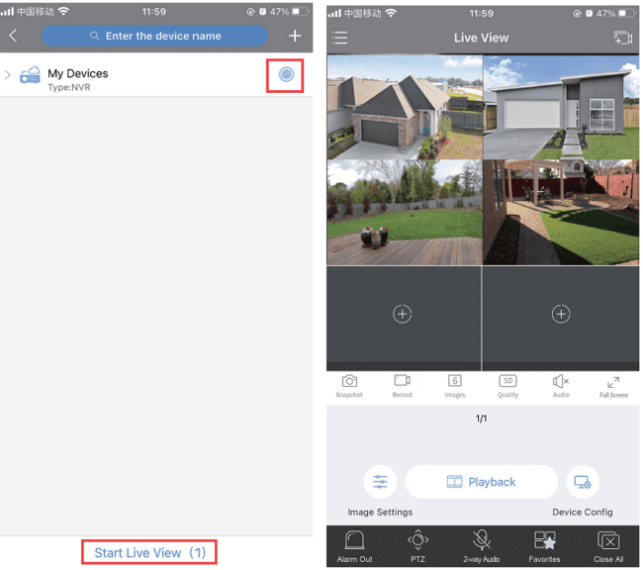
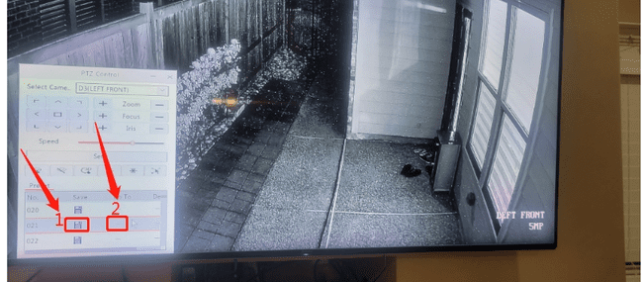
Human Tracking/Detect for Model PK-4YHD985-CT ?
1.To enable human tracking , Set preset point “21”. Here is the video link for your reference: https://www.amazon.com/live/video/07adae4ec34a47618bd754cc6c1f8966?ref_=dp_vse_ibvc1
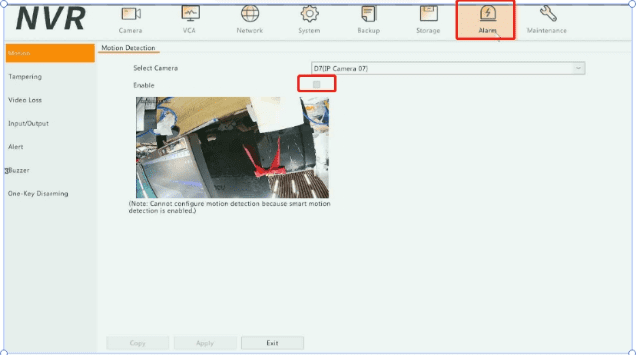
2.To enable human detection, plz go to this path “Menu–Alarm-Motion” , and choose the camera you want, to enable it
(This doesn’t support customize area)
No Video on TV Monitor or blank Screen?
.
The camera system video output resolution is 1080P, if your TV monitor resolution below that will occur this issue.
.
If possible, could you please try to connect the system to another TV monitor with a higher resolution(above 1080P).
Or, please hold your mouse wheel over 10seconds to see if the system can reboot or not.
If not, plz contact us for further support
How to share Device to others via APP Guard Viewer?
.
One device linked to One User ONLY. The NVR system ONLY can be controlled by one authorized account, who can share the device with others in order to prevent attacking or hacking.
For admin user, please follow the instructions to share the device with others:
.
1.Type on “Menu Icon ” and navigate to “Devices”
.
2.Tape on “… ” > “Share”, You can select a single channel to share or select the entire NVR system to share
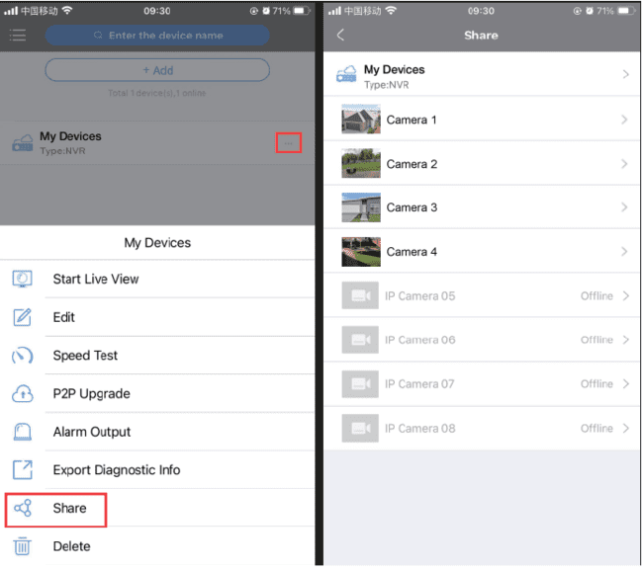
(1) Share device by typing in the user name you wanted to share with and selecting function as needed.
• The other user needs to register a Guard Viewer APP account and provide the user name for sharing.
• After that, when this user login the APP will find the device by navigate to “Devices”
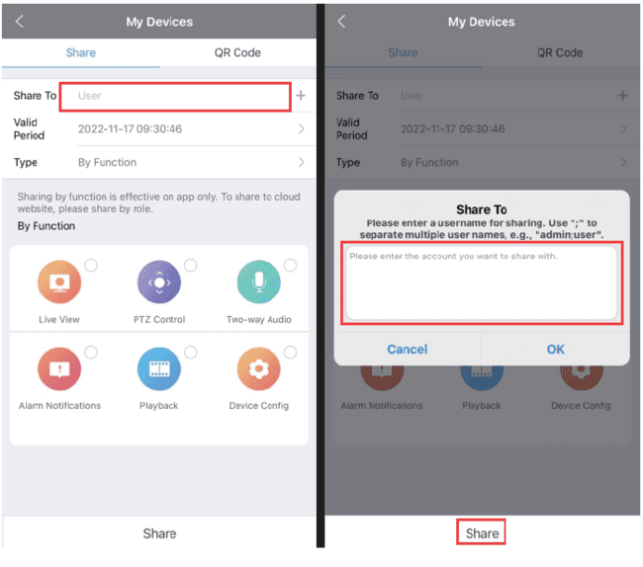
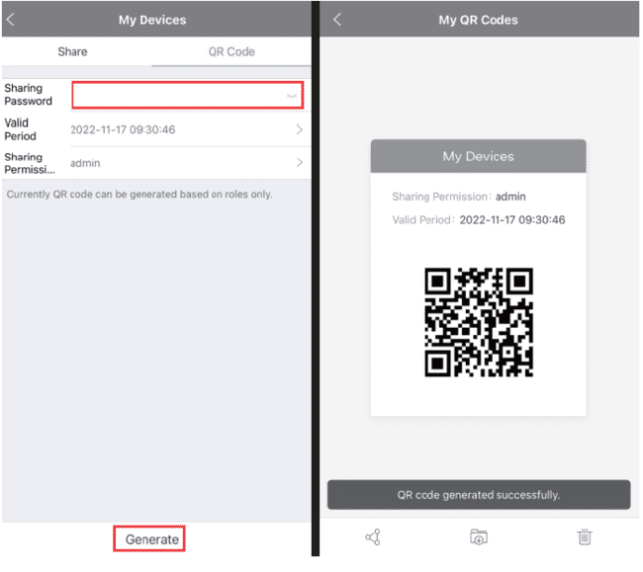
(2) Share device by generate a QR code
• Create a sharing password and set the valid period
• Click “Generate”, your APP will generate a QR code
• Other users can use the APP to add the device by scanning the QR code you sent
Download the mobile APP and Sign up for an Account
.
1. Download and install the app.
Please scan the QR code to download the free APP “Guard Viewer”
You also can visit the Apple Store or the Google Play Store to download the Guard Viewer app for iOS or Android devices. Alter installation, tap the icon to launch the app.

2.Register an account and login
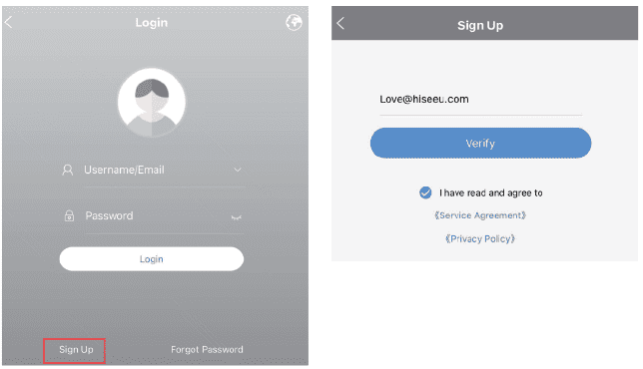
For first time use, please create a new account and add the following steps:
Please tap Sign up and follow the on-screen prompt to register an account by email.
Add Comment