

Tapo Smart Camera FAQ v1, An offshoot of TP-Link, a global provider of reliable networking devices and accessories, Tapo possesses insightful industry awareness and reliable production practices.
Tapo was created to engage in the small intelligent appliances market, to help people adopt a new smart home lifestyle at an affordable cost. That’s why we insist on Smart, Easy, Secure.
What should I do if I fail to configure the Tapo Smart Plug?
The Tapo app will guide you step by step during the initial configuration, but you may not be able to get through all the steps due to some interference. This FAQ will tell you what to do if you have trouble getting through a certain step.
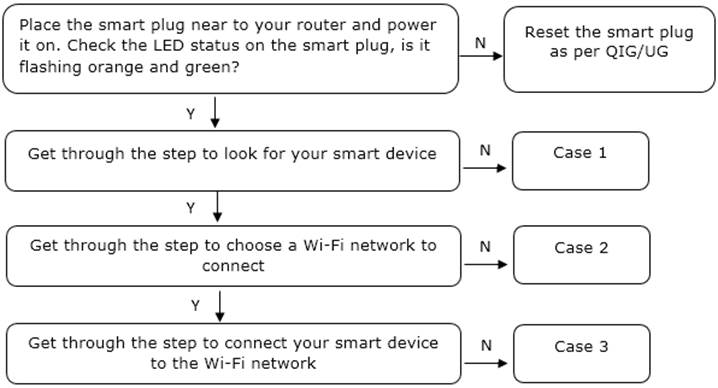
Case 1
The phone is looking for the smart device via Bluetooth or its default 2.4GHz WiFi, if you are unable to get through this step, you will see the following error page.
|
Bluetooth
|
WiFi
|
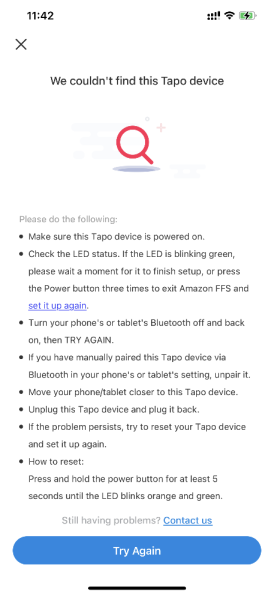
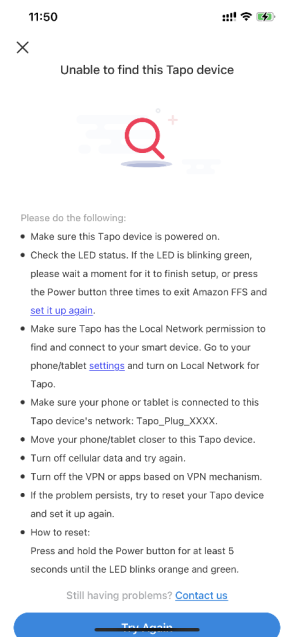
Troubleshooting tips:
Tapo Smart Camera FAQ v1
Case 2
If you are unable to find your home Wi-Fi network, please refer to the following suggestions.

Troubleshooting tips:
1. The signal strength of your home Wi-Fi network is a bit weak, move the smart device closer to your router for a try.
2. Ensure your home Wi-Fi network is a 2.4GHz Wi-Fi network, the Tapo device does not support a 5GHz Wi-Fi connection.
3. If it doesn’t display the Wi-Fi name of the router automatically, please click on “RECAN” at the upper right corner to refresh the Wi-Fi list.
4. If the router’s SSID is hidden, please choose “Other” to input SSID and password manually.
5. Please change the wireless channel of the 2.4G Wi-Fi network to 1, 6 or 11.
6. Reset the device as per QIG/UG and go through the process again.
Case 3
If you are unable to get through this step, you will see the following error page.
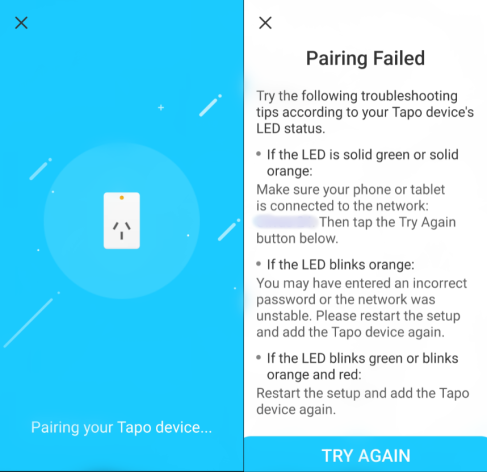
Troubleshooting tips:
1. Ensure you have selected the correct home Wi-Fi network and have entered the correct wireless password. If the Wi-Fi network or password is incorrect, click on “Choose a Network” and select the Wi-Fi network again.
2. Make sure your smart device is within the Wi-Fi range of your router.
3. Turn your phone’s or tablet’s Bluetooth off and back on.
4. If the problem persists, try to reset the smart device as per UG/QIG, and then set it up again.
5. Check if there is a firewall on your router. If yes, please turn it off.
6. Change the wireless security type of the 2.4G network to WPA2.
7. Try to connect the Tapo plug to the hotspot of your cell phone or another wifi network. If it works, please upgrade the firmware for the plug, then reset and reconnect it to your router.
What features does Tapo smart plug and Tapo smart switch support?
Currently the Tapo plug and switch supports the following features:
How to view Tapo camera on PC/NAS/NVR through RTSP/Onvif Protocol
The Tapo camera supports the RTSP and Onvif protocol, so it can work with third-party NVR or NAS devices that also support the RTSP/Onvif protocol. If a user wants to view the live stream of the camera with a third-party app like VLC Player, iSpy, here is the method for him.
Notes:
1. The username/password is the camera account that you created via the Tapo app. If you haven’t created the username and password, please follow the instruction of Step 1 in this article.
2. The IP address is the camera’s IP address assigned by your host router. You can find it on your host router’s DHCP list or in the Tapo app (Go to the Device Settings page of the camera and tap Device Info to see its IP).
3. If you want to view the live stream of the Tapo camera with a third-party app remotely, you will need to open port 554 for the camera on your host router first. Please enable the TCP forwarding for port 554.
4. You could use ONVIF standards to add the Tapo camera with its username/password and IP address. Please see the example of iSpy in Case 2 to know how to use onvif protocal to control the camera.
5. For Tapo C310, the resolution of the stream1 is determined by the video quality set on the Tapo APP.
If you need to watch the 3MP HD Video via RTSP, please change the video quality to Best Quality on the Tapo APP and use: rtsp://IP Address/stream1
6. If the Camera is inserted microSD card and subscribed Tapo Care, its RTSP stream will fail. You need to remove microSD card or cancel Tapo Care to get its RTSP stream.
7. If you find that there’s no or very little sound when using RTSP/Onvif to watch live stream, please adjust the camera microphone on Tapo APP.
Apart from the Tapo app, Tapo cameras can work with other third-party software to use and manage your Tapo camera.
Note: Before you start, make sure the computer/NAS/NVR and your camera are connecting to the same network or can visit the public IP and port of your camera.
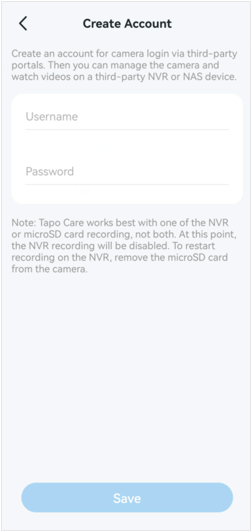
Step 1: Create a camera account in the Tapo app
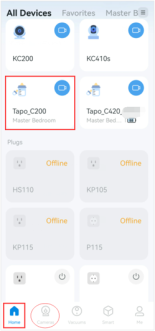
1. On the Home page, tap on your camera model card to go to the camera Live View page (or you can click on Cameras tab>tap Manage on your camera model to go to the Live View page).
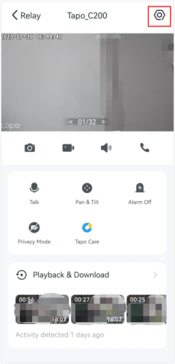
2. On the Live View page, tap the icon at the top right corner to enter the Device Settings page.
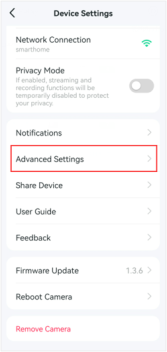
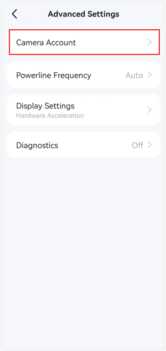
3. Tap Advanced Settings, then select Camera Account to create an account (username and password) for camera login on other portals.
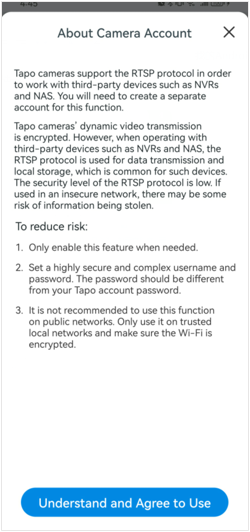
You will see a prompt like below (About Camera Account), please read it and tap Understand and Agree to Use, then you can create an account for the camera.
Note: The username and password should contain 6 to 32 characters.
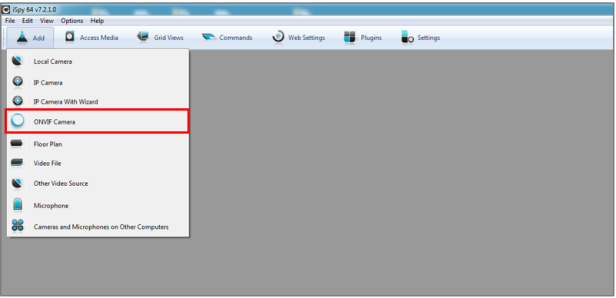
Step 2: Add your Tapo camera on iSpy (Example of Onvif protocol connection)
1. Run the iSpy software on your computer.
2. Click Add on the top left menu and select ONVIF Camera.
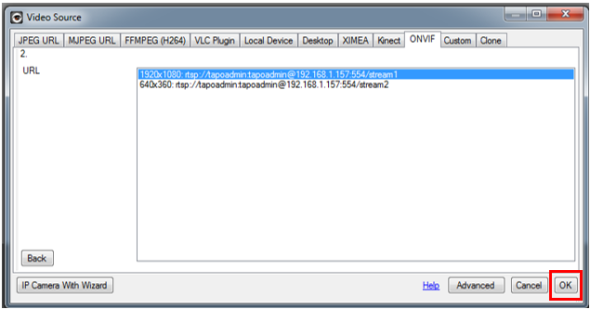
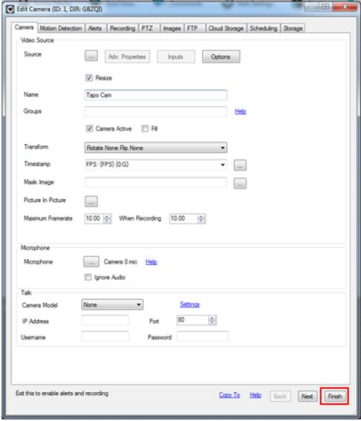
3. Enter the Username and Password that you set for your camera on the pop-up window, select Network Address, and click Next. You can customize other parameters if needed.

4. Choose the video resolution and click OK.
5. Customize the camera settings as needed, including Microphone, Talk, Motion Detection, Alerts, Recording, Images, Scheduling, and Storage. You can also change all the settings later. Click Finish to complete adding your camera to iSpy.
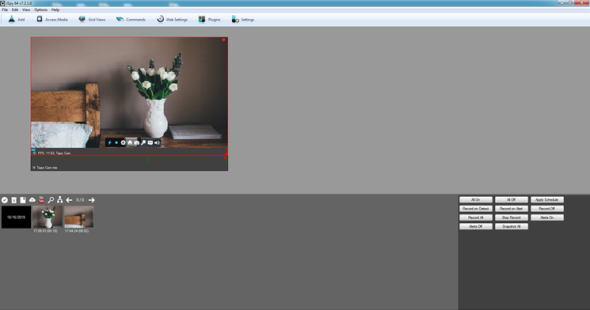
6. After adding your Tapo camera to iSpy, you can monitor and manage it using the app. View the live, customize motion detection, check the recordings when motion detected, set recording schedules, record videos and more.
Step 3: Watch your Tapo camera on VLC (Example of RTSP protocol connection)
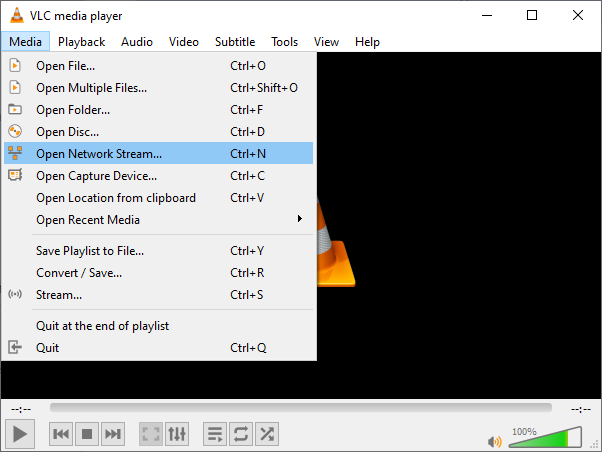
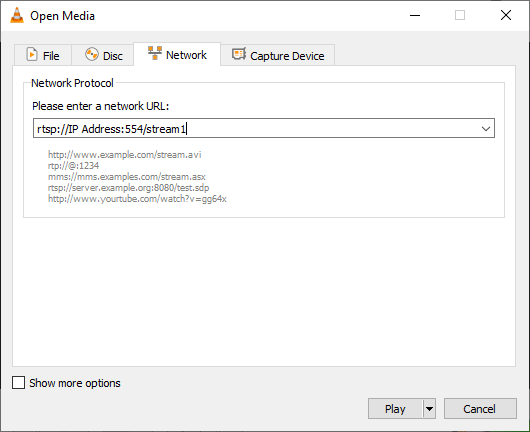
The URL of the RTSP live stream for the Tapo cameras will be:
For high quality stream1: rtsp://IP Address/stream1
For low quality stream2: rtsp:// IP Address/stream2
In some software, the URL need to add the port to access live stream, the default port is 554:
For high quality stream1: rtsp://IP Address:554/stream1
For low quality stream2: rtsp:// IP Address:554/stream2
If you fail to stream the Tapo camera via the RTSP/ONVIF protocol, you may refer to the article for the troubleshooting:
https://community.tp-link.com/en/smart-home/forum/topic/652710
To get to know more details of each function and configuration, please go to Download Center to download the manual of your product.
How to factory reset the Tapo or Kasa smart plug
To restore a Tapo or Kasa smart plug to its factory default settings and re-enable the setup mode, please press and hold the power button for 10 seconds.
The LED status for a factory reset varies by model:
|
Model |
LED Status for Reset |
|
Tapo P105, P100, P110 |
Blinking Green |
|
Tapo P115 |
Blinking Blue |
|
Tapo P300 |
Blinking White and Orange |
|
Kasa KP125M, KP125M, EP25 |
Blinking Orange and Blue |
After a completing the reset, you can then connect and configure the device in the Tapo App.
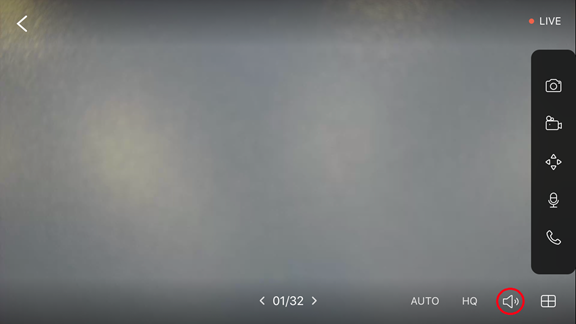
How to avoid noise when monitoring the sound from Tapo camera
Tapo cameras are capable of not only monitoring video stream from the camera, but also monitoring sound collected by the built-in microphone on the cameras. You can turn on/off the sound feature like the monitor screen as below. But to increase or decrease the volume, you need to press the volume button on your phone.
Why is there noise?
Noise is a physical phenomenon and it’s actually inevitable. Basically, the IP cameras including other brands’ have background noise more or less. And those cameras which seem to generate less noise probably have worse sound collecting performance. Tapo cameras are designed with a sensible sound collector which might take some noise in your monitor. Even though it is inevitable at present, we are still trying our best to make improvement and searching for better solutions.
How to reduce the noise?
1. Please keep your mobile device away from the camera as much as possible. The Tapo camera is designed for remote access and monitoring via cloud service, local usage in close range may cause interference and noise between your mobile device and the camera.
2. Please reduce the output volume below 50% since a louder volume may enlarge noise decibel. The value between 40%-50% is suggested with not only good sound quality but also minimum noise decibel. As long keep focus on our cloud camera you will find our progress on new models.
Your understanding is highly appreciated!
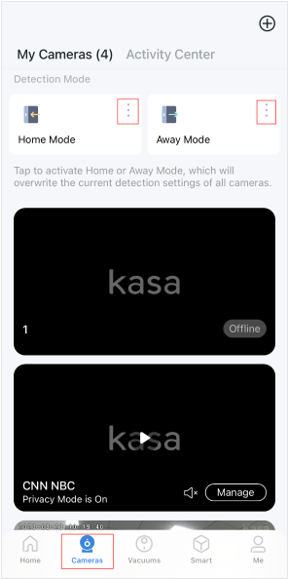
How to edit Home and Away Mode for Tapo&Kasa Cameras on the Tapo app
The Away mode and the Home mode are two different sets of Detection, Alarm, and Notification settings for Tapo&Kasa cameras. You can tap the button on the Tapo app>Cameras tab to quickly apply the preset settings to the cameras when you are home or away.
Note:
Here we take the Home Mode as an example.
For Tapo Cameras:
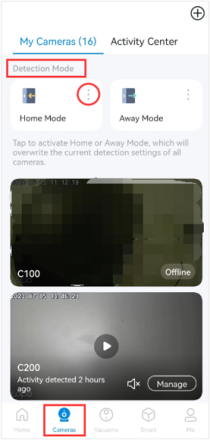
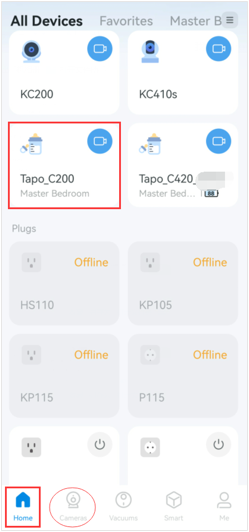
1. Open Tapo APP, find the Cameras tab at the bottom, and locate the Detection Mode section.
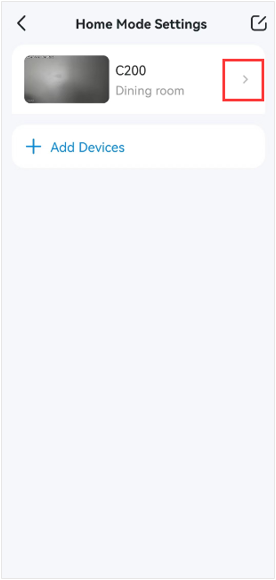
You can tap to activate the Home or Away mode, which will overwrite the current settings of all cameras. To edit the mode settings, click the three-dots option.
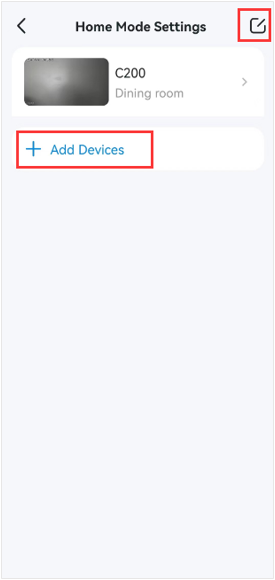
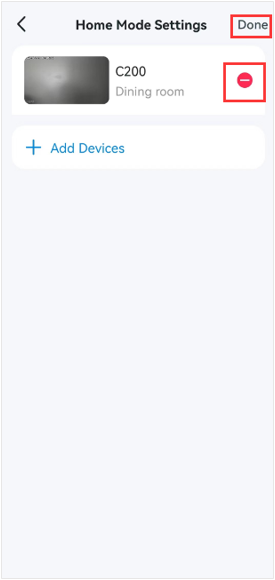
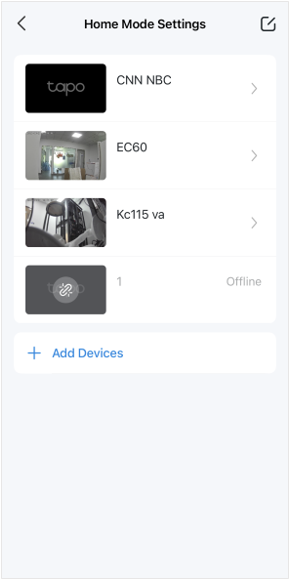
2. Click on Add Devices if you want to add more cameras to the Home mode.
Click on the Edit icon at the top right corner if you want to delete cameras from the Home mode.
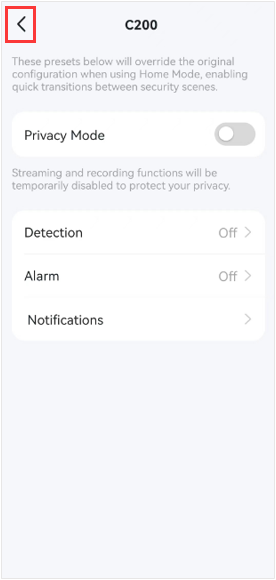
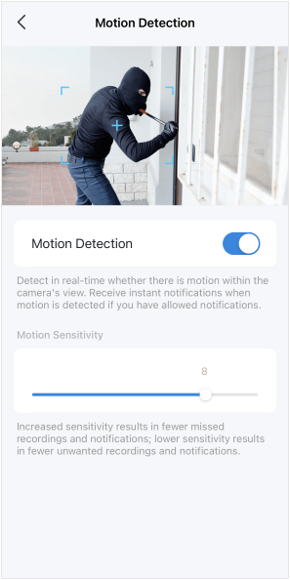
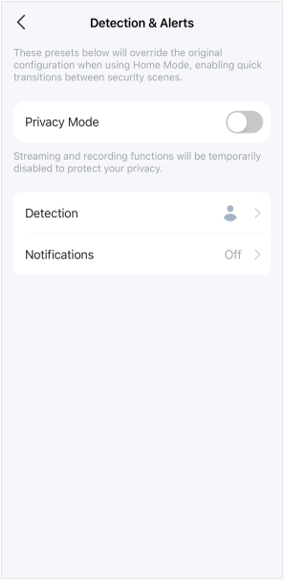
3. Select the camera you want to edit the mode settings. Here we take Tapo C200 as an example, and you can change the Privacy mode, Detection, Alarm, and Notification settings of the camera.
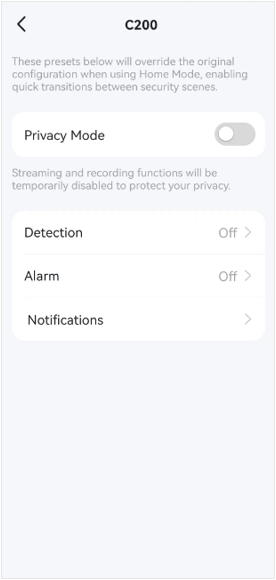
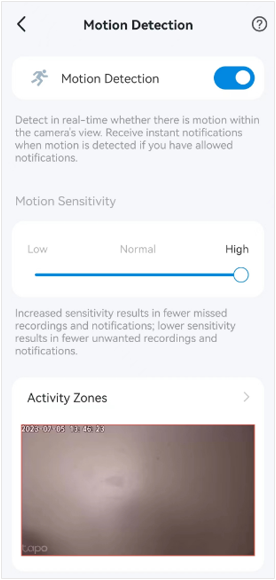
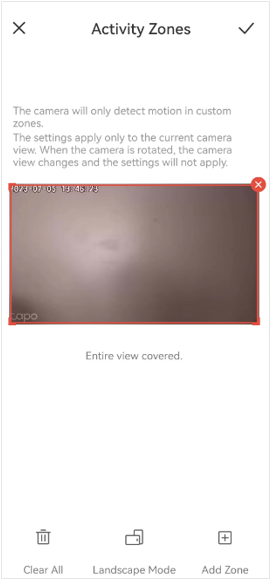
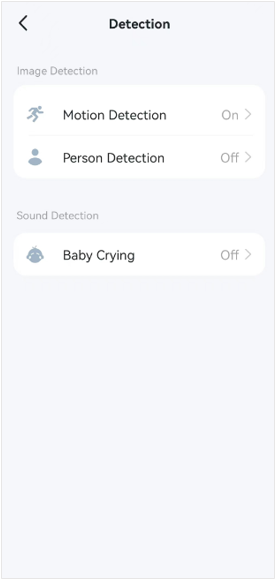
Take the Motion Detection feature as an example. You can click on Motion Detection to turn it on or off, change the Motion Sensitivity, and set the Activity Zones on the Motion Detection page.
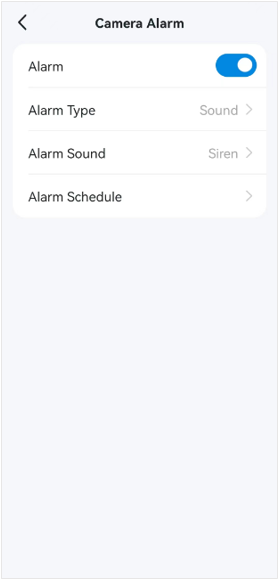
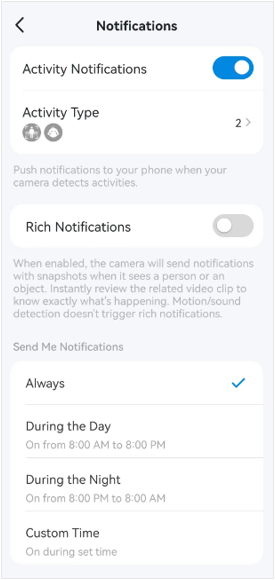
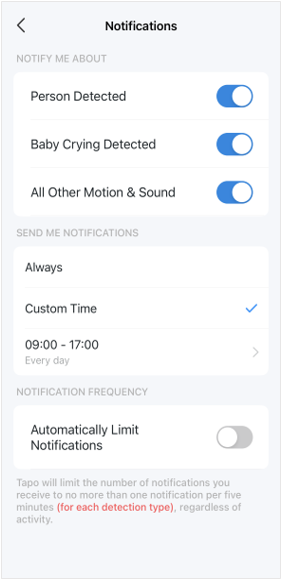
And you can also click on Detection>Person Detection or Baby Crying Detection to turn them on or off, and tap Alarm and Notifications to configure the related settings.
4. Click on the Back icon at the top left corner of the Tapo C200 page if you have changed the configurations, and click on other cameras if you want to change their configurations.
After completely presetting the Home or Away Mode, you can tap the Home mode or Away mode card on the Tapo app>Cameras tab to switch your cameras’ settings quickly.
For Kasa Cameras:
Here we take KC115 as an example.
1. Open the Tapo app, find the Cameras tab at the bottom and you can tap to activate the Home or Away mode, which will overwrite the current settings of all cameras. To edit the mode settings, click the three dots option.
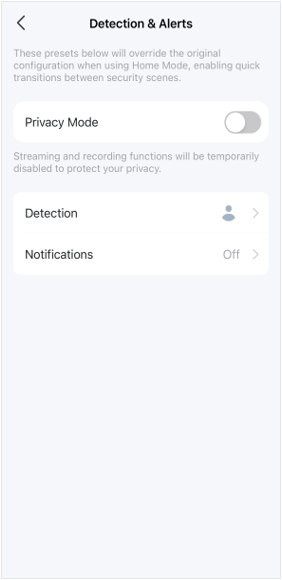
2. Select the camera you want to edit the mode settings and enter the Detection & Alerts page.
3. You can change the Privacy mode, Detection, and Notification settings of the camera.
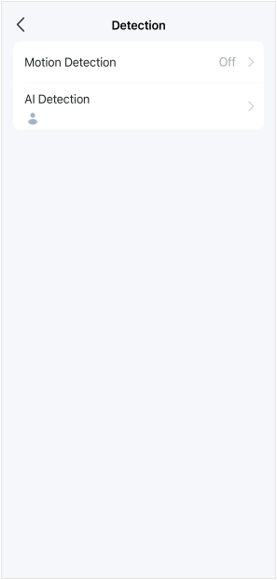
Tap Detection > Motion Detection to edit the motion detection function. You can adjust Motion Sensitivity.
Tap Detection>AI Detection to change your AI Detection feature, such as Person Detection.
4. After editing the detection settings, tap Detection & Alerts > Notifications to customize its current settings.
After completely presetting the Home or Away Mode, you can tap the card on the Tapo app>Cameras tab to switch all of your cameras’ detection settings to the mode you want.
How can I find the IP address of my Tapo&Kasa camera
Note: Some Tapo battery cameras or doorbells need to work with the hub and can’t connect to the router directly, which do not have IP address.
There are two methods to find the IP address of the camera.
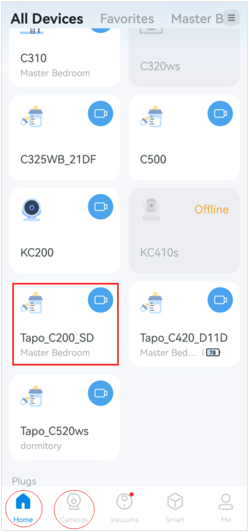
Here we take Tapo C200 as an example.
Method 1: Via Tapo app
1. On the Tapo app> Home page, tap your camera model card to go to the Live View page (or you can click on Cameras tab>tap Manage on your camera model to go to the Live View page).
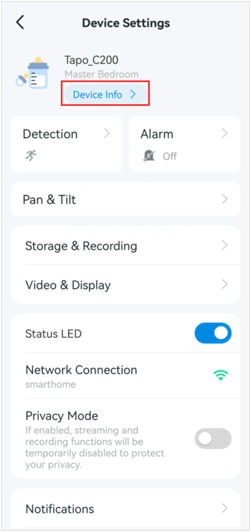
2. On the Live View page, tap the icon at the top right corner to enter the Device Settings page.
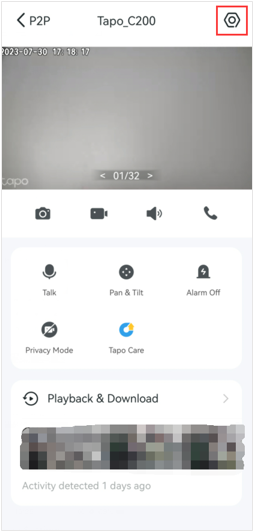
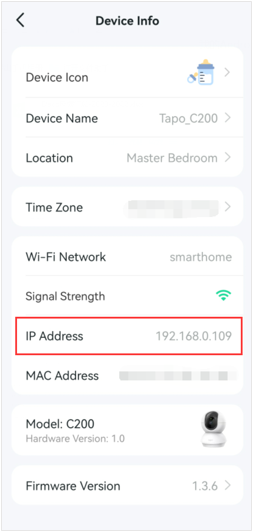
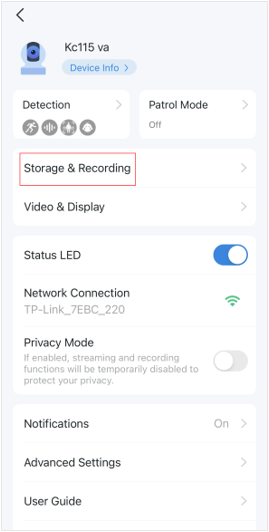
3. Tap Device Info and then you can find the IP address of your camera.
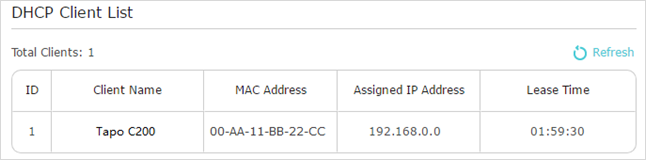
Method 2: Via the web management page of your router
Here we take the TP-Link router Archer C7 as an example.
1. Log in to the management page of your router.
2. Go to Advanced > Network > DHCP Server and locate the DHCP Client List section to find the IP address of your camera.
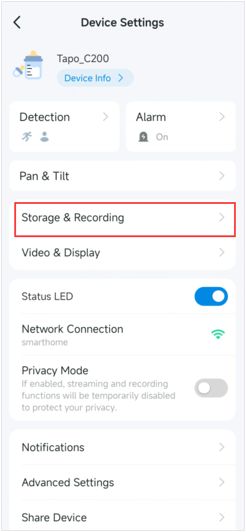
How can I view continuous recordings of Tapo&Kasa cameras on the Tapo app?
This article will show you how to view continuous recordings on the Tapo app.
Note:
For Tapo Cameras
Here we take Tapo C200 as an example.
Step 1.
On the Home page of the Tapo app:
Step 2.
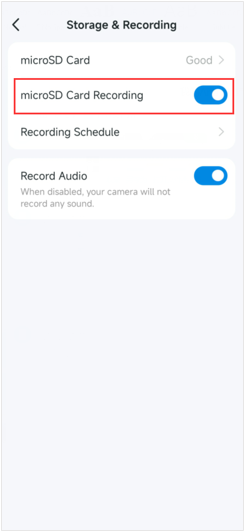
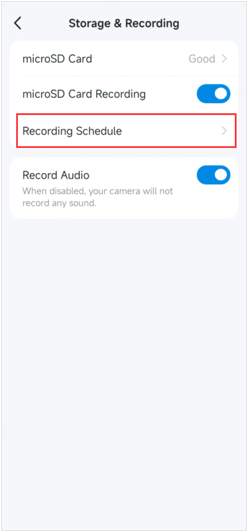
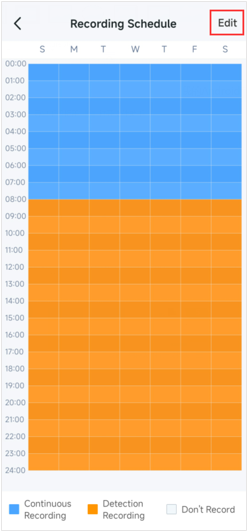
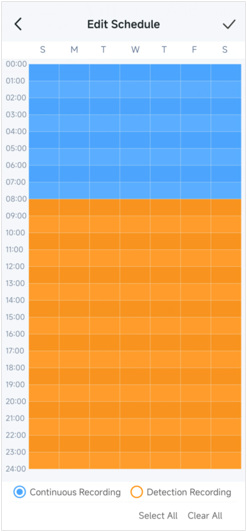
Click on Recording Schedule to see the detailed recording schedule settings.
Tap Edit on the Recording Schedule page if you want to change the Continuous Recording and Detection Recording schedule.
And please tap the tick icon at the top right corner to save your changes.
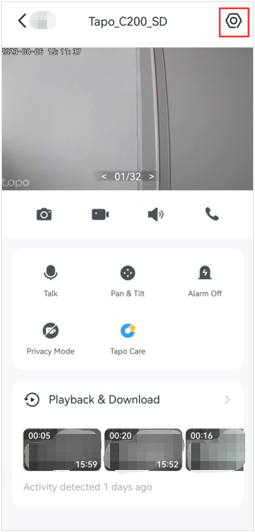
Step 3.
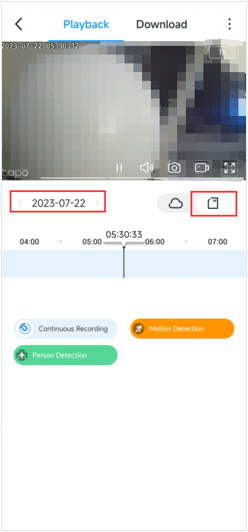
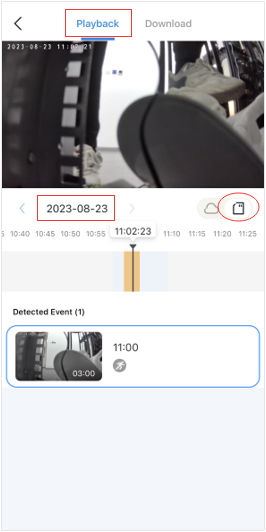
On the camera’s Live View page, tap Playback & Download, select the SD Card icon on the Playback page, select the date, and then you can drag the timeline to view the continuous recordings.
For Kasa Cameras
Here we take KC115 as an example.
Step 1.
On the Home page of the Tapo app:
Step 2.
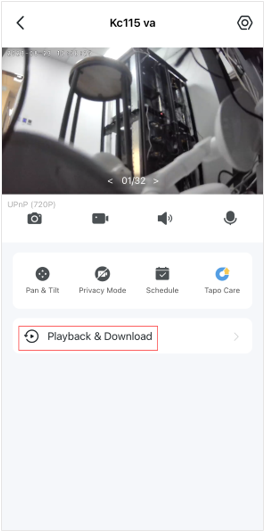
On the Live View page of the camera, tap Playback & Download > Playback to view all recordings. Drag the timeline and you can view recordings whenever you want and wherever you are.
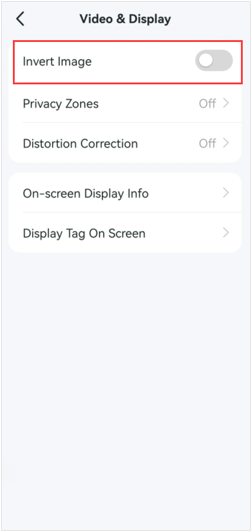
What can I do if the video image is upside down on my Tapo&Kasa camera
Tapo&Kasa cameras support the function of Video Rotation, and if the camera video image is upside down on the Tapo app, please refer to the following steps to correct it.
Here we take Tapo C200 as an example.
1. On the Home page of the Tapo app, tap your camera model card or tap the Cameras tab>click on Manage on your camera model to go to the Live View page.
2. On the Live View page, tap the icon on the top right corner to enter the Device Settings page.
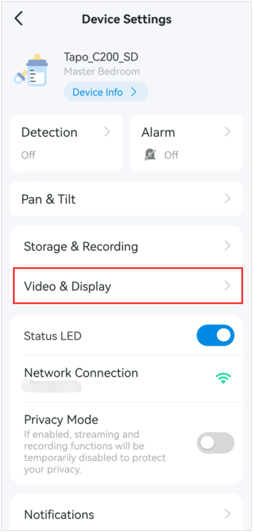
What can I do if I can’t find my Tapo camera on Tapo APP?
If your device does not appear on your app after completing the configuration process, please try the following troubleshooting suggestions:
1. If you are using a Wi-Fi wireless configuration to connect your camera, please check if the camera has successfully connected to the router. You can verify whether the camera is connected to Wi-Fi by checking the System light of your camera. For most Tapo Cams, if it is not connected properly, the LED light will blink red slowly. For the HomeKit version Camera, its LED light indicator will blink blue slowly. If the camera cannot connect properly, we recommend resetting the camera to factory default settings as per the User Guide and then reconfiguring the camera.
2. Check the DHCP settings on your router and ensure that the DHCP Server of your router is enabled. If the camera has already connected to the router properly, you will see the device in the client list of your router. If you don’t know how to do this, please contact your router’s customer support.
3. Please verify if there are any special symbols in your Tapo account(TP-Link ID) password. If there are, try to remove them and make the account password simpler by only using numbers and English letters. Then reset and add the camera from the beginning again.
4. Connect your smartphone to the same Wi-Fi network as your camera and check whether you can see it on the Tapo app. If you can see it, that means the camera fails to connect to the cloud for unknown reasons and you cannot access it remotely. In this case, verify if any firewall or security settings are blocking the connection to the Cloud Server. Temporarily disable any antivirus, firewall, or security software to see if it resolves the issue
.
5. Using a public DNS server may improve the connection, try changing your router’s DNS server settings to 8.8.8.8. If you don’t know how to do this, please contact your router’s customer support.
To eliminate potential issues with the router’s Wi-Fi network, it is recommended to use a mobile hotspot and configure the Camera to test its functionality.
Here are steps for using a mobile hotspot to test the Camera’s configuration:
Preparation: We suggest having two phones. Use one phone (Phone A) to create a hotspot and use another phone (Phone B) to download the Tapo app and complete the setup process.
Steps:
1. On Phone A, disable Wi-Fi and enable only mobile data.
2. On Phone A, navigate to phone settings and access the “Personal Hotspot” or “Mobile Hotspot” option, ensuring that the “Mobile Hotspot” feature is activated. Please make sure the created hotspot operates on a 2.4GHz network.
3. Set a unique name and password for the hotspot, different from your router’s Wi-Fi, to facilitate the Camera’s connection.
4. On Phone B, download the Tapo app. Follow the app’s instructions to add the device and complete the remaining setup steps as guided by the app.
Please contact TP-Link technical support with the following information if the issue persists after the above suggestions.
1) Your TP-Link ID or cloud account.
2) The model number of your TP-Link Cam and its MAC address.
3) The model number of the host router.
4) Whether you have tried all the suggestions listed above or not. If yes, what are the results?
Add Comment