
How To Use Icsee Camera 2024, Welcome to the comprehensive guide for iCSee, your go-to resource for understanding and utilizing this versatile remote video surveillance application. Whether you’re a new user or looking to deepen your knowledge of iCSee’s capabilities, this guide covers everything from basic setup to advanced features. iCSee is not just an app; it’s a solution that enhances the security and monitoring of your space, be it for home or business use. In the following sections, we’ll walk you through the essential aspects of iCSee, ensuring you make the most out of this powerful application.
What is iCSee?
iCSee is a mobile application designed for remote video surveillance. It allows users to connect and control various security cameras, network video recorders (NVRs), and digital video recorders (DVRs) using their smartphones or tablets. iCSee provides real-time video monitoring, playback, and management of surveillance devices over a network connection. The app offers features such as live streaming, motion detection alerts, two-way audio communication, video recording, and cloud storage options. iCSee is compatible with a wide range of IP camera brands and models, making it a popular choice for home security, business surveillance, and other monitoring needs.
What is iCSee camera?
iCSee Camera refers to any camera compatible with the iCSee mobile application.
Can my camera be connected to iCSee?
iCSee was developed by Xmeye, a company that specializes in security surveillance and video intelligence research and development. They focus on providing technical services, and solutions in the security monitoring field, including various modules, main boards, software, and cloud services.
So, generally speaking, only cameras using Xmeye module solutions can be adapted to iCSee app.
How to install iCSee for PC?
Wired cameras can be accessed on PC by downloading the VMS software. But, for Macbook users, the software currently only supports local area network connection.
For wireless cameras, it is recommended to connect through mobile devices, as accessing via PC may result in connection timeouts or instability.
VMS Downloading (Windows)
VMS Downloading (Macbook)
How to install iCSee app for mobile devices?
iCSee is a free app available for both iOS and Android platforms, offering full functionality without any costs or subscription fees. Follow these simple steps to install it on your device:
Explore our camera range: iCSee WiFi cameras, V380 4G cameras, and Ubox solar cameras. Engineered for home security, our cameras are affordable, low-power and durable, and our market share in third world countries is growing rapidly.
This tutorial applies to both icsee and icsee pro cameras.
Since the app is always being updated, the interface may be a little different.
Camera description
The details are subject to your manual.

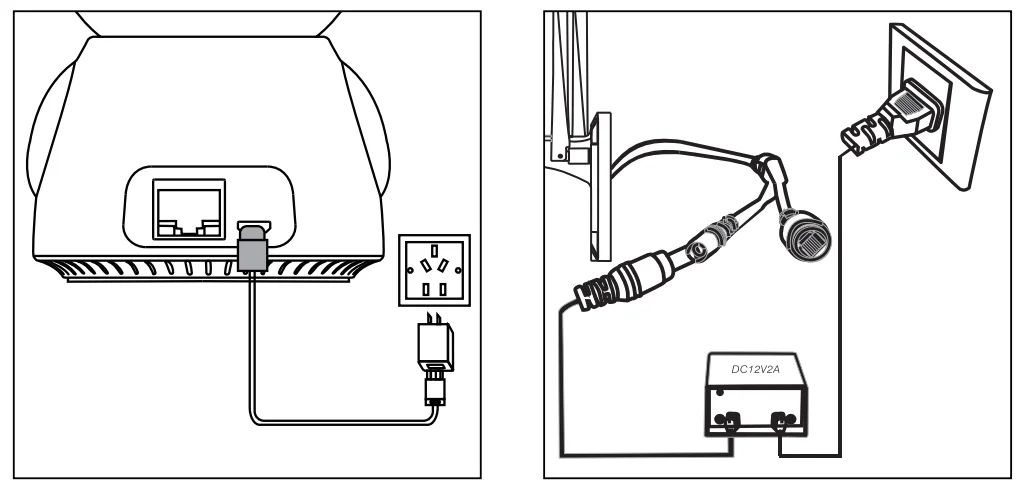
Connect To The Power Supply
Plz connect camera to the power cable,and turn on the power .
If you need to storage the video via the local TF card, plz install the TF card first then turn on the power.
(TF card doesn’t support the hot plugging, plz plug and unplug memory card when device is power off)
Video tutorial
How To Use Icsee Camera 2024
Read Also : XMEYE NVR Face Recognition guide
Register/Login
1.Open”iCSee” app, click “sign up” then use the phone number or mailbox to register account.
2.Register successfully, enter your phone number or mail number in the login interface, enter the password, login your app.
3.You can also use the wechat, facebook, line or the temporary visit to login app.
[Auto-pairing] WiFi Network Configuration
Note: camera can support 2.4G wifi for the time being, doesn’t support 5Gwifi, plz set the router parameter to2.4G first before configuring network, during the connection, phone,router and camera need keep within the 2m distance
1.Phone connect to the wifi network.
2.Click the “+”in the upper right corner click the “Add WiFi camera” according to the device’s voice prompt, follow the app interface guide to enter router’s password,click “confirm” start to configure network(if the device doesn’t appear voice prompt for a long time, you can long press the reset to restore default, then go on to configure network).
![[Auto-pairing] WiFi Network Configuration](https://icseeapp.com/wp-content/uploads/2021/08/Auto-pairing-WiFi-Network-Configuration.png)
3. Enter the search device’s interface, the device is in the connection process, plz wait.
※ Program search, do not operate other programs ;
※ When the camera prompts “succes sfully connected to router”, it will automatically go to the next step.
※ The camera fails to hear the prompt “succes sfully connect to router”. Please restore factory Settings and match again.
4. After connecting successfully ,interface will prompt to set device’s password and name for your device, after finishing, follow the app interface guide to complete network configuration .
5. After finishing, device will show in the device’s list, it represent the device is connecting successfully.
6. Click it you can view the monitoring image, and do the relevant operation and setting.
Note: Movement tracking is only for indoor ip cameras , bullet ip camera and dome cameras do not have this function
Note: If the automatic etwork configuration fails, you can choose the following two methods to configure the device
The second type: [Manual configuration] Wired network
1. Long press the camera Reset button for 10 seconds to restore the device to factory settings .
2. Connect your router to camera via network cable.
3. Connect phone to your router wifi network.
4. Login “iCSee” app, click the “+”in the upper right corner, and click “more” in the upper right corner.
5. click “Add the camera on same router.
6. Enter search device interface, click searched camera to add device,device will show in the device’s list, which represent device connect successfully.
7. Click it to view the monitoring image, also can do the relevant operation and setting
Manual configuration: AP netless direct connection mode
When there is no network in the installation environment, please select the following pairing method;
1. Long press the camera Reset button for 10 seconds to restore the device to factory settings .
2. Short press the camera Reset button 2-5 to enter the direct connection mode (most devices will voice prompt “enter direct connection mode”).
3. Open the mobile phone desktop-settings-wireless network, search for the device wireless hotspot name, Enter the wireless password:1234567890, connect to the wireless hotspot of the device;
Indoor IP Camera hot spot name: robot_xxxx;
Other kind of camera hot spot names: camera_xxxx;
Tips:
AP hotspot mode is only used for installation when there is no network in the environment, and cannot be remotely monitored,can only be accessed within 10 meters of the establishment of the hotspot!
4. Open the ‘iCSee’ APP, and directly add the device in the local direct connection mode.
5. The device is displayed on the device list interface, which means that the device is successfully connected.
6. Click the ‘Play’ button to enter the monitoring screen and perform related operations and settings.
7. If you have already registered an account to log in, please click the “+” sign at the top right, and click the “AP direct connection” mode to add.
How to set up mobile tracking?
Note: Mobile tracking and smart humanoid alert can’t be used at the same time;
●Click the “Mobile Tracking” switch buttonin the preview interface to turn on the corresponding function;
●Motion tracking: when it’s on, as long as an object enters the camera’s illumination range, camera will track the moving trajectory;
●Watch Point: set a fixed position, when the camera is operating or tracking, it will automatically return to the set position after staying for a period of time;
How to set the dual-ligh tal ert mode Star light full color?
Note: Mobile tracking and smart humanoid alert can’t be used at the same time;
Open the ‘iCSee’, click the ‘real-time playback’ , click or slide to the “light” or the “bulb” icon in the screen to open the setting screen;
●Night colored lights:When the light is insufficient, the white light will start, and the image will be colorful;
●Infrared night vision: When the light is insufficient, the infrared light is activated and the image becomes black and white;
●Double light alert:When the light is insufficient, the infrared light will be activated. When someone enters the monitoring screen, the white light will be triggered and the image will be colorful.
After a few seconds when the person walks away, the infrared mode will be switched on and the image will become black and white;
How to s et the humanoid alert function?
Note: Mobile tracking and smart humanoid alert can’t be used at the same time;
Open the ‘iCSee’, click the device real-time playback, click on the upper right button ‘setting’ ,Enter the ‘settings’-smart alarm, open the interface to make related settings.
Function introduction:
●Notification: Must be turned on to receive alarm trigger information.
●Humanoid detection: only judge and detect people to trigger an alarm;
●Show Tracking: When the human figure appears on the screen, the human figure can be tracked and reminded; Rule setting: select the designated area [Warning Line], when someone enters the divided area, the alarm can be triggered;
Add shared device
1. Click “Share” in the device list to pop up the QR code page using the main phone.
2. Log in to the ‘iCSee’ APP with the mobile phone you want to share,
click the “+” sign in the upper right corner of the APP main interface, click “Scan QR code to add a camera” , scan the QR code of the device shared by others or input Add the device serial number (the shared device must be connected to the Internet and successfully
added to the APP).
How to Restore factory settings/AP hotspot switching?
1. Long press the camera ‘Reset ‘ button for 10 seconds, and you can let go when you hear ‘ Restore factory setting,please wait’.
2. Short press the camera Reset button 2-5 to enter the direct connection mode (most devices will voice prompt “enter direct connection mode”).
How to query device serial number and info?
1. Open the ‘iCSee’, enter the real-time playback of the device, click on the upper right setting to enter the setting center-about the device , the QR code can be directly scanned and shared with other family members to watch (the QR code valid time is 30 Minutes); if exceeded, it will automatically expire;
2. If you find that the device time is not synchronized, please click the device time to synchronize it;
HOW TO USE THE CAMERA?
1.Please open the software to register one and log in to your account if you do not have an account.
2.Click “+” > Set up “MY DEVICE” to WiFi
3.Enter your WiFi password. Then click “confifirm” and wait for the camera to connect it.
Notes
* Please reset the device if the camera does not have any voice reminders for more than 180 seconds.
* Please check the WiFi password again and make sure the WiFi channel is 2.4GHz.
* Please do not make the device too far away from the Router.
4.Upon a successful connection, you can set up the name and the password of the camera.
SHARE THE CAMERA:
1.The administrator can send the QR code and password of the camera to the other persons.
2.Scan the QR code by the administrator to share with you and add the camera.
Infographics
Add Comment