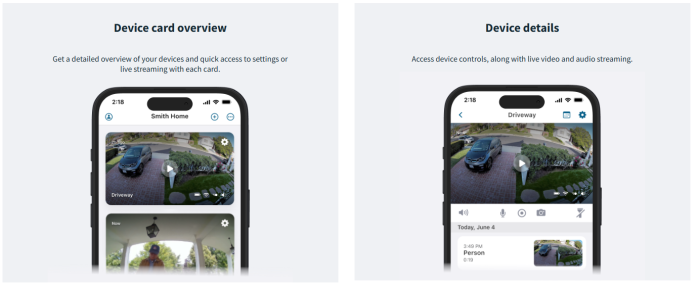
The NEW Arlo Secure App Smart Full Guide, The NEW Arlo Secure App Smart security simplified Check out new features that give you faster, easier and more convenient ways to manage your security.

https://www.arlo.com/content/dam/arlo/support/microsite/Upgrade.mp4
What is Low Power Mode and how does it work with my Arlo cameras?
Lower Power Mode is a feature that allows your Arlo device to extend its battery life. Instead of video recording, your device will take snapshots when Low Power Mode is activated. When the camera enters Low Power Mode, you will receive a push notification about this status and the Feed will also have an event indicating when Low Power Mode is activated. Snapshots will be available in the Feed.
The NEW Arlo Secure App Smart Full Guide
The following Arlo devices have Low Power Mode capability:
• Pro Security Camera 2K (6th Gen)
• Pro XL Security Camera 2K (6th Gen)
• Essential Security Camera 2K/HD (3rd Gen)
• Essential XL Security Camera 2K/HD (3rd Gen)
• Essential Outdoor Camera 2K/HD (2nd Generation)
• Essential XL Outdoor Camera 2K/HD (2nd Generation)
• Video Doorbell 2K/HD (2nd Generation)
What happens when Low Power Mode is enabled?
• When motion is detected and the camera is triggered to record, it will take a snapshot of the motion.
• You will receive a push notification with the snapshot. The snapshot will also be saved in your Feed.
• If motion continues after the snapshot is received, your camera will take additional snapshots. The camera will wait at least ten seconds between snapshots.
• You can still view your camera live stream by tapping on the push notification or from within the Arlo Secure App.
.
Activate Low Power Mode
Low Power Mode can be activated automatically, when your camera battery reaches a specific level, or can be activated manually in the Power Management settings. When activated automatically, Low Power Mode will turn off when the battery recharges to 10% above your set Low Power Mode Threshold.
To enable Automatic Low Power Mode:
1.Launch the Arlo Secure App.
3.Tap the Arlo device card.
4.Tap
6.Tap the Auto Low Power Mode switch to turn the feature on.
7.Move the slider left or right to increase or decrease the Low Power Mode Threshold.
• Your camera will automatically switch to Low Power Mode when the battery drops below the desired threshold to extend the camera battery life.
• When the battery recharges 10% above your set threshold, the camera will automatically switch back into its set Power Mode.
• When you disable the Auto Low Power Mode, the threshold slider will disappear.
To manually enable Low Power Mode:
1.Launch the Arlo Secure App.
3.Tap the Arlo device card.
4.Tap
7.Tap Confirm.
Note: When Low Power Mode is enabled manually, you will need to select a different Power Mode to return to normal video recording.
.
How do I change the Wi-Fi network that my Arlo device is connected to?
Most Arlo devices must be connected to a 2.4 GHz Wi-Fi network to operate. When you first set up your device, you are prompted to connect to a Wi-Fi network, but you can change this network after setup.
Before you start:
• Your mobile device must be connected to the same 2.4 GHz Wi-Fi network that you are attempting to connect to your Arlo device.
• The Arlo Pro 5S Camera can be connected to a 5 GHz Wi-Fi network, but only after installation on 2.4 GHz Wi-Fi is complete.
• Your Arlo device must be in Standby Mode to accept a Wi-Fi network change.
• Ensure that Arlo wire-free camera batteries are charged to 30% or above before you change the Wi-Fi network.
• Band Steering automatically connects your devices to the best available Wi-Fi frequency in your home. Most Wi-Fi modems come with two frequencies (2.4 GHz and 5 GHz) and ask you to choose between them when connecting a device to your home network.
◦ Disable Band Steering prior to installing your Arlo device.
◦ Upon successful installation and setup, you can re-enable Band Steering.
Note: Contact your router manufacturer for specific Band Steering instructions.
To change the Wi-Fi network that your Arlo device is connected to:
1.Launch the Arlo Secure App.
3.Select your Arlo device.
4.Tap
5.Tap Connected to or Wi-Fi Network.
7.Go to your phone settings and make sure your mobile phone is connected to a 2.4 GHz Wi-Fi network.
8.Return to the Arlo Secure App.
9.Tap Continue to allow Arlo to find the same 2.4 GHz network your phone is connected to.
10.Enter your Wi-Fi SSID Network Name and Password.
12.Press the Sync button on your Arlo device.
13.When the LED on the front of the Arlo device is flashing, tap Continue.
.
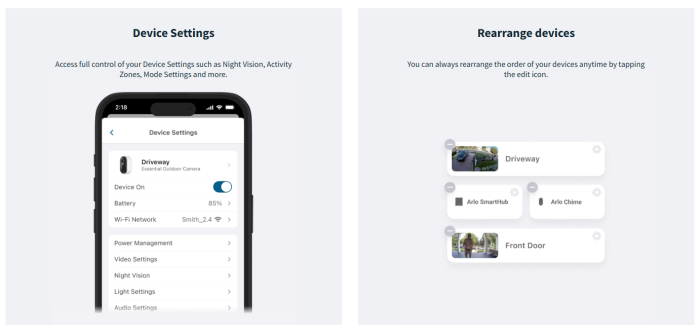
How do I adjust the Video and Audio Settings on my Arlo Camera or Arlo Video Doorbell?
You can use the Arlo Secure App to adjust the Video or Audio Settings on your Arlo Camera or Arlo Video Doorbell.
Note: Available settings may vary by device. Video Settings include:
Audio Settings include:
To adjust Video or Audio Settings on your Arlo Camera or Arlo Video Doorbell:
1.Launch the Arlo Secure App.
4.Tap
5.Tap Video Settings or Audio Settings.
.
How do I change my Arlo camera Power Management settings?
Arlo Wire-Free cameras allow you to choose Power Management settings to optimize battery life and video quality.
The following factors can reduce battery life:
• Frequent use of the camera spotlight or floodlight (For applicable models that have a built-in floodlight or spotlight feature)
• Weak connection to an Arlo SmartHub, Base Station, or router
• Extremely cold temperatures (below 32°F or 0°C)
• Low cellular signal strength (Arlo Go series only)
• Frequent motion detection or audio triggering
• Longer video recordings
To change Arlo camera Power Management settings:
1.Launch the Arlo Secure App.
3.Select a wire-free camera.
4.Tap
6.Select Best Video, Optimized, Best Battery Life, or Low Power Mode:
• Best Video. May reduce battery life but provides the best video quality.
• Optimized. Balances video quality and battery life.
• Best Battery Life. May reduce video quality but provides the best battery life.
• Low Power Mode. Extends battery life by taking snapshots instead of video (available on some Arlo cameras).
For more information, visit:
.
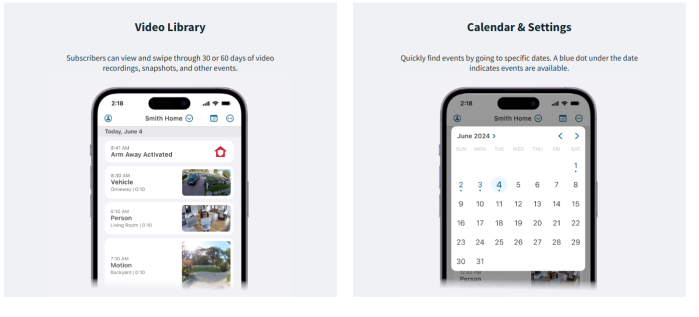
How do I adjust Arlo video recording length?
.
Most Arlo cameras can record until activity stops, up to 5 minutes. If you set the camera to record until activity stops, the camera will record as long as it detects audio or motion (up to 5 minutes). If the event exceeds 5 minutes, a new recording will start. You can also set your Arlo cameras to record videos for a fixed length from 10 seconds to 2 minutes long. Recording requires either an Arlo Secure subscription or local storage.
For more information, visit:
To adjust Arlo video recording length:
1.Launch the Arlo Secure App.
3.Select the device you want to adjust.
4.Tap
5.Tap Default Mode Settings.
6.Under RECORDING LENGTH, select between Record until activity stops for recording length up to 5 minutes, or Record for a fixed length. Move the slider to adjust the recording length from 10 seconds to 2 minutes.
.
How do I remove a device from my Arlo account?
.
WARNING: Removing a device from your account erases all modes and settings on that device and resets the device to factory default settings. If you remove a device from your account and later add it back, you must complete the setup process just like you did when you set up your system for the first time.
To remove a device from your Arlo account:
3.Select your Arlo device.
4.Tap or click
5.Tap or click the Arlo device name at the top of the Device Settings screen.
6.Tap or click Remove Device.
Note: If you remove an Arlo SmartHub or Base Station from your account, all the cameras synced to that Arlo SmartHub or Base Station are deleted from your account at the same time.
To remove all devices from your Arlo account and erase your recordings:
2.Tap
in the Arlo Secure App or click Settings on my.arlo.com.
5.Tap or click Reset & Erase Arlo Devices.
6.Tap or click Reset & Erase All Devices at the bottom of the screen.
7.Select Reset & Erase All when the pop-up displays.
8.Follow the prompts to confirm that you want to erase and reset all Arlo devices.
Note: Privacy Center feature availability varies by region.
.
How to add an additional Arlo device to an existing Arlo system
To add a new Arlo device to your existing Arlo account:
1.Launch the Arlo Secure App.
3.Tap
4.Select the Arlo device you want to add.
6.Follow the in-app instructions to add the new Arlo device to your system.
.
What is Low Power Mode and how does it work with my Arlo cameras?
Lower Power Mode is a feature that allows your Arlo device to extend its battery life. Instead of video recording, your device will take snapshots when Low Power Mode is activated. When the camera enters Low Power Mode, you will receive a push notification about this status and the Feed will also have an event indicating when Low Power Mode is activated. Snapshots will be available in the Feed.
The following Arlo devices have Low Power Mode capability:
• Pro Security Camera 2K (6th Gen)
• Pro XL Security Camera 2K (6th Gen)
• Essential Security Camera 2K/HD (3rd Gen)
• Essential XL Security Camera 2K/HD (3rd Gen)
• Essential Outdoor Camera 2K/HD (2nd Generation)
• Essential XL Outdoor Camera 2K/HD (2nd Generation)
• Video Doorbell 2K/HD (2nd Generation)
What happens when Low Power Mode is enabled?
• When motion is detected and the camera is triggered to record, it will take a snapshot of the motion.
• You will receive a push notification with the snapshot. The snapshot will also be saved in your Feed.
• If motion continues after the snapshot is received, your camera will take additional snapshots. The camera will wait at least ten seconds between snapshots.
• You can still view your camera live stream by tapping on the push notification or from within the Arlo Secure App.
Activate Low Power Mode
Low Power Mode can be activated automatically, when your camera battery reaches a specific level, or can be activated manually in the Power Management settings. When activated automatically, Low Power Mode will turn off when the battery recharges to 10% above your set Low Power Mode Threshold.
To enable Automatic Low Power Mode:
1.Launch the Arlo Secure App.
3.Tap the Arlo device card.
4.Tap
6.Tap the Auto Low Power Mode switch to turn the feature on.
7.Move the slider left or right to increase or decrease the Low Power Mode Threshold.
• Your camera will automatically switch to Low Power Mode when the battery drops below the desired threshold to extend the camera battery life.
• When the battery recharges 10% above your set threshold, the camera will automatically switch back into its set Power Mode.
• When you disable the Auto Low Power Mode, the threshold slider will disappear.
To manually enable Low Power Mode:
1.Launch the Arlo Secure App.
3.Tap the Arlo device card.
4.Tap
7.Tap Confirm.
Note: When Low Power Mode is enabled manually, you will need to select a different Power Mode to return to normal video recording.
.
.


Add Comment