

Lorex Wireless Cameras and Monitors guide 2024, Wireless Security Lorex offers a wide-range of wireless devices and battery-operated (wire-free) security cameras that are easy to install, easy to set-up, and easy to use. Lorex Fusion Combine Wired and Wireless Cameras together! Fusion Recorders allow you to connect and record Smart Home Cameras around-the-clock – just like Wired Security Cameras Wi-Fi Security Cameras Easy plug-and-play monitoring solutions. Choose from both indoor and outdoor models, as well as Pan-Tilt options Accessories: Selecting the right range-extending antenna
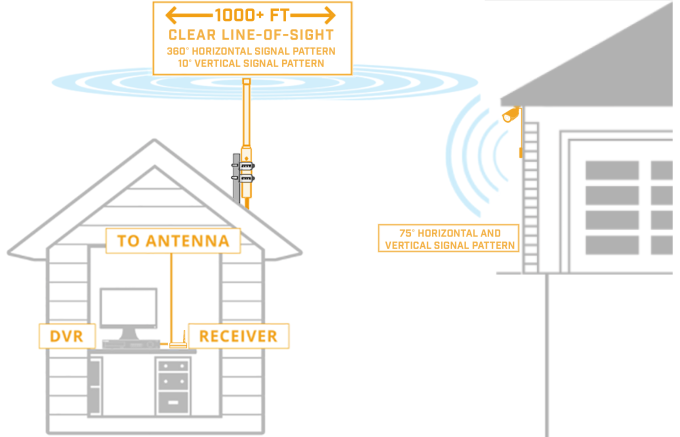
If you are experiencing low or no signal strength with one or more of your wireless or wire-free cameras, a good option is to use a range-extending accessory antenna.
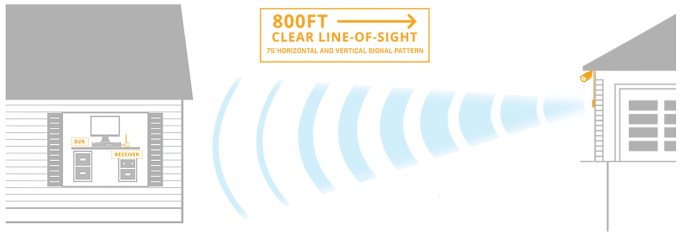
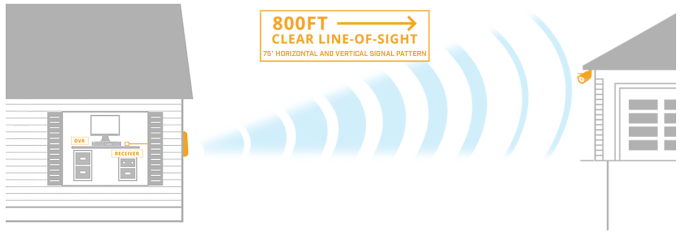
ATTENTION: Prior to purchasing and installing an accessory antenna, read the product specifications of your receiver to determine if your receiver has a weatherproof housing. Installing your weatherproof receiver outdoors provides a better line-of-sight between the receiver and the camera, increasing the strength of the wireless signal. See your product specifications to determine the weatherproof rating of your receiver.
The Directional Wireless Panel Antenna and the Omni-Directional Antenna are used to extend the range of one or multiple wireless or wire-free cameras.
Directional Wireless Panel Antenna (ACCANTD9)
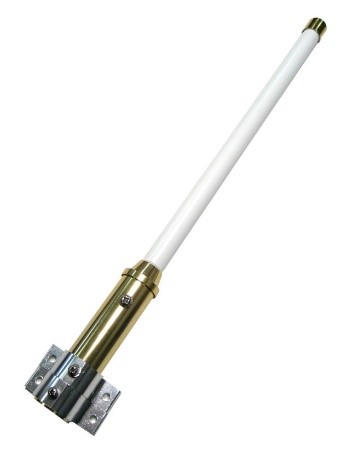
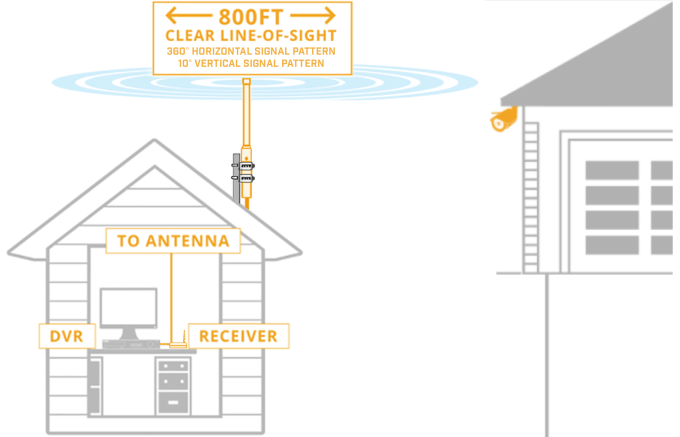
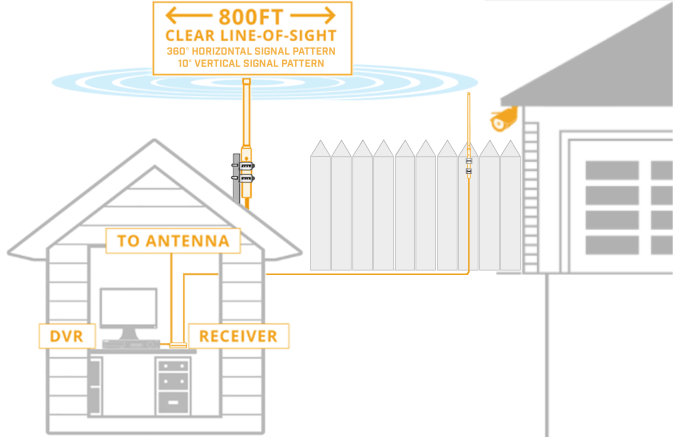
Omni-Directional Antenna (ACCANTO8)
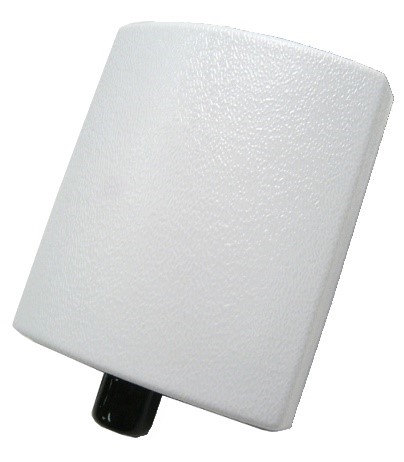
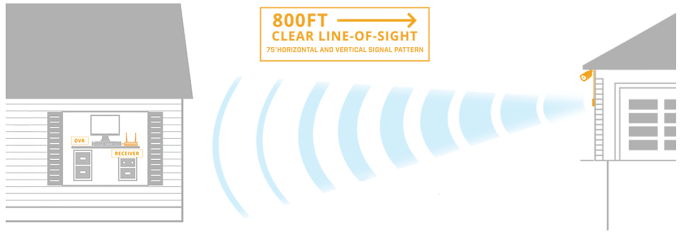
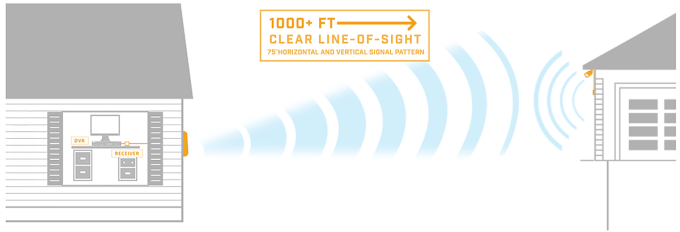
Use the 2.4GHz Directional Wireless Panel Antenna (ACCANTD9) to focus a wireless signal onto one specific wireless device (camera or receiver) to increase the range of transmission. A clear line-of-sight between the antenna and the wireless device needing range extension is required.
Use the 2.4GHz Omni-Directional Antenna (ACCANTO8) to enhance the signal of one or multiple cameras that are paired to a single or dual antenna receiver. You may also use two Omni-Directional Antennas to extend the range of all cameras paired to a dual antenna receiver.
REQUIREMENT: To connect the antenna directly to the camera or receiver, the device must have a removable SMA type antenna. Visit www.lorextechnology.com/compatibility to ensure the antenna is compatible with your camera or receiver model.
Lorex Wireless Cameras and Monitors guide 2024
Also Read : Lorex Camera Troubleshooting
Recommended Antenna Installation Methods
Your antenna needs will vary depending on the setup of your camera system, the number of cameras that require range extension, and the number of channels on your wireless receiver. Review the scenarios below to ensure you have the correct antenna and installation method to meet your needs.
Click a setup scenario to see the recommended installation method:
Combining Accessory Antennas
If you have installed your accessory antenna according to the recommended installation methods and would like to enhance wireless signal strength even further, you may add an additional Directional Wireless Panel Antenna (ACCANTD9) directly to a camera. The additional Directional Wireless Panel Antenna can be used with a Directional Wireless Panel Antenna or with an Omni-Directional Antenna attached to the receiver.
Click an antenna combination to see recommended installation methods:
Scenario 1: Extend the range of one camera paired to a single antenna receiver
To extend the range of one camera connected to a single channel receiver, use the Directional Wireless Panel Antenna (ACCANTD9).
The Directional Wireless Panel Antenna can be connected in two configurations.
Configuration 1. Connect the antenna directly to the camera
Configuration 2. Connect the antenna directly to the wireless receiver
REQUIREMENT: The antenna connects using an SMA cable and replaces the existing antenna on either the camera or wireless receiver. Check www.lorextechnology.com/compatibility to determine if your product is compatible with the antennas.
Scenario 2: Extend the range of one camera paired to a dual antenna receiver
To extend the range of one camera connected to a multi-channel receiver, use the Directional Wireless Panel Antenna (ACCANTD9). Connect the Directional Wireless Panel Antenna directly to the camera.
Scenario 3: Extend the range of select cameras paired to a dual antenna receiver
To extend the range of select cameras on a multi-channel receiver, use the Omni-Directional Antenna (ACCANTO8).
Connect the Omni-Directional Antenna to one of the antenna ports on the wireless receiver.
REMINDER: Each antenna port on a dual antenna receiver is associated with specific camera channels. One antenna communicates with odd numbered channels (1, 3, and 5), while the other antenna communicates with even numbered channels (2, 4, and 6). See the table below for dual antenna channel configurations.
|
Receiver Model##### |
4-Channel Receiver###### |
6-Channel Receiver |
|---|---|---|
|
Antenna 1 |
Channels 1 and 3 |
Channels 1, 3 and 5 |
|
Antenna 2 |
Channels 2 and 4 |
Channels 2, 4, and 6 |
If you connect the Omni-Directional Antenna to an antenna port and your wireless signal does not improve, try switching the Omni-Directional Antenna to the other antenna port or pairing your camera to a different camera channel.
Scenario 4: Extend the range of all cameras paired to a dual antenna receiver
To extend the range of all cameras on a dual antenna receiver, connect an Omni-Directional Antenna (ACCANTO8) to each antenna port on the receiver.
IMPORTANT: Two Omni-Directional Antennas are required to accommodate this setup.
Combination 1: Combine two Directional Wireless Panel Antennas
If you are using a Directional Wireless Panel Antenna (ACCANTD9) to enhance the signal of a single camera with a single channel receiver, you can use an additional Directional Wireless Panel Antenna to further enhance the wireless signal.
Connect one Directional Wireless Panel Antenna directly to the camera and one Directional Wireless Panel Antenna directly to the wireless receiver. To maximize signal strength, it is recommended to aim the two antennas directly at each other with a clear line-of-sight.
Combination 2: Combine a Directional Wireless Panel Antenna with an Omni-Directional Antenna
If you are using an Omni-Directional Antenna (ACCANTO8) to enhance the signal of multiple cameras, you can further enhance the signal of a specific camera by connecting a Directional Wireless Panel Antenna (ACCANTD9) directly to the camera.
A clear line-of-sight between the Directional Wireless Panel Antenna and the Omni-Directional Antenna is recommended to maximize signal strength.
Lorex SD Pro App: Changing / resetting the password
If the password for the Lorex SD Pro app to view the Wireless Home Monitor is lost or forgotten it will need to be reset.
To reset the Lorex SD Pro app password:
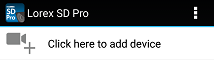
Lorex SD Pro App: Setting up Wireless Home Monitor remote access
You can access and view wireless cameras from a Wireless Home Monitor system using an iPhone, iPad, or Android smartphone or tablet using the Lorex SD Pro app. It is available at the App Store or Google Play Store.
Prerequisites:
To set up the mobile application:
REMINDER: If using the default password, you may be prompted to create a new password.
The system will be displayed in the Device Manager as Online.
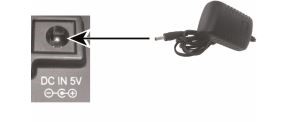
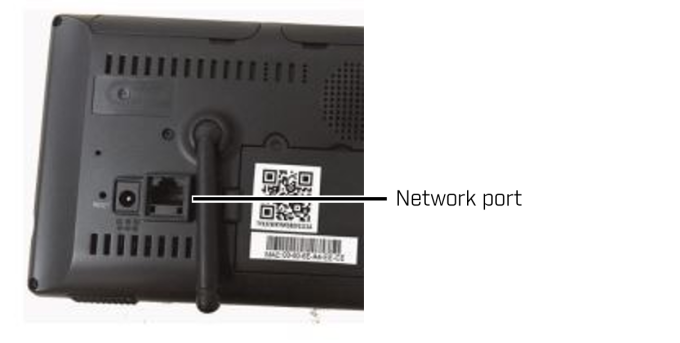
LW2700 Wireless Home Monitor: Included cables and accessories
LW2700 Series Wireless Home Monitors support wireless cameras using a wireless signal. They do not have an internal battery and require a connection to a power source. Refer to your user manual for model specific information on cables and accessories. Click here for downloads and documentation for your product.
Most wireless home monitors include the following cable connections and accessories when purchased:
Network: Wireless camera Internet requirements
Standard wireless cameras that connect to a DVR / NVR, do not need access to the Internet to function. Stand-alone IP cameras do not require an Internet connection for basic functions, but an Internet connection is required for full functionality.
Security Cameras: Understanding Field of View (FOV)
Field of View (FOV) is the maximum observable area that is seen at any given moment through an optical device such as a camera lens. The coverage of the area can be measured using the horizontal and vertical distances to find the diagonal of the area in degrees. Mathematically, the FOV is calculated using the horizontal dimension of the sensor (h) and the Focal Length (F).
You can find the camera’s Field of View details in the Specifications sheet. Click here for additional support content including security camera documentation.
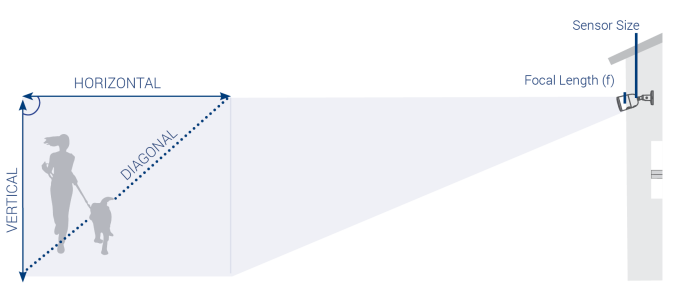
The Camera Lens, Sensor and Focal Length
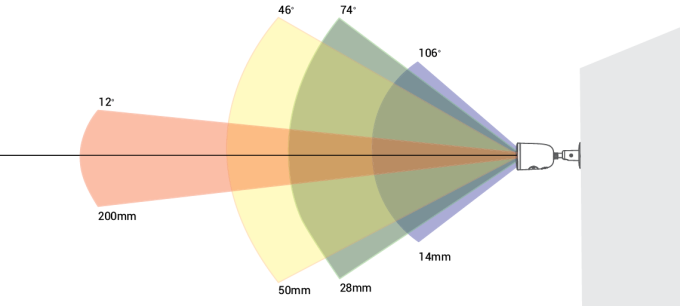
Focal length (F) is the distance between the center of a lens and its sensor. The size of the lens is the aperture size.
These factors affect field of view. A narrower focal length captures more of the scene and displays a larger field of view. A wider focal length magnifies a scene and decreases the field of view. The higher the focal length value the lower the FOV.
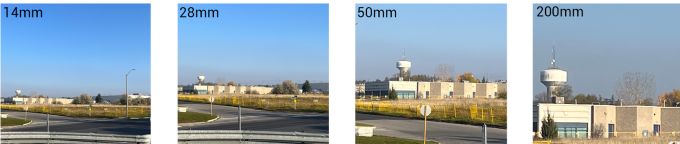
Types of Camera Lenses
Fixed: a fixed camera focal length provides an Angular FOV which is permanently set and cannot be adjusted by the user. Varifocal: the camera focal length can be manually adjusted by the user. Generally, this is done manually with screws or dials. At Lorex we have motorized varifocal cameras that allow you to digitally zoom using your phone or NVR without losing details. These lenses provide flexibility and customization for your camera image needs.
The importance of Field of View
A wide angle lens or smaller lenses produce a greater field of view and captures more objects in a scene enhancing your ability to cover larger and wider areas such as foyers, parking lots or warehouses.
A narrow angle lens or larger lenses produce a smaller field of view; capturing a limited area, but the camera quality image improves in detail. These are designed to monitor a specific object, such as cash registers, entrances/exits, hallways or objects of value.
How to Calculate the FOV
To calculate the FOV requires the sensor size and the focal length of the lens: h = Sensor Size F = Focal Length of the Lens
FOV is represented by this equation: FOV = 2tan-1(h) / 2F
Example: h = 4.7mm F = 6mm FOV = 2tan-1(h) / 2F = 2tan-1(4.7)(12) = 2tan-1(0.39) = 2(21.4°) = 42.8°
W482CAD – 2K Wi-Fi Camera : Frequently Asked Questions
The following FAQ article answers many of the general questions about the 2K Wi-Fi Camera with Smart Deterrence (W482CAD). Where applicable, the FAQ includes links to articles where you may find more information.
Where do I place my Lorex 2K Wi-Fi Camera?
How should I position my Lorex 2K Wi-Fi camera?
When mounting the camera on a wall, make sure of the following:
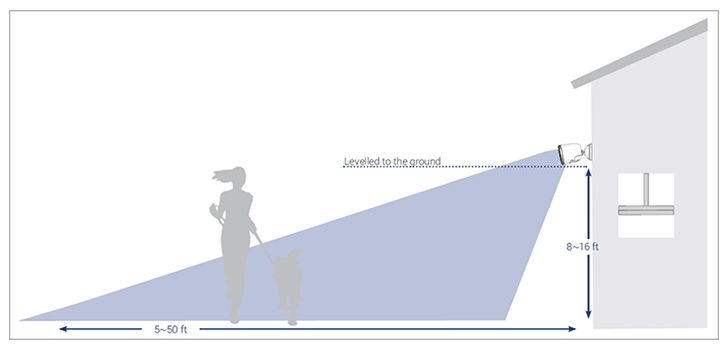
![]() Accuracy of person detection will be influenced by multiple factors, such as the person’s distance from the camera, the height of the person, and the height and angle of the camera. Night vision will also impact the accuracy and distance of detection.
Accuracy of person detection will be influenced by multiple factors, such as the person’s distance from the camera, the height of the person, and the height and angle of the camera. Night vision will also impact the accuracy and distance of detection.
How do I enable motion detection and person detection?
Note: If motion detection is disabled, general/person/vehicle detection will automatically disable and you will not receive any motion detection notifications in the Lorex App.
How do I customize Motion Zones™?
Motion Zones™ allows you to customize your device’s motion detection region. Motion Zones™ screen consists of the following settings:
To set Motion Zones™
![]() For full instructions on how to set customized Motion Zones™, see Configuring Motion Zones™.
For full instructions on how to set customized Motion Zones™, see Configuring Motion Zones™.
Why am I receiving so many notifications?
There are a few ways you can lower the number of notifications you are getting.
How do I enable Color Night Vision?
Note: Disabling Auto Night Vision will force the camera into Color Night Vision mode. Recommended in low-light conditions.
How to activate Two-Step Verification?
![]() For detailed setup instructions, see Two-Step Verification Setup.
For detailed setup instructions, see Two-Step Verification Setup.
How to optimize video quality?
Note: Enabling HDR optimizes video picture in high-contrast conditions such as under-lit and over-lit areas.
By default, the video quality is set to High (2x1080p HD).
What is Home & Away™?
Lorex App can automatically use your location to manage your notifications when you are at home or away. The app will notify you when you are inside/outside of your set home perimeter.
To start using this feature, navigate to your mobile device settings and enable Location services for Lorex App.
![]() For detailed setup instructions, see Configuring Home & Away™.
For detailed setup instructions, see Configuring Home & Away™.
How do I activate the LED deterrence light when motion is detected?
How do I remove the 2K Wi-Fi Camera from my account?
How to permanently delete data of 2K Wi-Fi Camera?
Refer to Formatting Device Storage for more information.
Does my device support WPA2 or WPA3?
Your device supports Wi-Fi Protected Access 2 (WPA2) which is the industry standard security protocol for Wi-Fi networks. WPA2 offers security against unauthorized access and data interception and is supported by most Wi-Fi routers including those that support both WPA2 and WPA3. It employs Advanced Encryption Standard (AES), an encryption mechanism, which secures communication between your camera and Wi-Fi network to keep transmitted data confidential. For information on which devices support WPA2 and which devices support WPA3, please refer to “WPA2 and WPA3 Supportive Devices.”
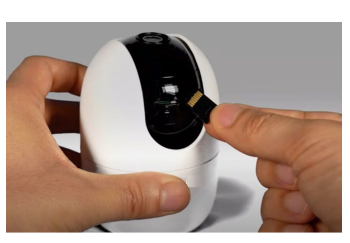
What are the compatible SD cards?
Refer to Compatible SD Cards and Storage Sizes for more information.
What devices are compatible with the 2K Wi-Fi camera?
Refer to Product Compatibility Chart for more information.
W482CAD – 2K Wi-Fi Camera : Installation
This article provides instructions to install your Lorex 2K Wi-Fi camera with Smart Deterrence (W482CAD).
What is included in the box?

![]() The above contents are based on one camera.
The above contents are based on one camera.
How to connect with Lorex App
Note: Ensure your camera is plugged in and powered ON throughout the setup.
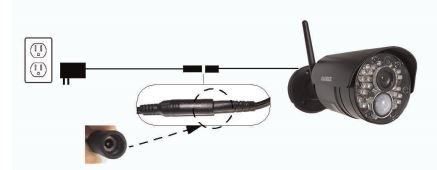
Optional: Attach the weatherproof extension cable to the camera.
For full instructions on Lorex App setup, see Connecting with Lorex App.
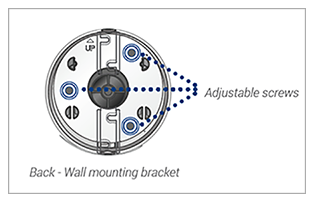
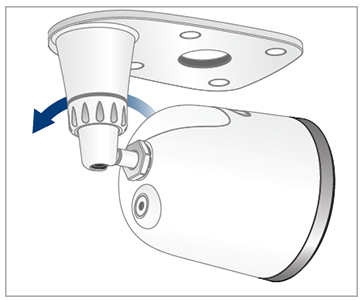
How to mount 2K Wi-Fi Camera to the wall
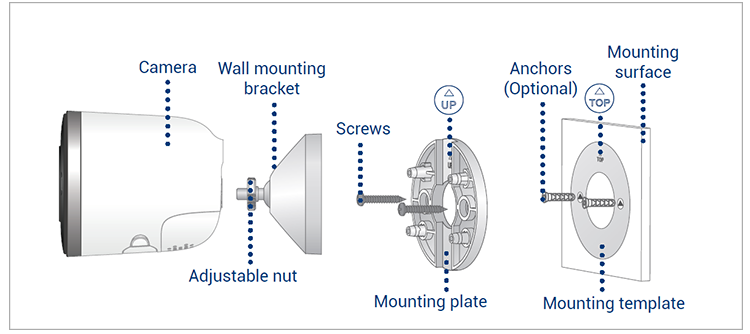
Note: Ensure an outlet is nearby, and keep in mind the cable lengths.
Optional: Drill 15/64″ (6mm) holes for the anchors.
Using a screwdriver and provided screws, secure the mounting plate to the surface.
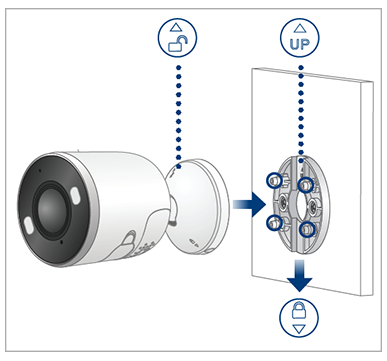
Note:
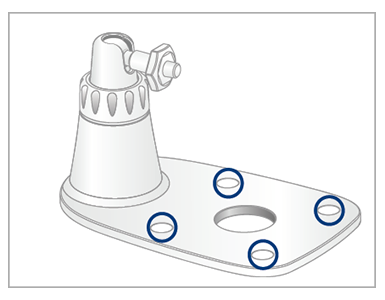
How to mount 2K Wi-Fi Camera to the ceiling
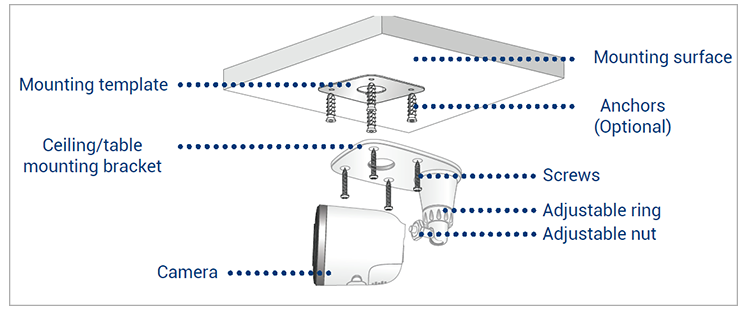
Note: Ensure an outlet is nearby, and keep in mind the cable lengths.
Optional: Drill 15/64″ (6mm) holes for the anchors.
Optional:
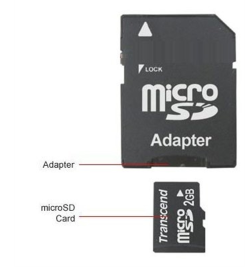
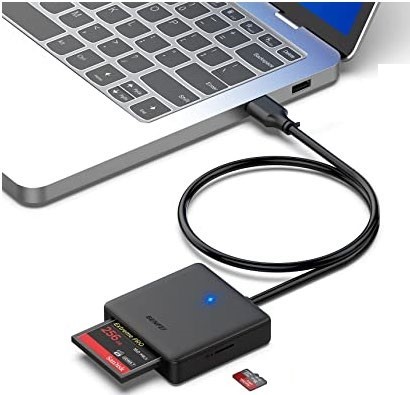
Wi-Fi Security Cameras – How to Read a MicroSD card
To view the contents of a MicroSD card on a laptop or computer, follow these steps:
If your computer only has an SD reader, a MicroSD to SD adapter is required.
If your laptop or computer does not have an SD card reader built-in, you can purchase an external card reader that connects to your device via USB.
![]()
a. Select the day to play back:

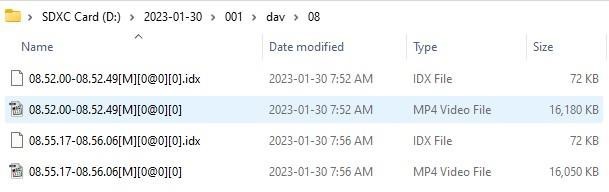
b. Click on the available folder:

c. Within the folder, click either the day folder (Video files) or the jpg folder (Snapshots):

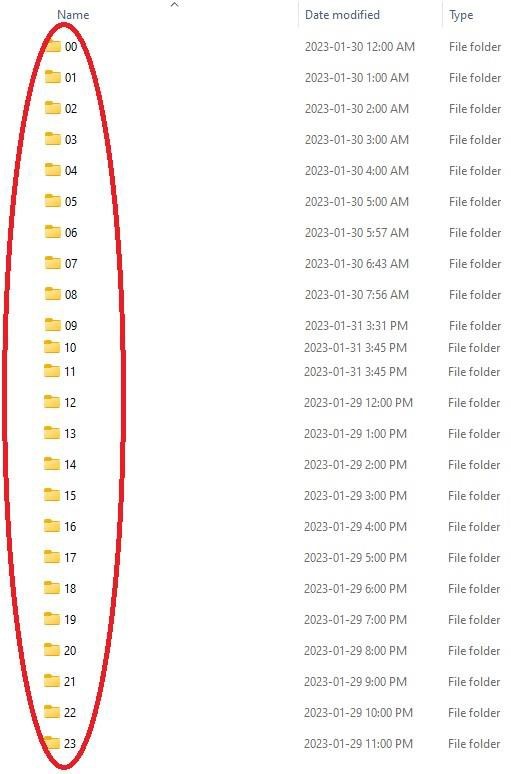
d. Click to select a video time from 00 – 23 hours:
Wireless Home Monitor: Audio not working
If the audio is not working on your Wireless Home Monitor:
If audio is not working after increasing the volume and viewing in Full Screen mode, restore the system to default settings.
To restore your monitor to default settings:
CAUTION: Restoring to default settings will erase any setting input on the monitor. Your monitor will need to be reconfigured.
Add Comment