
How to Integrate SONOFF Camera into Home Assistant, This guide walks you through integrating the SONOFF Camera into Home Assistant using the ONVIF protocol. With this setup, you’ll be able to:
🔎 How to Integrate SONOFF Camera into Home Assistant?
1.Introduction
This guide walks you through integrating the SONOFF Camera into Home Assistant using the ONVIF protocol. With this setup, you’ll be able to:
View real-time video in Home Assistant
Receive motion and human detection events
Set up automation (e.g., trigger recording when motion is detected)
Before you start, make sure your device firmware and app version meet the requirements for ONVIF support.
SONOFF CAM-B1P camera with firmware ≥ v1.0.2 SONOFF CAM-PT2 camera with firmware ≥ v1.0.5 SONOFF CAM-S2 camera with firmware ≥ v1.1.5
eWeLink App (version ≥ v5.18.0) installed on your phone
*This tutorial takes the SONOFF CAM-PT2 camera as an example.
2.What You’ll Need
To complete this integration, make sure you have the following:
Hardware & Software
A device running Home Assistant (e.g., Raspberr Both the camera and Home Assistant in the
.
Account Info & Access
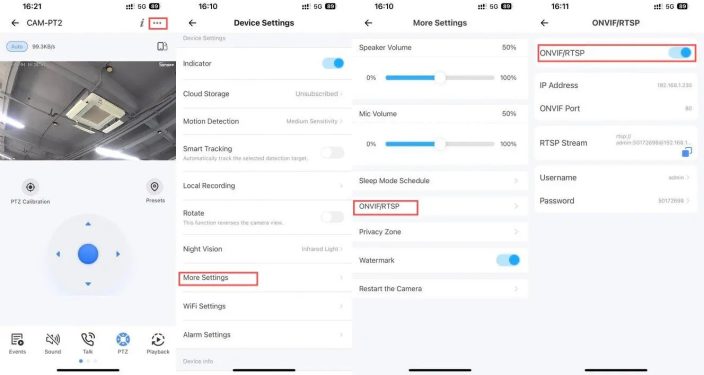
Your SONOFF Camera has been added ONVIF/RTSP function enabled via:
Device Settings → More Settings →
.
Record the Following Info:
IP address of the camera ONVIF port
Username and Password (modifiable)
.
.
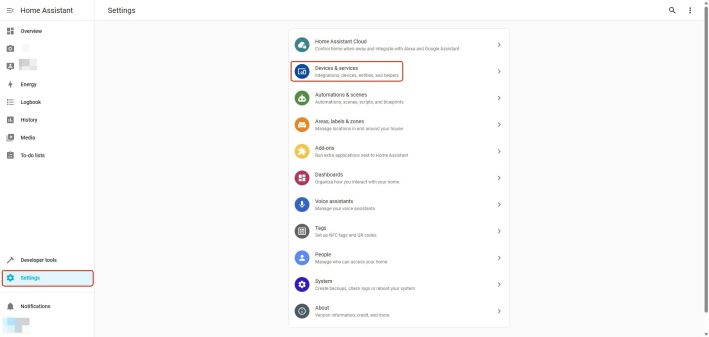
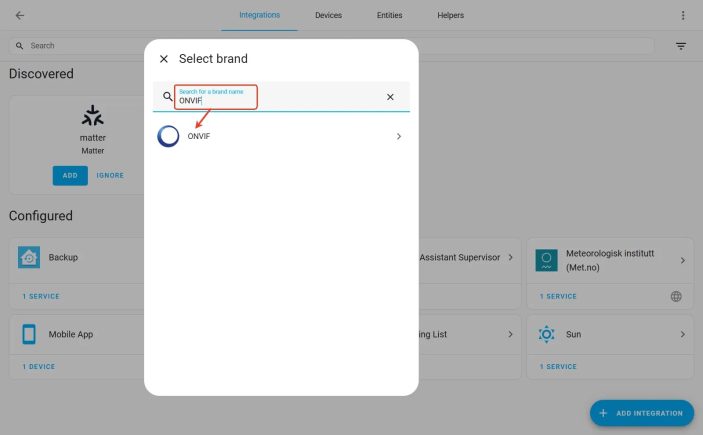
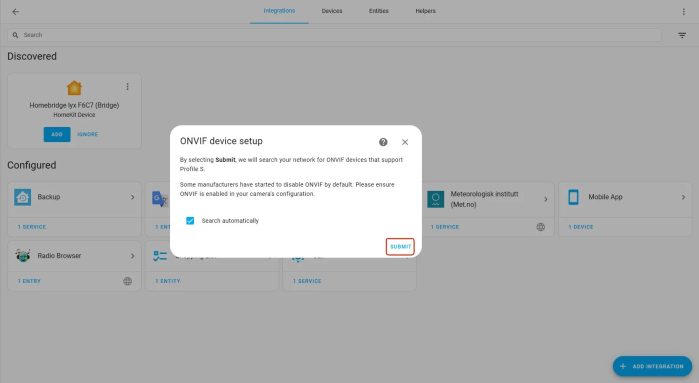
Step 1: Install ONVIF Integration
.
.
.
Step 2: Add the Camera
.
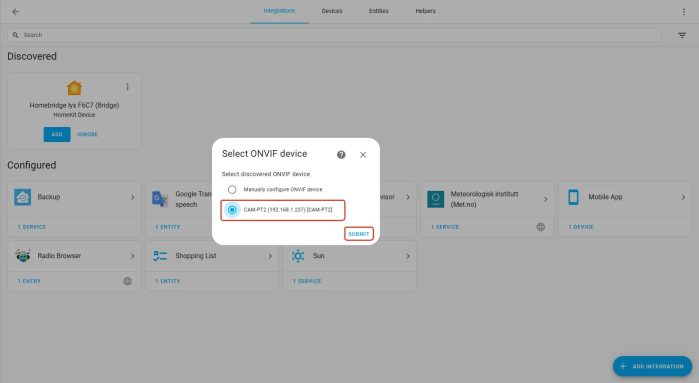
.
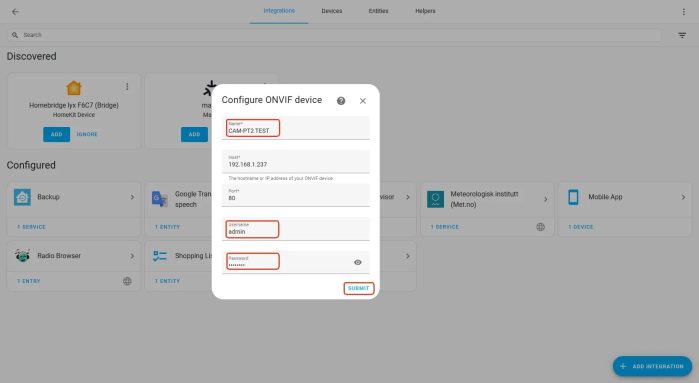
.
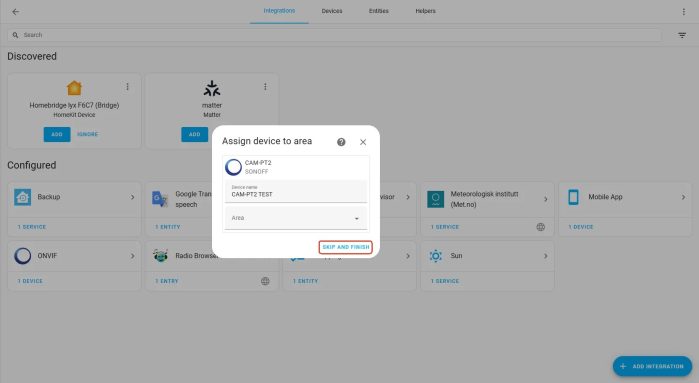
.
You will now see your camera in the Home Assistant dashboard under the Overview tab.
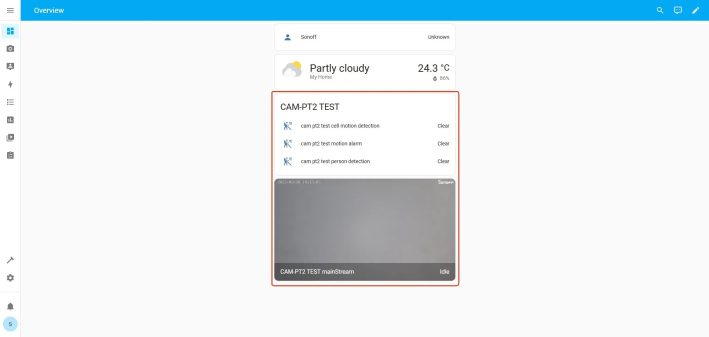 .
.
.
.
Watch live video feed directly in Home Assistant Toggle audio on/off
.
Motion/Human Detection as Automation Triggers
Create a New Dashboard
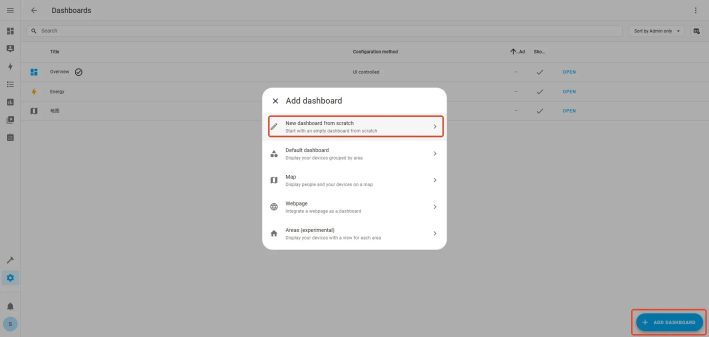
.
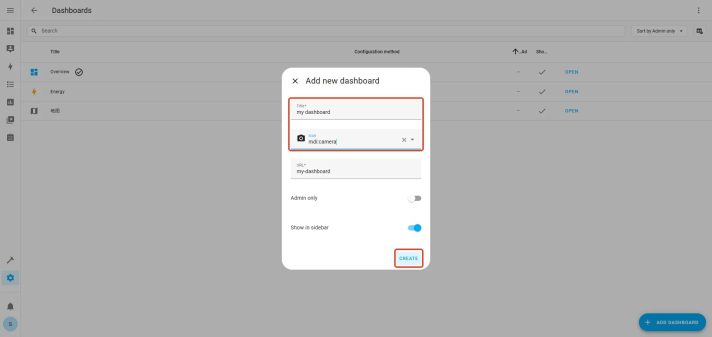
Edit the Dashboard
.
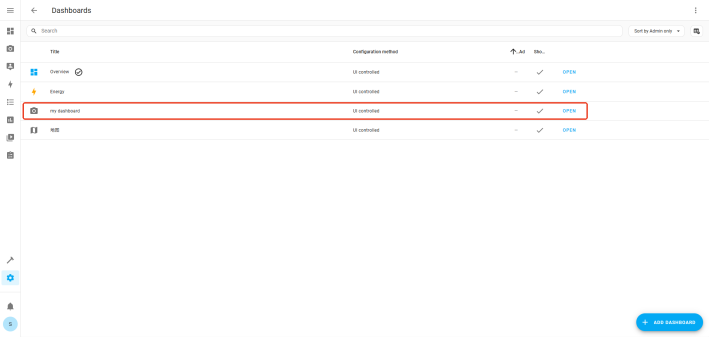
.

.
Create a New section
.
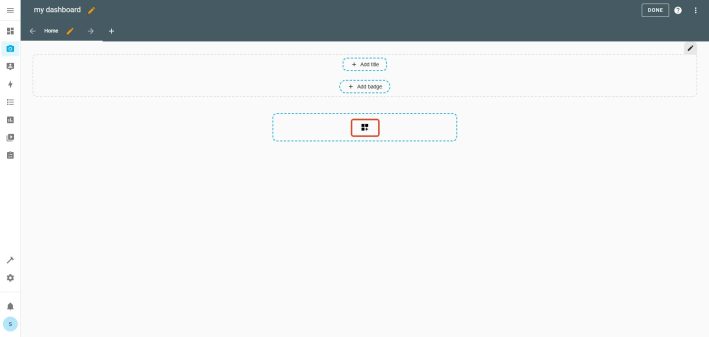
.
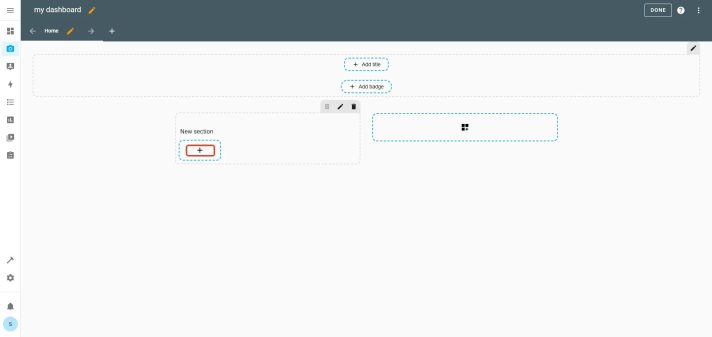
.
In the “By Entity” panel, check the boxes for your camera’s motion/person detection sensors and the MainStream stream entity. Then, click “Add to Dashboard” to include them in your layout.
.
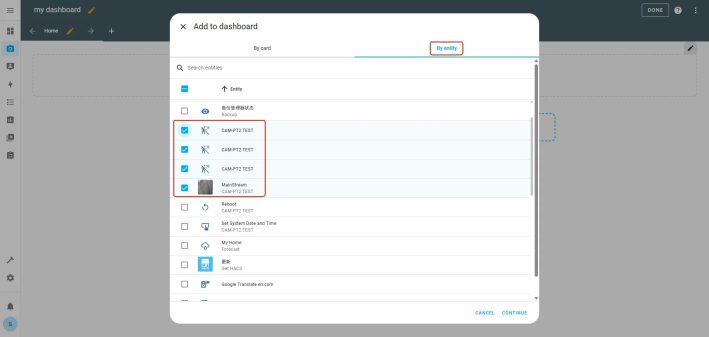
.
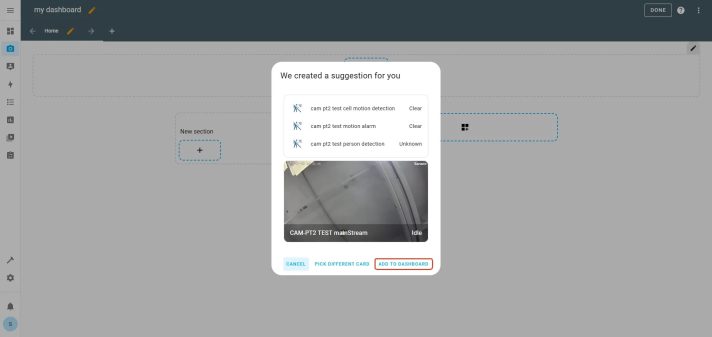
.
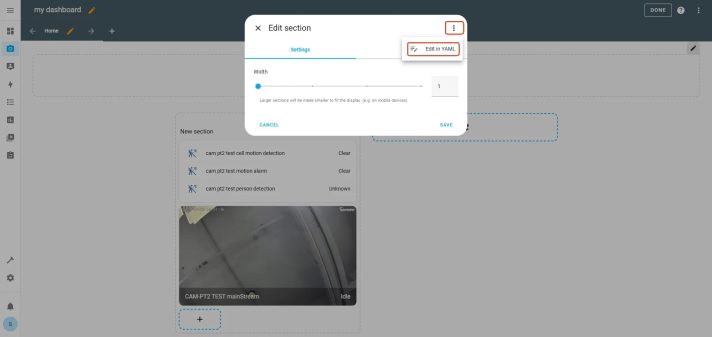
In the newly created section, click the edit icon (⋮) in the top right corner, and choose “Edit in YAML” from the menu.
.
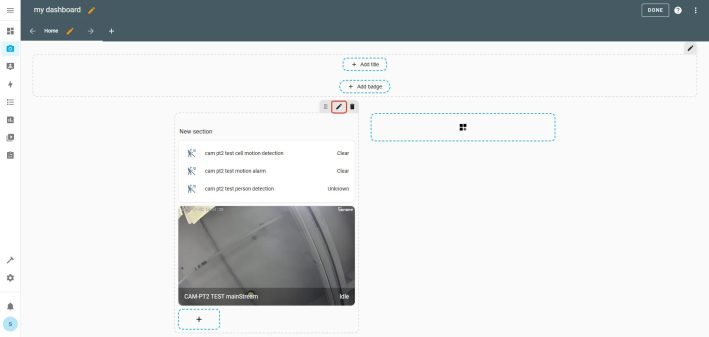
.
.
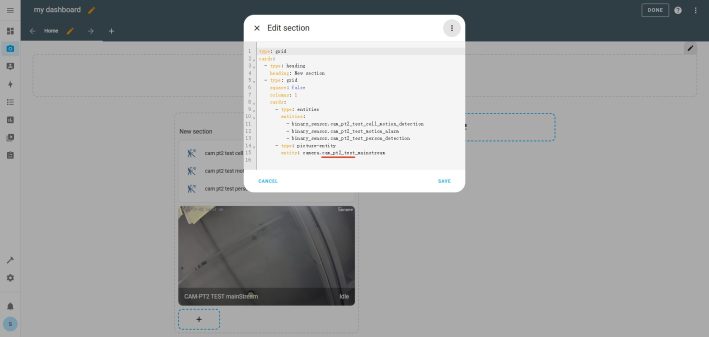
Identify the text to the left of “_mainstream.”This text represents your camera’s name. For example, if your camera string is “cam_pt2_test_mainstream”, then the camera name is “cam_pt2_test”.
.
.
type: grid
square: false columns: 1
cards:
action: call-service service: onvif.ptz
service_data:
entity_id: camera.<camera_name>_mainstream pan: LEFT
speed: 1
distance: 0.3
move_mode: ContinuousMove name: Pan Left
show_state: false
icon: mdi:arrow-left show_icon: true
action: call-service
service: onvif.ptz service_data:
entity_id: camera.<camera_name>_mainstream tilt: UP
speed: 1
distance: 0.3
move_mode: ContinuousMove name: Tilt Up
icon: mdi:arrow-up
action: call-service service: onvif.ptz
service_data:
entity_id: camera.<camera_name>_mainstream tilt: DOWN
speed: 1
distance: 0.3
move_mode: ContinuousMove name: Tilt Down
icon: mdi:arrow-down
action: call-service service: onvif.ptz
service_data:
entity_id: camera.<camera_name>_mainstream pan: RIGHT
speed: 1
distance: 0.3
move_mode: ContinuousMove name: Pan Right
icon: mdi:arrow-right show_icon: true
camera_image: camera.<camera_name>_mainstream camera_view: live
.
.
For example:
.
.
type: grid
square: false columns: 1
cards:
action: call-service service: onvif.ptz
service_data:
entity_id: camera.cam_pt2_test_mainstream pan: LEFT
speed: 1
distance: 0.3
move_mode: ContinuousMove name: Pan Left
show_state: false
icon: mdi:arrow-left show_icon: true
action: call-service service: onvif.ptz
service_data:
entity_id: camera.cam_pt2_test_mainstream tilt: UP
speed: 1
distance: 0.3
move_mode: ContinuousMove name: Tilt Up
icon: mdi:arrow-up
action: call-service service: onvif.ptz
service_data:
entity_id: camera.cam_pt2_test_mainstream tilt: DOWN
speed: 1
distance: 0.3
move_mode: ContinuousMove name: Tilt Down
icon: mdi:arrow-down
action: call-service service: onvif.ptz
service_data:
entity_id: camera.cam_pt2_test_mainstream pan: RIGHT
speed: 1
distance: 0.3
move_mode: ContinuousMove name: Pan Right
icon: mdi:arrow-right show_icon: true
camera_image: camera.cam_pt2_test_mainstream camera_view: live
.
.
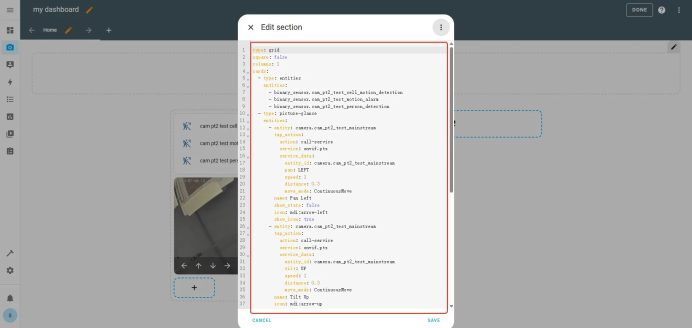
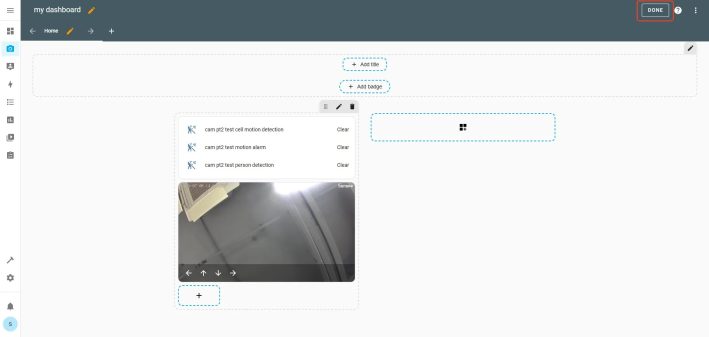
After replacing <camera_name> with your camera’s name, fully replace the original code with the modified version. Then click SAVE and DONE to apply the changes.
.
.
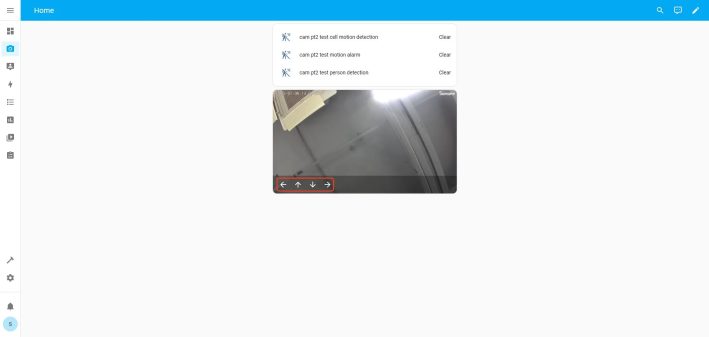
At this point, you can see the live feed from the camera as well as the PTZ control buttons. You can use these buttons to rotate the camera up, down, left, and right.
Create automations using camera events as triggers. Example:
.
When motion is detected:
.
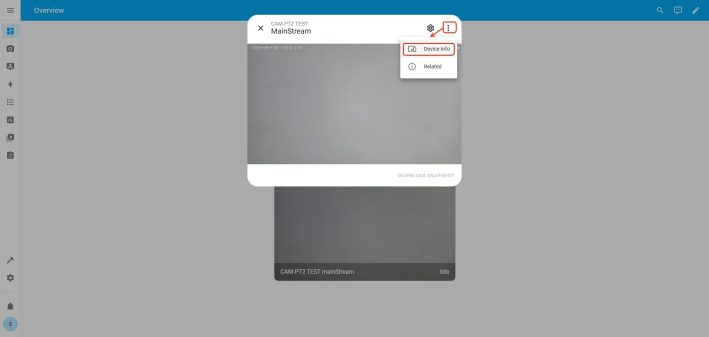
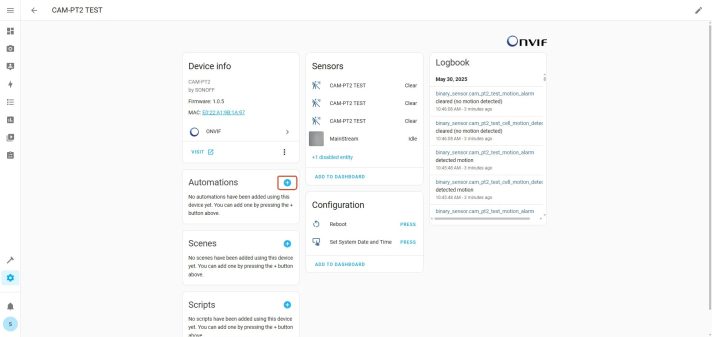
Go to Device Info → + Add Automation → Use device as trigger
.
.
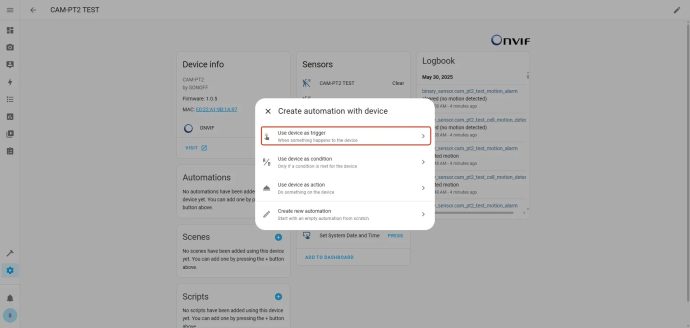
Select “Motion started detecting”
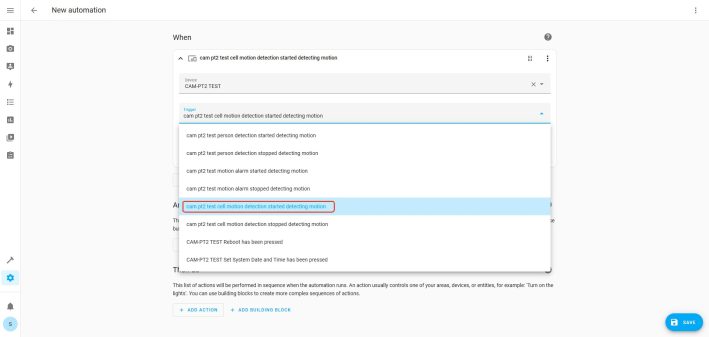
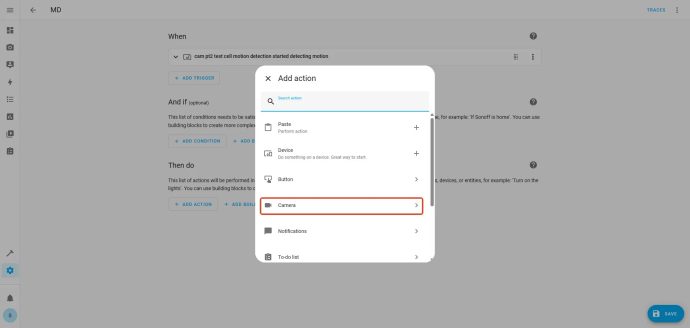
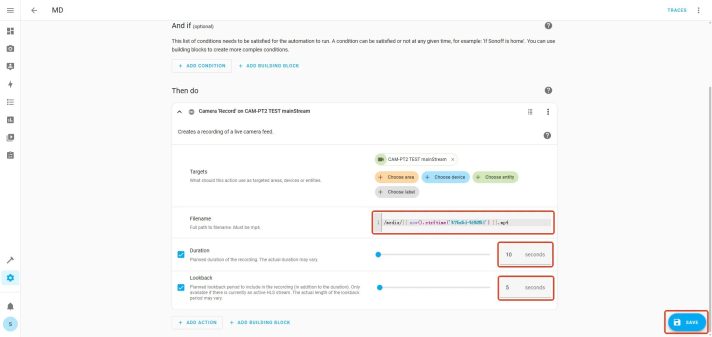
Choose an action:
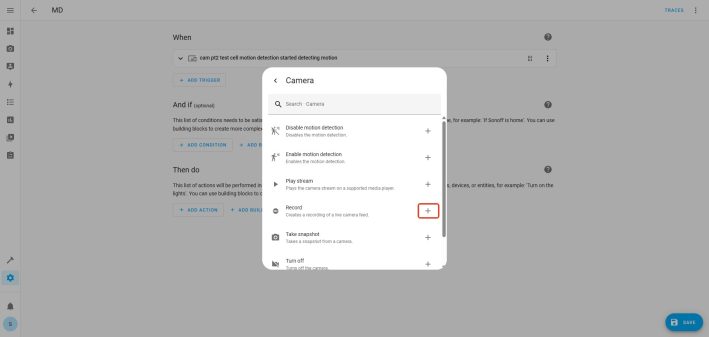
Camera → Record, set file path like:
/media/{{ now().strftime(‘%Y%m%d-%H%M%S’) }}.mp4
.
.
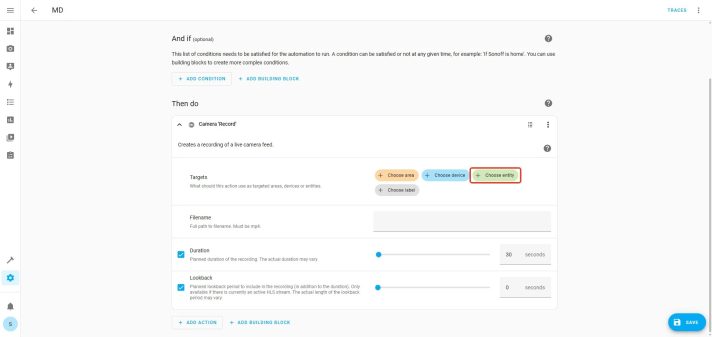
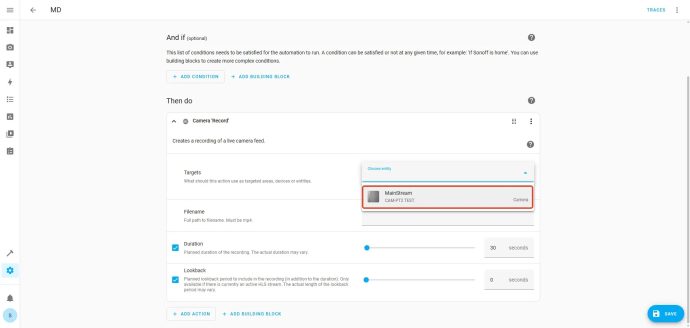
Configure duration and lookback
Click Save
.
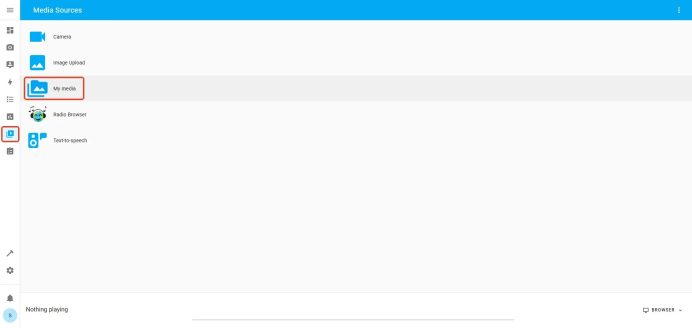
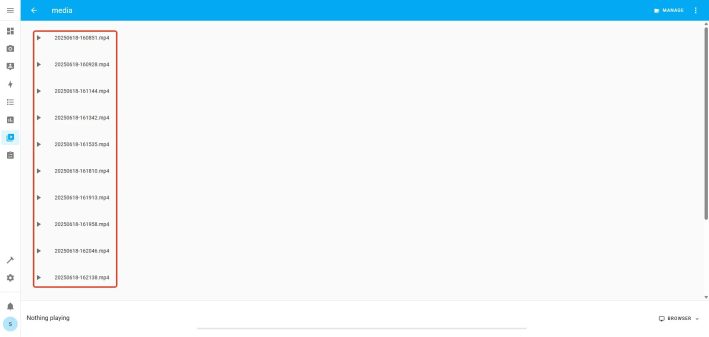
You can then find recordings under Media → My media.
.
.
.
SONOFF Camera supports ONVIF and RTSP, enabling easy integration with Home Assistant. To help you get to know the differences, a quick feature overview is provided below.
.
CAM-B1P/CAM-PT2
.
| .
Feature |
.
ONVIF |
.
RTSP |
| .
Device Discovery |
.
√ |
.
× |
| .
Live View |
.
√ |
.
√ |
| .
. PTZ Control |
.
√ Manual configuration via script is required. |
.
. × |
| .
. Event Notification |
.
√ Triggers Automation (Motion, Human) |
.
. × |
CAM-S2
.
| .
Feature |
.
ONVIF |
.
RTSP |
| .
Device Discovery |
.
√ |
.
× |
| .
Live View |
.
√ |
.
√ |
| .
. Event Notification |
.
√ Triggers Automation (Motion, Human) |
.
. × |
.
Apple Home + SONOFF Devices Setup Guide
In this guide, you will find instructions for adding SONOFF devices to Apple Home using different integration methods.
SONOFF offers both Matter-certified devices, which can be added to Apple Home directly, and non-Matter devices(including legacy WiFi and Zigbee Devices), which can be integrated through Matter Bridge solutions.
This page explains how each type of device can be connected to Apple Home and helps you choose the appropriate setup based on your device type.
💡Add SONOFF Matter Devices to Apple Home
.
Introduction
.
Apple Home offers a sleek, intuitive smart home experience—and now with Matter protocol support, adding devices like the SONOFF MINIR4M Wi-Fi Smart Switch is easier than ever. SONOFF’s Matter over Wi-Fi devices integrate locally with Apple Home, without relying on cloud servers or additional hubs.
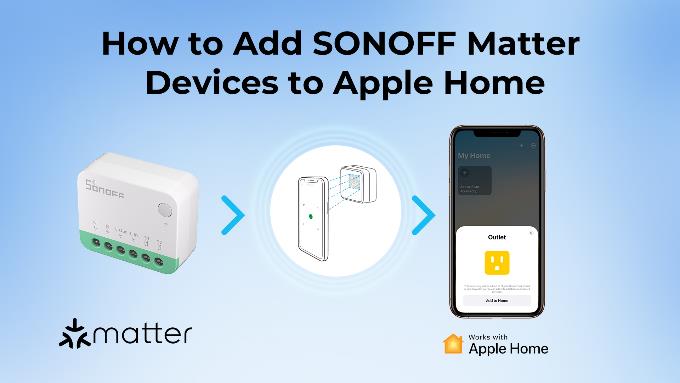
In this guide, we’ll walk you through how to pair the SONOFF MINIR4M with Apple Home, enabling remote control, Siri voice commands, and automation through your Apple Home app.
Preparation
.
Before you begin, make sure you meet the following requirements:
Setup Guide
Step 1: Power on Your SONOFF Matter Device
.
Step 2: Add the Device in the Apple Home App
.
.
.
.
Once added, the SONOFF MINIR4M will appear in your Home app. You can tap to control manually or include it in an automation (e.g., “When I arrive home, turn on the light”), or try using Siri, e.g., “Hey Siri, turn off the living room lights”.
SONOFF Matter Devices List
.
All SONOFF Matter devices listed below are compatible with Apple Home:
| Category | Product Name |
| DIY Smart Switch | Smart Roller Shutter Switch | MINI-RBS |
| Wi-Fi Smart Switch (Dry Contact Relay) | MINI-D | |
| MINI Extreme Wi-Fi Smart Switch | MINIR4M | |
| Smart Wall Switch | SwitchMan Smart Wall Switch | M5 Matter |
Stay tuned for more SONOFF Matter-compatible devices.
💡Add SONOFF Non-Matter Devices to Apple Home
.
Introduction
.
Not all SONOFF devices are Matter-certified.
However, you can still integrate non-Matter SONOFF Zigbee and Wi-Fi devices into Apple Home using Matter Bridge solutions.
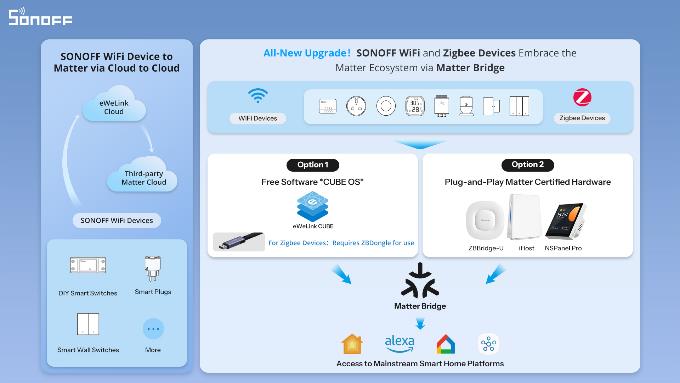
Two Ways to Integrate Non-Matter Devices
Option 1: Software-Based Matter Bridge with eWeLink CUBE
.
eWeLink CUBE is a free self-hosted local software that bridges eWeLink Wi-Fi and multi-brand Zigbee devices into the Matter network for Apple Home, SmartThings, Google Home, Alexa, and Home Assistant.
With eWeLink CUBE, you can:
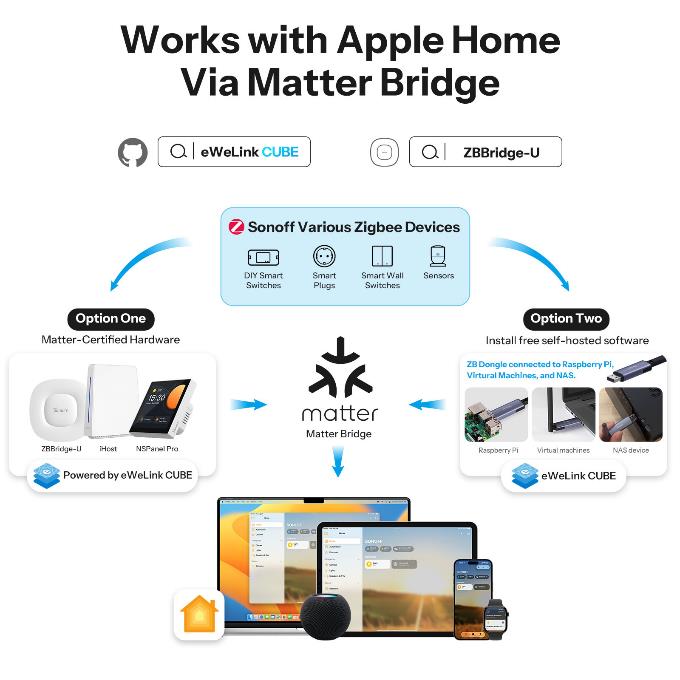
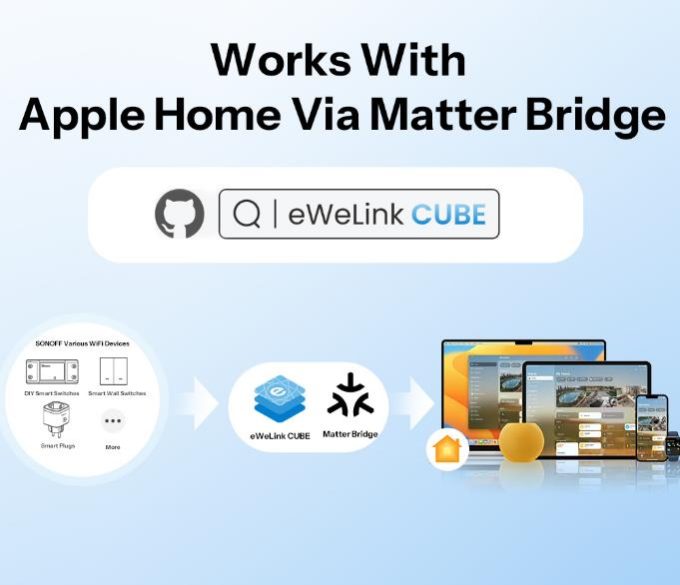
This option is especially suitable for users who prefer a flexible, software-based solution for integrating existing devices into the Apple Home ecosystem.
Learn More About eWeLink CUBE Integration
For detailed setup guides, supported devices, and configuration steps, please refer to the eWeLink CUBE documentation:
Option 2: Plug-and-Play Matter-Certified Hardware
.
Some SONOFF hardware products like ZBBridge-U, iHost and NSPanel Pro provide built-in Matter Bridge functionality, allowing non-Matter devices to be shared with Apple Home through a dedicated hub.
These solutions offer a straightforward, plug-and-play experience and are suitable for users who prefer hardware-based integration.
Troubleshooting
.
Can’t scan QR code?
Find the QR code in the product Quick Guide.
Use the numeric setup code (you can find it in the eWeLink App – Device Settings).
Ensure your iPhone is running iOS 16.3 or later.
Device not showing up in Home app?
Confirm the device is in pairing mode (LED blinking)
Make sure your device is connected to 2.4GHz Wi-Fi
Restart the device and Home app, then try again.
Apple Home says “Accessory Not Certified”?
Make sure the device is officially labeled “Matter” and the firmware is up to date.
FAQ
.
Q: Can I use SONOFF Matter devices with Apple Home without a HomePod or Apple TV?
A: No. To control Matter devices and enable automations in Apple Home, you need a Matter controller such as HomePod (mini or newer) or Apple TV 4K (2nd gen or newer).
Q: Is SONOFF MINIR4M compatible with iOS Shortcuts and Scenes?
A: Yes. Once added to Apple Home, you can use MINIR4M in any Shortcut, Scene, or automation routine.
Q: Can I use the MINIR4M with other platforms too?
A: Yes, if you enable multi-admin sharing, you can add the same device to platforms like Google Home, Home Assistant, or other Matter ecosystems.
Q: Can I control the device remotely outside my home?
A: Yes, but only if you have a Home Hub (HomePod or Apple TV) configured in your Apple Home. Without a hub, remote access is not available.
.
Home Assistant + SONOFF Matter Device Setup Guide
Introduction
.
SONOFF Matter-enabled devices allow you to build a seamless, local, and cross-platform smart home experience. While many Matter devices require Thread support, SONOFF offers Wi-Fi-based Matter devices that can connect directly to your network and be integrated with Home Assistant using the Matter integration—no Thread Border Router required.
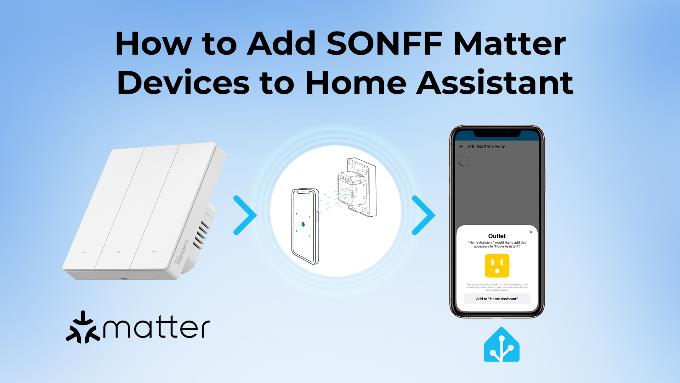
This guide walks you through connecting SONOFF’s Matter over Wi-Fi devices to Home Assistant using its built-in Matter protocol support.
—— Learn More about Matter
Preparation
.
Before you begin, make sure you have the following ready:
Setup Guide
.
Here I’ll show you the process of adding the SONOFF M5 Matter Smart Wall Switch to Home Assistant. Let’s follow the steps.
Step 1: Power on Your SONOFF Matter Device
.
Step 2: Add the Device in the Home Assistant App
.
In the dialog, select No, it’s new..
.
This starts the commissioning process, which may take a few minutes
.
If it is not convenient to scan the QR code on the device, you can also click Enable Pairing Mode in the Device Settings of the eWeLink app to generate a QR code or Copy code.
.
After adding, you can control and configure M5 Matter in Home Assistant. Start automating!
.
SONOFF Matter Device List
.
All SONOFF Matter devices listed below can be directly added to Home Assistant:
| Category | Product Name |
| DIY Smart Switch | Smart Roller Shutter Switch | MINI-RBS |
| Wi-Fi Smart Switch (Dry Contact Relay) | MINI-D | |
| MINI Extreme Wi-Fi Smart Switch | MINIR4M | |
| Smart Wall Switch | SwitchMan Smart Wall Switch | M5 Matter |
Stay tuned for more SONOFF Matter-compatible devices.
Troubleshooting
.
Device not found during pairing?
Make sure the device is in pairing mode (LED blinking rapidly).
Check that your Matter device is on the same 2.4GHz Wi-Fi network as Home Assistant.
Reboot your router and Home Assistant if necessary.
Matter Server not working?
Ensure the Matter add-on is started in Home Assistant.
Restart Home Assistant Core and try again.
QR code missing or damaged?
Find the QR code in the product Quick Guide.
Use the numeric setup code (you can find it in the App – Device Settings).
Device added but not responding?
Check IP address and Wi-Fi strength.
Restart the device or re-pair.
FAQ
.
Q: Do I need a Thread Border Router to use SONOFF Matter devices with Home Assistant?
A: No. SONOFF Matter devices like MINIR4M and M5 Matter connect via Wi-Fi, so no Thread is required.
Q: Is cloud required for Matter integration?
A: No. Once paired with Home Assistant, Matter operates locally without any cloud dependency.
Q: Can I control these devices with both Home Assistant and another platform?
A: Yes, Matter supports multi-admin. After adding to Home Assistant, you can also share the device with Apple Home, Google Home, etc. (as long as the device supports it).
Q: Can I add the same SONOFF Matter device to multiple controllers?
A: Yes. Multi-admin pairing allows a single Matter device to be shared with multiple platforms like Home Assistant, Alexa, or Google Home.
Q: Can I update the firmware of SONOFF Matter devices via Home Assistant?
A: No, you should update it in the eWeLink App.
.
.