

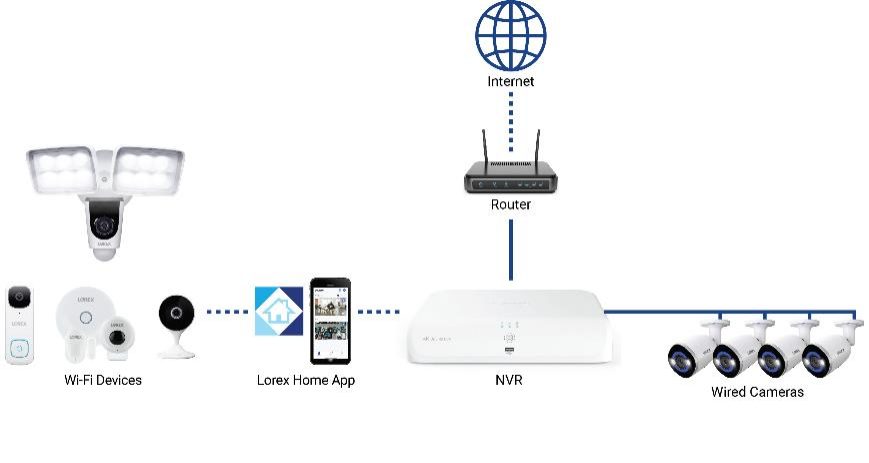
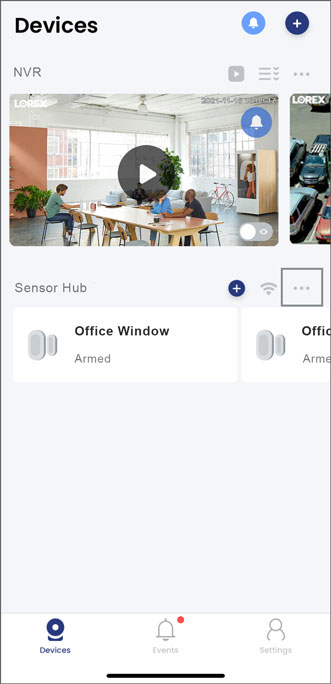
Lorex Fusion Troubleshooting FAQ, The Lorex Fusion Collection is a set of NVRs and wireless cameras that work together through the Lorex App. It works like this: Fusion Series NVRs, which connect to wired IP Cameras, can also incorporate two Wi-Fi cameras, allowing you to record them continuously to the NVRs Hard Drive.
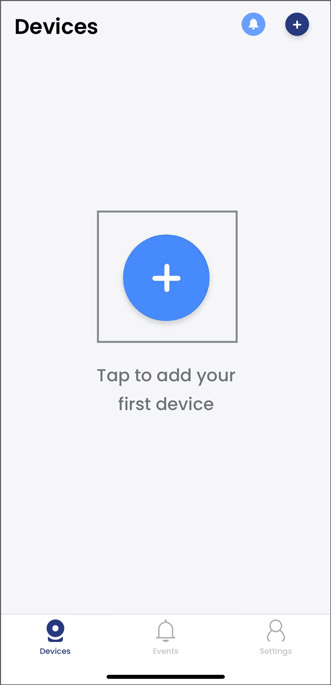
Lorex Fusion: Download the Lorex App
The following article provides instructions for downloading the Lorex App and connecting your Lorex Fusion Collection recorder to the app.
Prerequisite
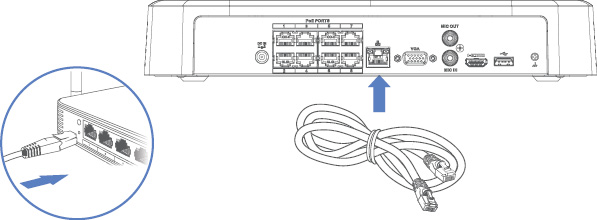
Before you start, your Fusion recorder must be powered on and connected to your router using the included Ethernet cable. For Basic System Setup instructions, refer to your Fusion recorder’s Quick Start Guide or Manual on the product support page. Visit help.lorextechnology.com and search your Fusion recorder’s model number.
Download the Lorex App

Once your Fusion recorder has connected to the Lorex App, complete the final Fusion steps by connecting your Fusion Wi-Fi cameras and accessories.
For setup instructions using the new local UI, please see the article Lorex Fusion: Connect Your Wi-Fi Cameras and Accessories (New Local UI).
For setup instructions using the previous local UI, please see the article Lorex Fusion: Connect Your Wi-Fi Cameras and Accessories.
Lorex Fusion: Frequently Asked Questions
The following frequently asked questions (FAQs) provide more information about your Lorex Fusion Collection. Where applicable, the FAQ includes links to articles where you may find more information.
Lorex Fusion Troubleshooting FAQ
What is Lorex Fusion?
Our Lorex Fusion recorders incorporate the newest (fusion) technology to connect both Lorex Wired and Fusion Wi-Fi Cameras, Doorbells, Floodlights, and Sensors to one system. Lorex Fusion Wi-Fi Cameras and Accessories can connect to one recorder for continuous 24/7 recording and local, secure storage (up to 10TB). Everything can be accessed from your Lorex App for easy control of all devices.
Why do I get an offline message and a blank screen for the (B463AJ) 2K battery doorbell’s channel on the Fusion recorder?
Being a battery-operated doorbell, it will always go to sleep after a period of inactivity to conserve battery life. Once the doorbell is correctly paired to your Fusion recorder, the offline message means the doorbell has gone to sleep but is still connected and can be awakened. When motion is detected, or when the call button is pressed, there will be live video from that channel. You can also manually wake up the doorbell through the Lorex app, by activating the liveview.
Can my Battery Video Doorbell record continuously?
To conserve battery life, Wi-Fi Battery Video Doorbells only record when motion is detected. They do not record continuously.
Which recorders are part of Fusion?
For a list of Lorex Fusion Recorders, please refer to the Product Compatibility Chart.
Can I connect all Lorex Wi-Fi Cameras and Accessories to my Fusion recorder?
Only Lorex Fusion Compatible Wi-Fi Cameras and Accessories can connect to Lorex Fusion Recorders.
Which Lorex Wi-Fi Cameras and Accessories are part of Fusion?
See the following list of Lorex Fusion Wi-Fi devices:
Should I update my Lorex Fusion recorder’s firmware?
It is recommended to update your system firmware to the latest version to ensure remote connectivity and to support newly added Fusion Wi-Fi devices.

Does my Lorex Fusion recorder require a network setup?
Yes, a network setup is required to connect Fusion Wi-Fi cameras and accessories to your Fusion recorder. Ensure you connect the included Ethernet cable to your recorder’s LAN port and your router.
Does it matter which router I use?
Yes, due to its strong signal, the dual-band router is suitable for high resolution video recording and for connectivity between devices. Ensure that your Fusion Wi-Fi cameras and accessories and your Fusion recorder are all connected to a dual-band router (2.4 GHz/5 GHz bands).
How many Lorex Fusion Wi-Fi Cameras and Accessories can I connect to my Fusion recorder?
This depends on your Fusion recorder and the number of Fusion Wi-Fi channels it comes with. For full technical specifications, refer to the Product Specifications on your recorder’s product support page. Visit help.lorextechnology.com and search your Fusion recorder’s model number.
What is a Fusion Wi-Fi channel?
A Fusion Wi-Fi channel is the channel you use to add a single Fusion Wi-Fi camera to your system. A 16-channel security system with 8 PoE ports/channels (for wired camera connection) and 8 Fusion Wi-Fi channels means that 8 Fusion Wi-Fi cameras and accessories can connect to the entire system.
Note: Fusion Wi-Fi channel’s are only available on certain Lorex Fusion recorders. For a list of Fusion recorders, see the Product Compatibility Chart.
How many Fusion Wi-Fi channels are on my Lorex Fusion Recorder?
The number of Fusion Wi-Fi channels varies per Fusion recorder. For full technical specifications, refer to the Product Specifications on your recorder’s product support page. Visit help.lorextechnology.com and search your Fusion recorder’s model number.
How do I setup my Lorex Fusion system?
Complete your Fusion setup in the following order:
After connecting your Fusion system, ensure you adjust your Fusion settings.
Are there Fusion setup tutorial videos?
For a video walk-through of the Fusion setup with the new local UI (N845, N846, N847, N864, D863, D881 Series), please watch here.
For a video walk-through of the Fusion setup with the previous local UI (N841, N842, N843, N844, N861, D862, D871 Series), please watch here.
How do I setup my Lorex Fusion recorder and wired cameras?
For Basic System Setup instructions, refer to your recorder’s Quick Start Guide or Series Manual on the product support page. Visit help.lorextechnology.com and search your Fusion recorder’s model number.
How do I connect my Lorex Fusion Wi-Fi camera or accessory to my Fusion recorder?
For full setup instructions, please click on the article corresponding with your model number.
Which password should I enter to connect my Lorex Fusion Wi-Fi camera or accessory to my Fusion recorder?
Enter the same password that you created in the Lorex App when setting up your Fusion Wi-Fi device.
What is continuous recording?
Once your Lorex Fusion Wi-Fi camera connects to your Fusion recorder, your camera’s recording settings are automatically set to continuous. This means that your Fusion Wi-Fi camera will record 24/7 or for the entire duration of the recording schedule onto your Fusion recorder’s hard drive. It is worth noting that recordings on the camera are limited due to the size of its onboard storage, while recordings on the recorder are extensive (3TB to 10TB). Continuous recording captures everything in the background, and you can playback to catch anything you missed.
Do all Lorex Fusion Wi-Fi cameras record continuously?
No, to conserve battery life, battery-operated video doorbells do not record continuously (24/7).
How do I set my Lorex Fusion Wi-Fi camera to continuous recording?
After Fusion setup, your Wi-Fi camera is automatically set to Continuous recording. To adjust your camera’s recording settings, login to your recorder and navigate to the devices menu. For instructions, please see the article Lorex Fusion: Adjust Settings.
Note: Battery-operated video doorbells do not record continuously (24/7). Being a battery-operated doorbell, it will always go to sleep after a period of inactivity to conserve battery life. Once the doorbell is correctly paired to your Fusion recorder, the offline message means the doorbell has gone to sleep but is still connected and can be awakened. When motion is detected, or when the call button is pressed, there will be live video from that channel. You can also manually wake up the doorbell through the Lorex app, by activating the liveview.
How come I’m receiving duplicate notifications in the Lorex App?
After completing the Fusion setup, your Wi-Fi camera or accessory is connected to the Lorex App twice – once as a single device and then a second time as a device connected to your recorder. To avoid receiving duplicate notifications from the same camera or accessory, you will need to Turn off Alerts for your Wi-Fi device connected to your recorder. For instructions, please see the article Lorex Fusion: Adjust Settings.
After Fusion setup, where is my Lorex Fusion Wi-Fi camera’s video footage being stored?
Your Lorex Fusion Wi-Fi camera saves recorded motion detection videos onto the local microSD card (not always included). Once you’ve connected your Fusion Wi-Fi camera to your Fusion recorder, your camera’s recording settings is automatically set to 24/7 Continuous recording, and all recorded video is stored on your recorder’s extensive hard drive (up to 10TB).
What features are supported in my Fusion recorder vs. the Lorex App?
Please see the following list of features supported in either your Fusion recorder and/or the Lorex App:
Can I use my web browser to access my Lorex Fusion Wi-Fi camera?
You can only access your camera on the Lorex App, recorder, or on the Lorex Cloud Client.
When modifying the password in the Lorex Cloud Client, which password should I enter?
Enter the password for your Wi-Fi camera or accessory created in the Lorex App during setup.
Where can I order the Lorex Fusion Collection?
To order, go to lorex.com.
Lorex Fusion: Troubleshooting
The following article provides some troubleshooting tips for setting up your Lorex Fusion Collection.
My Fusion Wi-Fi camera or accessory is not appearing in the device list.
My Fusion Wi-Fi camera or accessory is not connecting to my Fusion recorder.
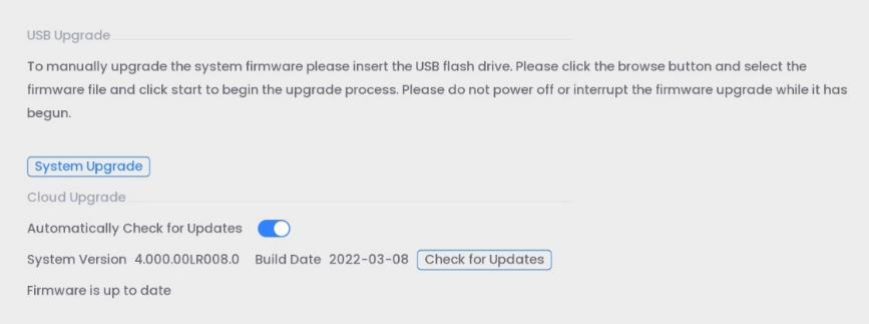 Previous Local UI: Login to your recorder and navigate to Main Menu > Information > Update/Reset > Update, then click Check for Updates. For instructions on updating your recorder’s firmware through USB, see the article How to manually upgrade the firmware of your recorder.
I don’t know the password for my Fusion Wi-Fi camera or accessory.
If you don’t know the password for your Fusion Wi-Fi camera or accessory, then you will need to reset the device and connect it to the Lorex App again.
To reset your Fusion Wi-Fi camera or accessory:
![]()
I’m receiving duplicate notifications in the Lorex App.
After completing the Fusion setup, your Wi-Fi camera or accessory is connected to the Lorex App twice – once as a single device and then a second time as a device connected to your recorder. To avoid receiving duplicate notifications from the same camera or accessory, you will need to Turn off Alerts for your Wi-Fi device connected to your recorder. For instructions, please see the article Lorex Fusion: Adjust Settings.
Lorex Fusion: Connect Your Wi-Fi Cameras and Accessories (N910 Series)
The following article provides instructions for connecting your Lorex Fusion Collection Wi-Fi Cameras and Accessories to your N910 Fusion recorder.
Our Lorex Fusion recorders incorporate the newest (fusion) technology to connect both wired and Wi-Fi cameras, doorbells, floodlights, and motion sensors to one system. All Fusion compatible Wi-Fi cameras and devices connect to one recorder for continuous 24/7 recording and private local storage. Access everything from the Lorex App for easy control of all devices.
Note: To conserve battery life, Wi-Fi Battery Video Doorbells only record when motion is detected. They do not record continuously.
For any connection issues, see the article Lorex Fusion: Troubleshooting.
Part One — Wired Setup

Setup your Fusion recorder and wired cameras. For Basic System Setup instructions, refer to your recorder’s Quick Start Guide or Manual on the product support page. Visit help.lorextechnology.com and search your Fusion recorder’s model number.
Important: Network setup is required for your system — use the included Ethernet cable to connect your recorder to your router.
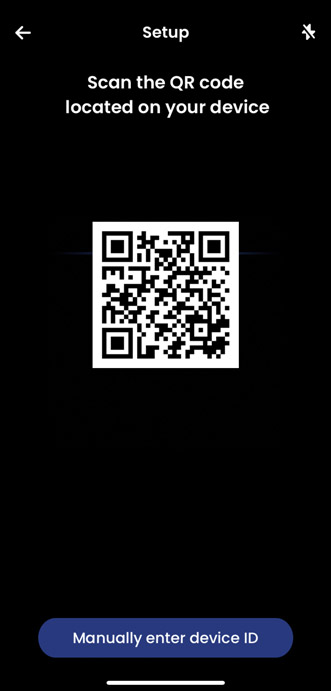
Part Two — Connecting your Lorex Fusion Wi-Fi Camera
Connect your Lorex Fusion Wi-Fi Camera to the app and then from your recorder scan your network to add it.
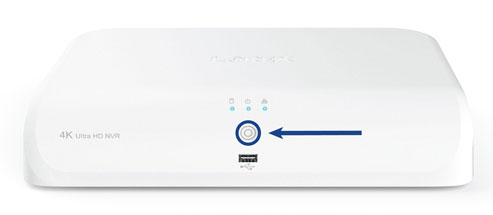
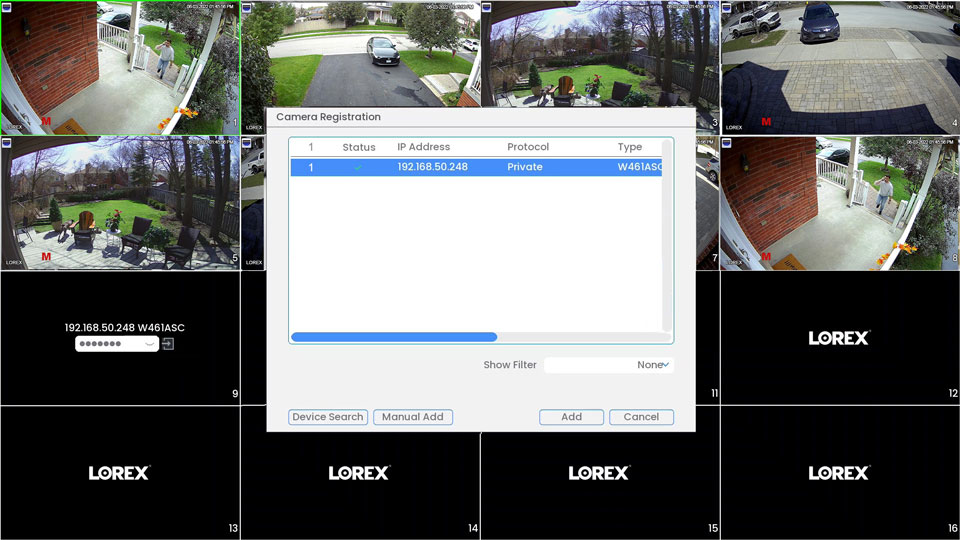
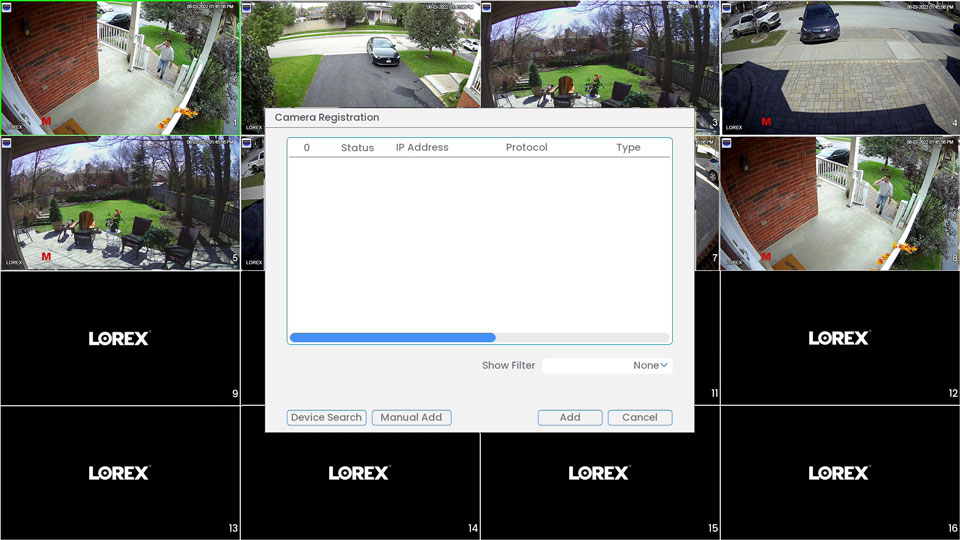
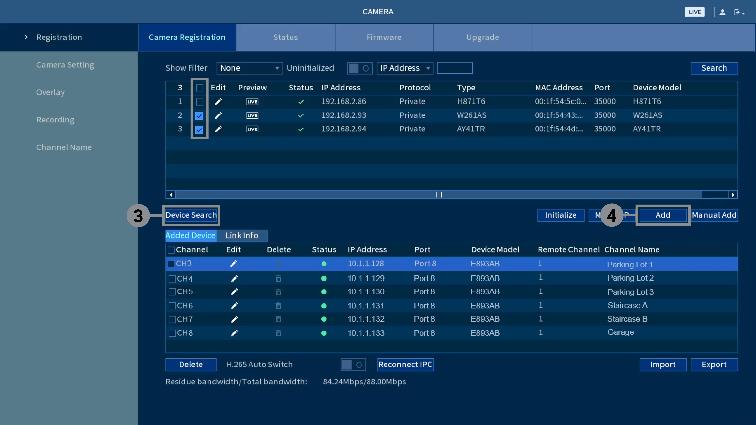
Option A — Connecting Your New Lorex Fusion Wi-Fi Camera to Your Recorder
Add compatible Lorex Fusion Wi-Fi Cameras and Accessories onto Fusion Wi-Fi channels on the recorder.
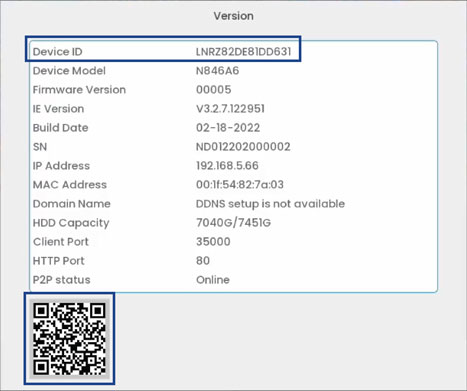
To connect your New Lorex Fusion Wi-Fi Camera to the recorder:
Note:
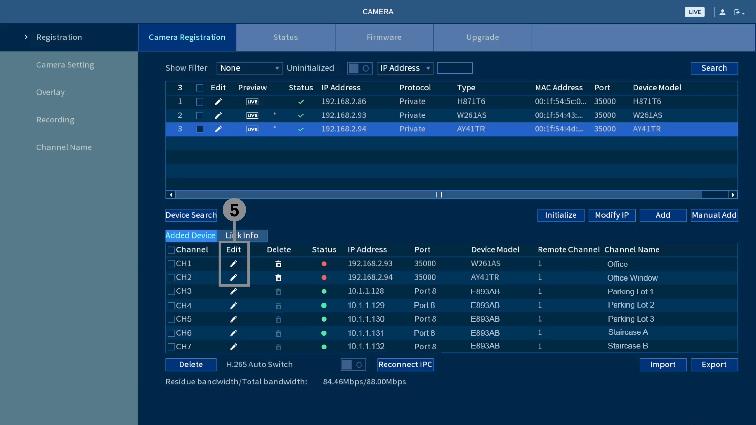
Option B — Connecting Your Existing Lorex Fusion Wi-Fi Camera to Your Recorder
Add compatible Lorex Fusion Wi-Fi cameras and accessories onto Fusion Wi-Fi channels on the recorder.
Note:
To enable remote viewing for the mobile app, you will need to:
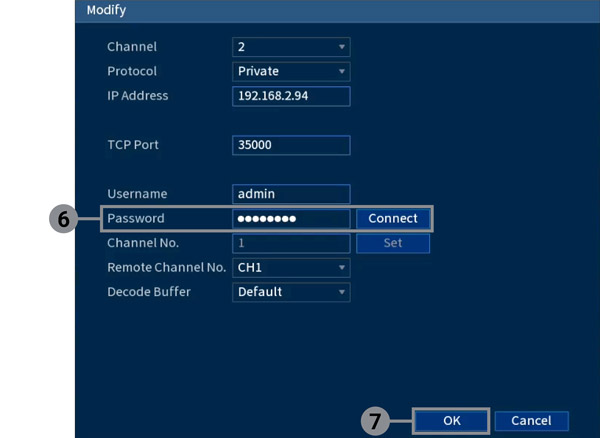
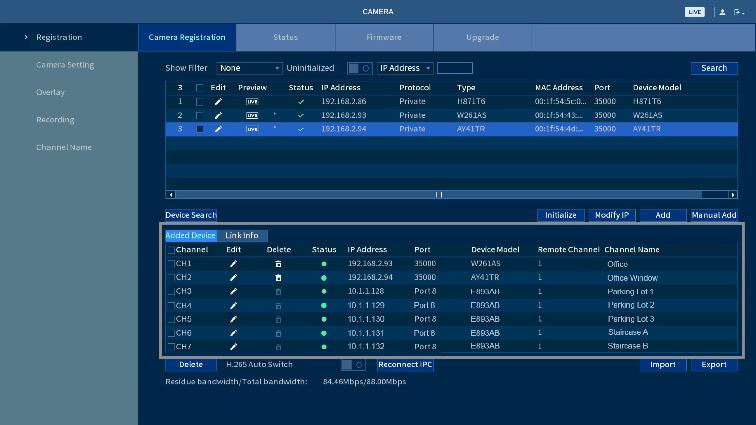
To connect your Existing Fusion Wi-Fi camera to the recorder:


Note: It may take a few minutes for your Lorex Fusion Wi-Fi Camera’s video feed to appear.
To turn off duplicate notifications, adjust your camera’s recording settings, or link motion sensors to cameras, see the article Lorex Fusion: Adjust Settings.
Lorex Fusion: Connect Your Wi-Fi Cameras and Accessories (N845, N846, N847, N864, D863, D881 Series)
The following article provides instructions for connecting your Lorex Fusion Collection Wi-Fi cameras and accessories to the Lorex App and to your Fusion recorder.
Note: These Fusion instructions apply to the new local UI only. For Fusion instructions that apply to the previous local UI, please see the article Lorex Fusion: Connect Your Wi-Fi Cameras and Accessories.
Before you start
Watch the Lorex Fusion setup tutorial video
For a video walk-through of the fusion setup, please watch here.
Connect your Fusion Wi-Fi cameras and accessories to the Lorex App
Follow the Lorex App steps to add your Lorex Fusion Wi-Fi cameras and accessories. Refer to your camera’s documentation at help.lorextechnology.com for detailed setup instructions. Search your camera’s model number to access the product support page.
Note:


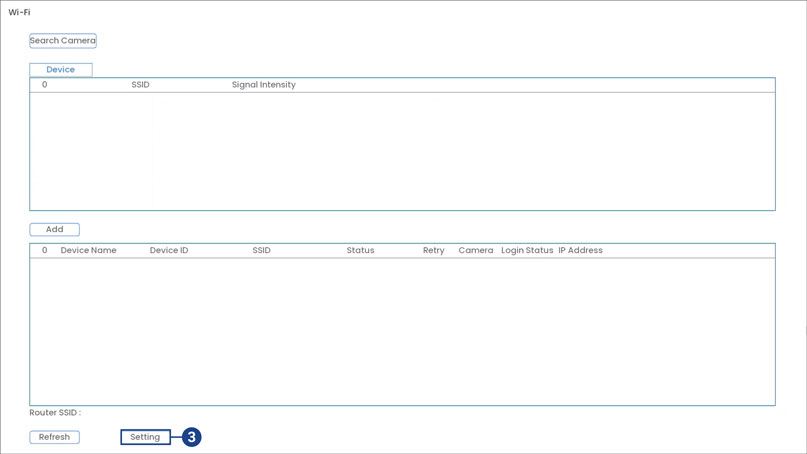
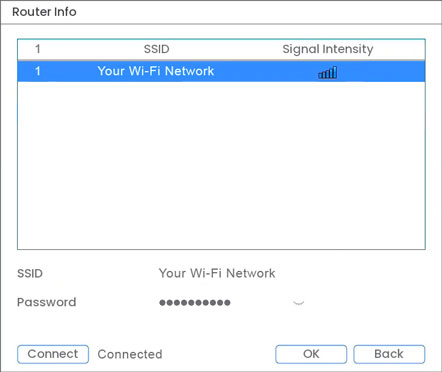
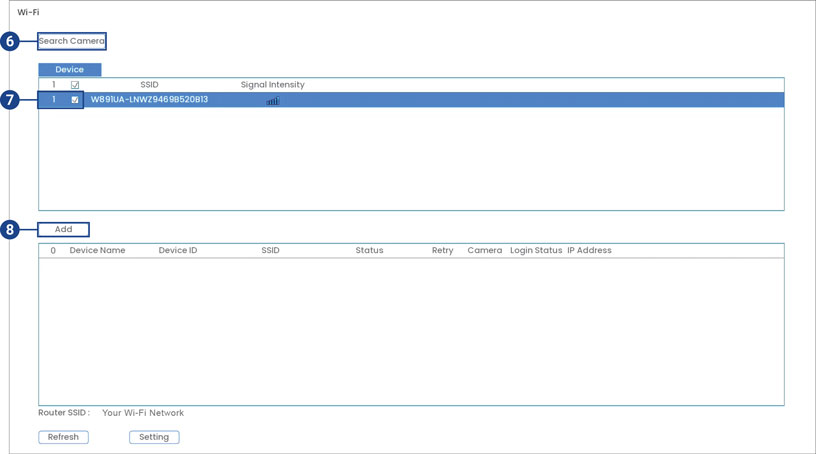
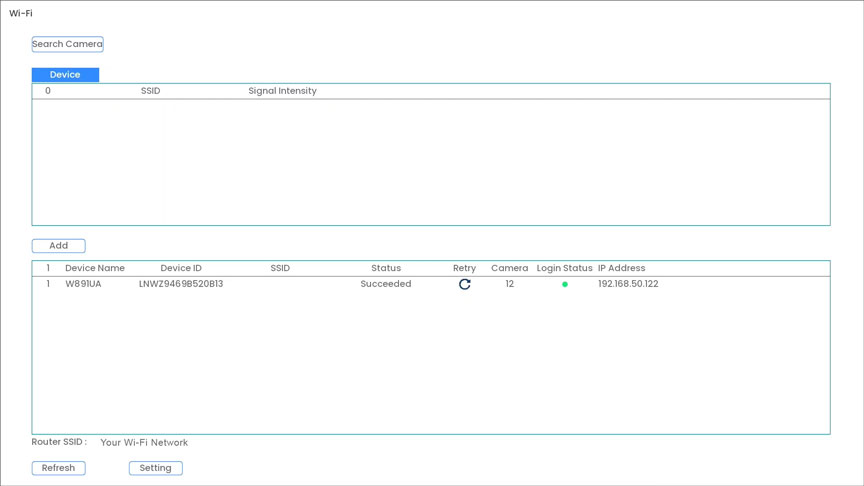
Connect your Fusion Wi-Fi cameras and accessories to your Fusion recorder
Note: You can add one Wi-Fi camera or accessory to one Fusion Wi-Fi channel. The number of Fusion Wi-Fi channels varies per Fusion recorder. For full technical specifications, refer to the Product Specifications on your recorder’s product support page. Visit help.lorextechnology.com and search your Fusion recorder’s model number.

Note: If your Lorex Fusion recorder and Fusion Wi-Fi camera share the same password, then the devices will automatically connect without entering the password.
After successfully connecting to your Fusion recorder, your Fusion Wi-Fi camera or accessory connection status turns green. For any connection issues, see the article Lorex Fusion: Troubleshooting.
To turn off duplicate notifications, adjust your camera’s recording settings, or link motion sensors to cameras, see the article Lorex Fusion: Adjust Settings.
Lorex Fusion: Connect Your Wi-Fi Cameras and Accessories (N841, N842, N843, N844, N861, D862, D871 Series)
The following article provides instructions for connecting your Lorex Fusion Collection Wi-Fi cameras and accessories to the Lorex App and to your Fusion recorder.
Note: These Fusion instructions apply to the previous local UI only. For Fusion instructions that apply to the new local UI, please see the article Lorex Fusion: Connect Your Wi-Fi Cameras and Accessories (New Local UI).
Before you start
Watch the Lorex Fusion setup tutorial video
For a video walk-through of the Fusion setup, please watch here.
Connect your Fusion Wi-Fi cameras and accessories to the Lorex App
Follow the Lorex App steps to add your Lorex Fusion Wi-Fi cameras and accessories. Refer to your camera’s documentation at help.lorextechnology.com for detailed setup instructions. Search your camera’s model number to access the product support page.
Note:


Connect your Fusion Wi-Fi cameras and accessories to your Fusion recorder
Note:
After successfully connecting to your Fusion recorder, your Fusion Wi-Fi camera or accessory connection status turns green. For any connection issues, see the article Lorex Fusion: Troubleshooting.
To turn off duplicate notifications, adjust your camera’s recording settings, or link motion sensors to cameras, see the article Lorex Fusion: Adjust Settings.
Lorex Fusion: Adjust Settings
The following article provides instructions for adjusting your Lorex Fusion Collection settings.
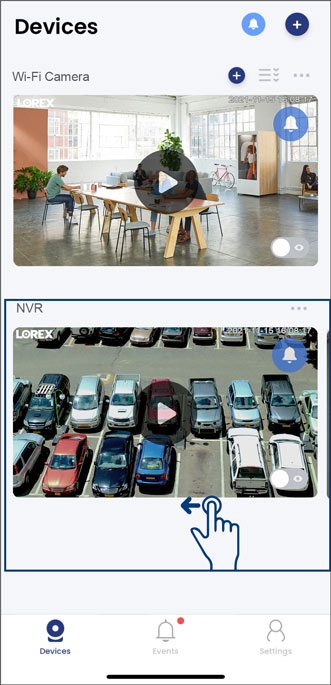
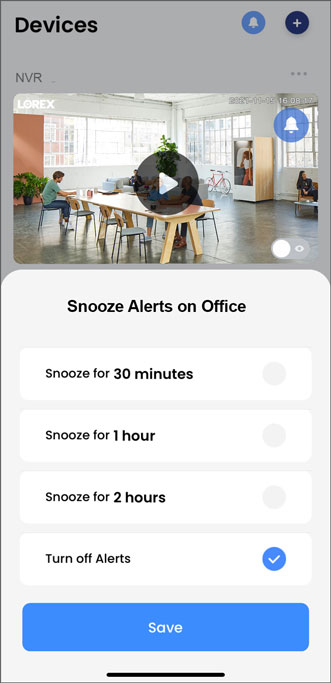
Turn off duplicate notifications
After completing the Fusion setup, your Wi-Fi camera or accessory is connected to the Lorex App twice – once as a single device and then a second time as a device connected to your recorder. To avoid receiving duplicate notifications from the same camera or accessory, you will need to Turn off Alerts for your Wi-Fi device connected to your recorder.
To turn off duplicate notifications:
 .
.
Adjust the recording settings for your Fusion Wi-Fi camera or accessory
After Fusion setup, your Lorex Fusion Wi-Fi camera’s recording settings will automatically adjust to Continuous, recording 24/7 directly to your recorder’s hard disk drive.
To adjust the recording settings (new local UI):
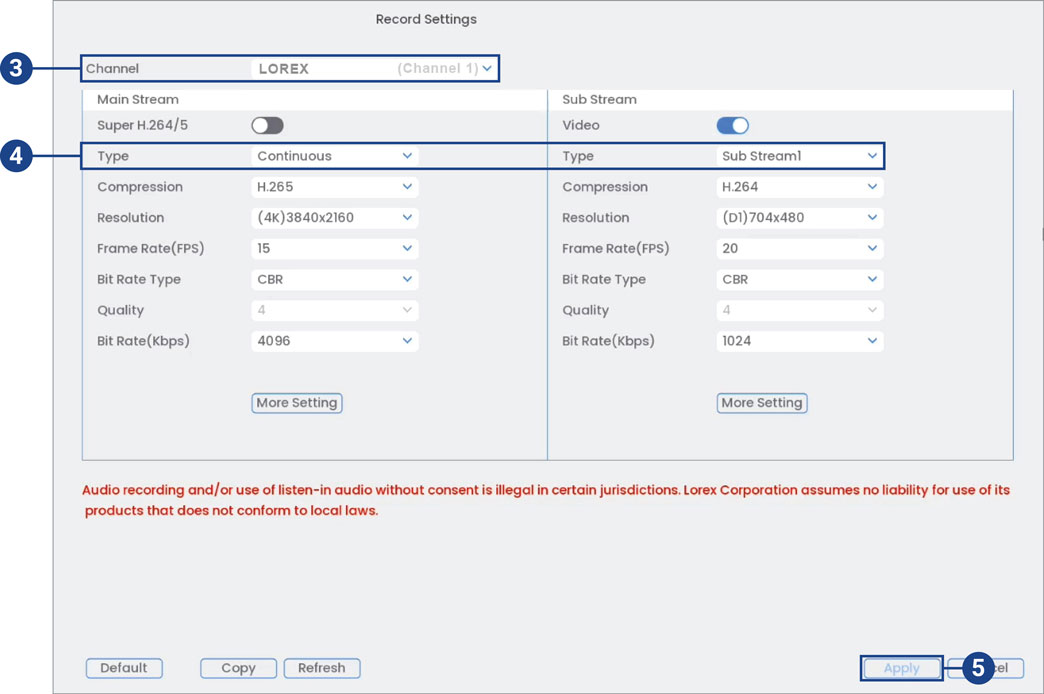
To adjust the recording settings using the previous local UI, navigate to Main Menu > CAMERA > Recording > Recording and follow the same steps as above.
Set the recording schedule for your Fusion Wi-Fi camera or accessory
You can set a custom recording schedule according to your needs. For example, you can set the system to record continuously during business hours and record on motion detection only outside of business hours.
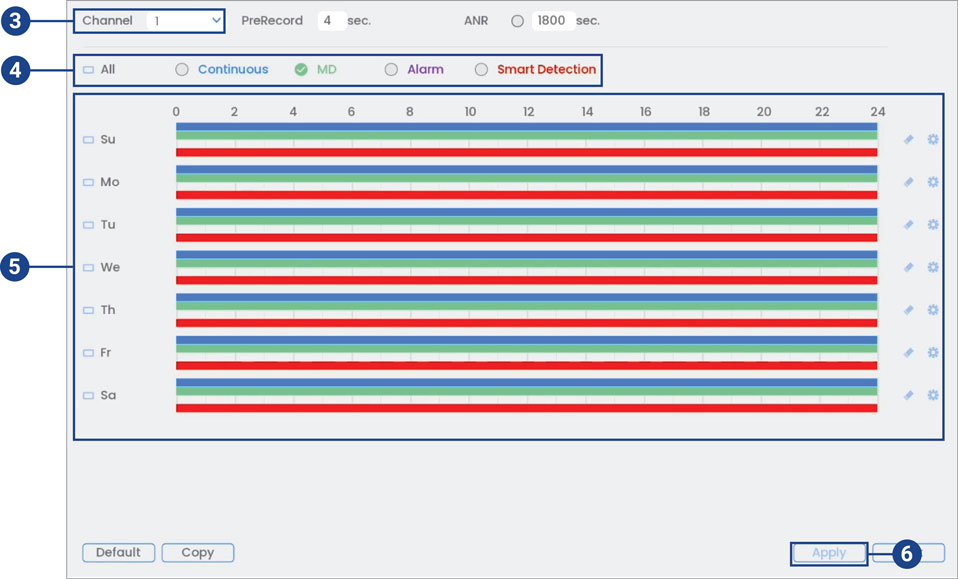
 .
.To set the recording schedule using the previous local UI, navigate to Main Menu > STORAGE > Schedule and follow the same steps as above.
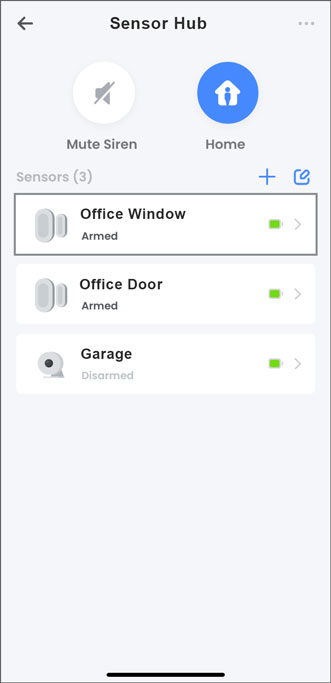
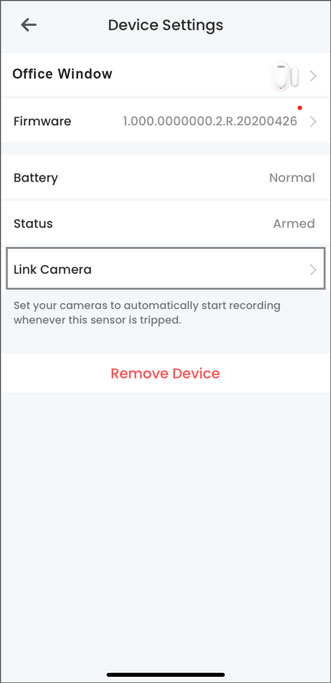
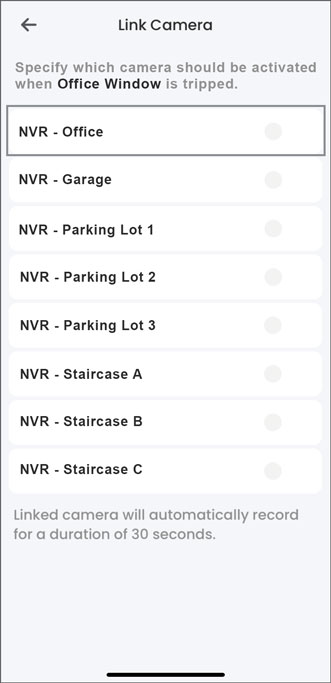
Link sensors to cameras
Once you’ve completed the Fusion setup, you can link motion and door/window sensors to any compatible camera, so that when the sensors are triggered the linked automatically cameras record.
To learn more about using your Lorex Fusion system, visit the Fusion page or refer to the Lorex Fusion: Frequently Asked Questions article.
Add Comment