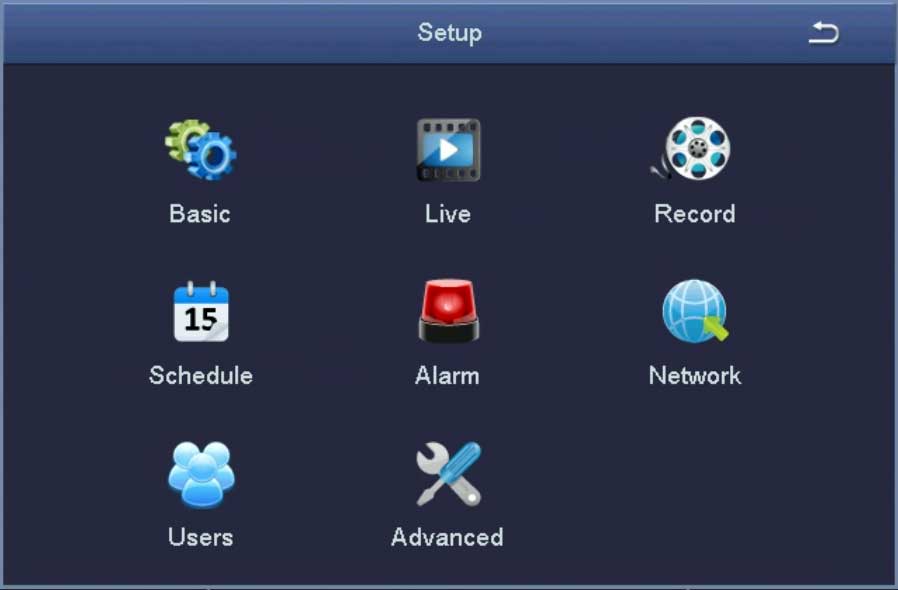
The Setup Menu contains several different options that will let you configure and customize your Zosi NVR.

The Setup Menu is where you will control most of the settings and recordings on your Zosi NVR system.
Basic – Customize personal settings, as well as date and time information.
Live – Contains settings to change display layouts and colour settings.
Record – Set up recording options for your channels.
Schedule – Determine the times your cameras will be active. The default is 24/7.
Alarm– Configure alarm settings for each channel.
Network– View settings related to the NVR’s network connection.
Users– Add and remove users.
Advanced Setup – Reset the NVR to factory default settings and backup your NVR settings to USB.
Zosi NVR Operation – Setup > Basic
The Setup > Basic menu allows you to control the basic functions of your NVR through the three tabs.
Basic > System
The Basic > System tab enables you to change the date and time settings for your Zosi NVR, along with other customization options.

Basic > System Menu
The Basic > System menu contains several settings to personalize your Zosi NVR.
The options, from top to bottom are as follows:
1. System Type: The name of your Zosi device. Left click to bring up the virtual keyboard to change the device name. Confirm and save changes by selecting the enter button.
2. System Number: The default is one, or you can manually enter a system number. Left click to bring up the virtual number pad to change the system number. Confirm and save changes by selecting the OK button.
3. Video Format: The option is set by the manufacturer depending on region. The default is locked to AUTO to ensure regional compatibility.
4. Password Check: Select whether you want to protect NVR access with a password. If selected you will need to input the password when accessing the NVR’s menus.
5. Show System Time: Select whether to display the current time on screen. The default is set to enable time display on screen.
6. Max Online Users: Select how many users can simultaneously access the NVR through the Mobile App. The default is set to 10.
7. Video Output: Select the output resolution. The NVR will default to outputting the highest resolution the NVR is capable of.
8. Language: Select the language you want the menus to be displayed in.
9. Logout After [Minutes]: Determine how long you want to stay logged into your Zosi NVR system before automatically logging out.
10. Setup Wizard: Select whether you want to Setup Wizard to appear the next time the NVR is powered on.
Basic > Date and Time
This menu will allow you to adjust the time settings for your Zosi NVR.

Basic Date and Time Menu
Date Format: Select between different formats to display the date. The options are:
-
- DD-MM-YY (default)
- YY-MM-DD
- MM-DD-YY
Time Format: Select between a 12 hour and 24 hour formats.
Time Zone: Select your current timezone.
Sync Time with NTP Server: Automatically update your system date and time with this feature. Check the box to sync the system time with an internet server. The default NTP server is provided by Windows.
NTP Server: Ensures you have an accurate system time. The default server is time.windows.com. It is recommended you use the default server. You can change the setting by left-clicking with the mouse, and inputting a new server using the virtual keyboard.
Update Now: Select this option after entering a new NTP Server to enable and save your changes.
System Date: Select the selected system date. To change the date click the calendar icon and select the accurate date from the calendar menu using the mouse.
System Time: Displays the current system time.
Basic > DST
Use this page to determine time changes caused by Daylight Savings time

- Enable: Select whether you want to enable the tracking of Daylight Savings Time on your system time.
- Time Offset [Hours]: Determine how many hours you want to offset the time. The default is 1.
- Mode: Select whether you want the DST settings to take effect on the week of Daylight Savings Time or on an exact date.
- From: Determine Daylight Savings starting time by clicking the calendar icon and selecting the appropriate date from the calendar menu.
- Until: Determine Daylight Savings end time by clicking the calendar icon and selecting the appropriate date from the calendar menu.
Zosi NVR Operation – Setup > Live
The Setup > Live menu allows you to customize settings related to the NVR’s Live View page.
Live > Live
Personalize the names of your cameras and change colour settings.
Please note: The above video was created for use with the Zosi DVR system, but also displays the same Live > Live menu used with certain models of Zosi NVRs.

1. Channel List: List of available channels.
2.Camera Name: Select the text field to name the channel using the virtual keyboard. Select “Enter” to confirm your changes.
3. Colour: Select Setting to alter the Brightness, Hue, Saturation, Contrast and Sharpness settings for the selected channel. Select ‘OK’ to confirm changes.

Colour Menu
Live > Main Monitor
Choose between several different display options for the Live View and Scan screens.

1. Display Mode: Select how many channels are displayed while using the Scan feature found in the Quick Menu. View up to 9 screens at once in a 3×3 formation.
2. Channel Selection: Select where each channel displays. Selecting different configurations using the Display Mode drop-down menu will give more options in the Channel Selection box.
3. Interval[S]: The amount of time in seconds before changing to another channel while using the Scan feature. The default is 5 seconds.
4: Groups: Use the blue arrows to the right and left of the Interval box to switch between each separate group of your Scan. Each group can be individually customized using the other options. You can see which group you’re on in the top right corner, or when you hover over one of the blue arrows.
Zosi NVR Operation – Setup > Record
The Setup > Record menu allows you to configure your recording settings for the NVR.
Record > Enable
Enable or disable recording for the channels on your NVR.

- Channel List: List of available channels.
- Record: Select which channels will record. Your Zosi NVR will default to enable video recording. Uncheck the box to disable recording for this channel.
To apply your selections to all channels check the box at the bottom of the screen under the section marked “All”.
Remember to “Apply” your settings before exiting the menu.
Record > Record Bitrate
Adjust the settings that determine the quality of recorded video

- Channel List: List of available channels.
- Resolution: Automatically displays the record resolution for each connected camera.
- FPS: Select how many frames-per-second will be recorded. Higher frames-per-second will take up more hard drive space but will provide a smoother picture.
- Encode: Select between CBR (Constant Bit Rate) and VBR (Variable Bit Rate) audio encoding. VBR is the default.
- Quality: Select between 7 levels of video quality. The default is “higher” quality. Lower settings will use less storage space while reducing image quality.
- Max Bitrate: Select the maximum bit rate to be transferred from the camera to the NVR. A higher bitrate will result in a higher quality recording at the expense of storage space.
To apply your selections to all channels check the box at the bottom of the screen under the section marked “All”.
Remember to “Apply” your settings before exiting the menu.
Record > Recycle Record
Select whether the NVR will automatically recycle old footage.

Recycle Record: Select to recycle the oldest video with the most recent video as hard drive space is needed. The default is set to overwrite the oldest material on the NVR. Be advised that turning this setting off will require manual management of any files on the NVR. If un-managed the NVR may fill up, and the NVR may not record.
Record > Snap
A Snap is a quick single-frame photograph of the image that appears on the Live View whenever motion is detected.

- Resolution: The resolution for Snap photographs is CIF resolution.
- Snap Time Interval [S]: Set how many seconds between each image. The default is 5 seconds.
- Snap Number: Select how many snaps to send with the email notification. The default is 1.
Zosi NVR Operation – Setup > Alarm Menu
Alarm Menu
This section contains different options to configure alerts and alarms for your NVR.

- Motion: Create motion grids, schedule your motion detection, and configure how the NVR reacts when motion is detected.
- Video Loss: Select notification options if a channel loses its video connection.
- Other Alarm: Configure notification options if other errors arise.
Zosi NVR Operation – Setup > Network
The Setup > Network menu allows you to configure settings related to internet connectivity.
Network > Network
The NVR will automatically detect these settings and configure for best results once you have connected an Ethernet cable to the back of the NVR.
It is strongly recommended that all settings in the Network panel remain unchanged, unless you know you have a PPPoE connection.

- If you connect to the internet using a PPPoE service provider: Please ensure the PPPoE selection box is enabled and that your username and password are accurately input into the proper fields. These are not your Zosi View login credentials. It might be a password used to connect to your router given to you by your internet provider or configured yourself. If you do not know if you use PPPoE, leave this setting unchecked.
- If you connect to the internet WITHOUT using a PPPoE service provider: Ensure the “Obtain an IP Address Automatically” option is checked.
- Select the “Test” button to determine if you are connected to the internet. If you are successfully connected, it will state “OK”. If you are unable to connect a message will appear stating that you “Cannot Connect To The Network”.
If you have an active firewall, you may need to configure your internet options further to allow your Zosi NVR to transmit video to your mobile device. If you are unsure how to configure firewall settings, consult your router’s user manual or speak directly to the manufacturer for more details.
If you are unable to connect on your local WiFi connection, please test the connection using your mobile device’s 4G or LTE network.
Depending on your mobile device, you may have restricted access to data. To check your data options, view the Background App Refresh option on Apple devices, and the Data Saver option in the Settings > Connections > Data Usage menu on Android devices. These options are designed to restrict your data usage in order to reduce data charges.
Network > Email
This section helps you set up email notifications. Information may be required from your internet and/or email service provider.

- SMTP Server: Please confirm SMTP server with your email service provider.
- Port: Your mail service port number. This is dependent on your email service provider.
- SSL Check: Provides a secure login. The default is set to enable SSL Check.
- Send Address: Your email account from your provider
- Password: The password used to access your email account.
- Receive Address: When an email alert is triggered, your Zosi NVR will send emails to these specified addresses. Please be advised that there is a maximum of three email addresses.
- Test: Use this button to test your settings, and ensure that email notification is set up.
How To Set Up Email Notifications
To set up email notifications you must have an email address. We recommend using a Gmail address, as they are free to set up.
- The SMTP Server for Google is: gmail.smtp.com / The SMTP Server for Yahoo is yahoo.smtp.com
- The Port is: 465 or 587
- The SSL Check is: Enabled
- The Send Address is your email address
- The Password is your email password
- Please input up to three emails that will receive alerts.
- Test your settings.
- If successful, you will see the following message:

Please be aware that a normal recording schedule will overwrite any motion detection scheduling, and that any e-mail alerts must be manually enabled.
If you do not want to input your personal email address, you can easily create a new email through Google, specifically to monitor your NVR alerts. Input the new email as the Send Address and your normal email into one of the Receive Address fields.
Network > Wireless Network
This section is used to modify the Wireless Network created by your NVR. It is strongly recommended to leave these settings on default to avoid disruption to your NVR system.

Network > DDNS
This section will allow you to configure the NVR’s DDNS network settings.

- DDNS – Enable or Disable the DDNS function on the NVR.
- DDNS Server – Select your preferred DDNS server.
- User Name – Input your DDNS username.
- Password – Input your DDNS password.
- Host Domain – Input the URL of the DDNS Provider.
- DDNS Update [Hours] – Select how often the NVR updates the DDNS.
- Test – Select the Test option to test your DDNS Settings.
- UPNP – Enable or Disable Universal Plug and Play.
Zosi NVR Operation – Setup > Users
The User Management screen displays an overview of the active users and their current permission levels. From this menu add users, delete users, or change your current password.

- Add: Adds a user. When adding a user specify their user name, password and user permission level. User permissions include Normal and Advanced users. Advanced users have all permissions enabled by default. Normal users can have their permissions restricted on the Authority tab. It is recommended that there is only one Advanced user on the system.
- Delete: Delete a user from the NVR.
- Change Password: Change the password of the selected user. First, input the old password before changing to the new password.
If it is your first time setting the system up, or you haven’t set a password yet, the “Old Password” field will be left empty.
Adding a User

- User Name: Input the user name for the new user using the virtual keyboard
- Password: Input the password used to log in.
- Confirm Password: Confirm the password used to log in.
- User Type: Select the user permission level.
- Binding PC Mac Address: Select whether to limit access for this user to a specific PC’s MAC address.
If checked the user will only be able to access from a predetermined computer.
Adding A User > Authority

- Select between enabling and disabling user permissions on this menu. Enable access by ensuring a check mark appears in the relevant box. For each heading select whether you want the user to have access to the designated menus or channels. All permissions set are unique to the specific user. New permissions will need to be created for each new user.
Only an “Advanced“ account is able set permissions for other users
Zosi NVR Operation – Advanced Setup Menu
The Advanced Setup Menu will allow you to reset the NVR back to factory default settings, or Import/Export the configurations from one NVR to another.

- Reset – Select this option to reset the NVR back to factory default settings. This will not delete any recordings, but will erase any recording schedules, alarms, or personalized settings.
- Import/Export – Select this option to import configuration settings from another NVR, or to create a configuration file detailing the settings for this NVR.
- Exit – Return to previous screen
Advanced Setup > Reset
Select this option to reset the NVR back to factory default settings. This will not delete recordings, but will remove any recording schedules, alarms, or personalized settings.

- Select “OK” to reset the NVR back to factory default settings.
Advanced Setup > Import/Export
Import configuration settings from another Zosi NVR, or export the configuration settings from this NVR to your USB Flash Drive.

- New – Create a new folder
- Delete – Delete the selected file
- Import – Import the selected .config file. The NVR will reboot with the new configuration loaded. Any previous options will be replaced by the new configuration.
- Export – Create a .config file with the same configuration settings created on this NVR. Any schedules, alarms, or personalized settings will be copied.
- Exit – Return to the previous screen.




It really worked, I appreciate it!
I am having trouble with the installation
hi how can i do
my recorder is not working
hi how can i do
can you help me please
It was a great sharing
hello nice sharing thanks
please provide support for me i leave my email address
It really worked, I appreciate it!
please provide support for me i leave my email address
Can you write your contact number?
I can’t upload
please provide support for me i leave my email address
I really love you
I sent an e-mail from the communication channel. Can you help?
problem not solved thanks
I can’t upload
It really worked, I appreciate it!
I really love you
I am having trouble with the installation
It was a great sharing
hi how can i do
my recorder is not working
problem not solved thanks
my recorder is not working
I really love you
Can you write your contact number?
problem not solved thanks
It really worked, I appreciate it!
can you help me please
I am having trouble with the installation
It was a great sharing
Can you write your contact number?