UNV NVR Cloud Upgrading Guide, Periodically updating your NVR and camera’s firmware is a great way to ensure your CCTV system is running smoothly and efficiently. This tutorial will guide you through the steps to cloud update your UNV NVR from the EZView mobile application.
Cloud Updating Your UNV NVR from the EZView Mobile App
Overview
Periodically updating your NVR and camera’s firmware is a great way to ensure your CCTV system is running smoothly and efficiently. This tutorial will guide you through the steps to cloud update your UNV NVR from the EZView mobile application.
Prerequisites
This tutorial assumes you have already initialized your NVR and added it to your EZView application. If you have not done so, please CLICK HERE for our tutorial section to learn how to do so.
Step 1
Open the EZView app on your phone. At the Live View screen, click on the three horizontal lines on the top left-hand side of your screen. This will open your main menu.
You will need to access your device list. To do so, click the word “Devices” in your main menu.
Device menu open, you will see a list with all your devices. When you have found the device you wish to upgrade, tap the three horizontal dots on the right-hand side of the NVR’s name. This will open the Device Menu for your NVR.
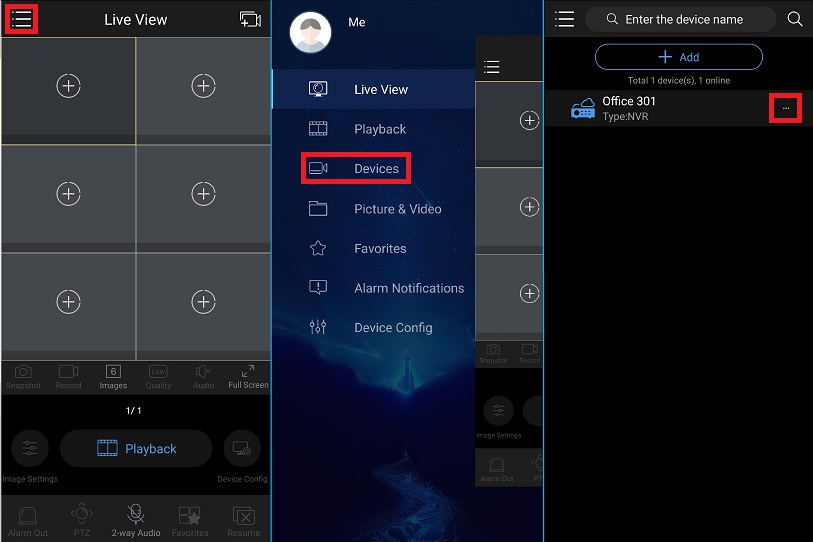
PLEASE NOTE: Typically, when there is a cloud update available for your NVR or cameras, you will see a small red dot next to the name of the NVR. In this case, no units needed a firmware update, so that red dot does not appear on the pictures. If you see a small red dot by your NVR, that means it is ready for an upgrade.
Step 2
After opening the device menu, click on the words “P2P Upgrade” to proceed to the Cloud Upgrade screen.
In the Cloud Upgrade screen, you will see which devices need a firmware update. It may be cameras, your NVR or both. In the figure below, the unit says it has the latest firmware. However your screen will show a red dot with an upgrade available. To start this upgrade, select your cameras and click “Start Upgrade (#)” at the bottom of the screen.
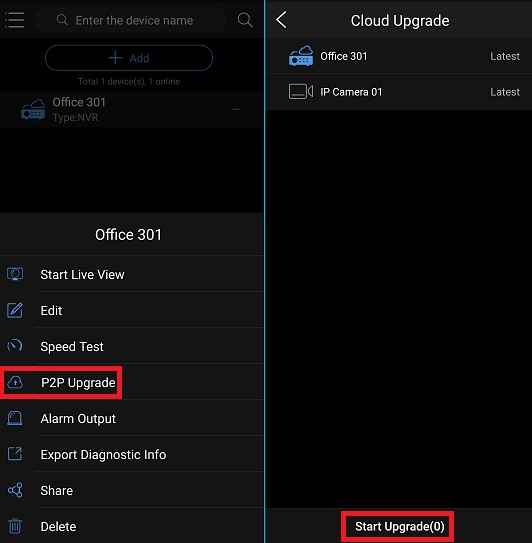
PLEASE NOTE: Your phone may ask you for confirmation to upgrade and restart your devices. You will click “Yes/Accept/Continue”, whichever you have on your screen. This will begin the process of upgrading your devices. Please keep in mind that your cameras and recorder will reboot and go offline for a short time. After starting the upgrade, it is recommended that you close the app for fifteen minutes to allow for the upgrade to take place.
UNV NVR Cloud Upgrading Guide
Read More :
Cloud Upgrading the Firmware of Your UNV Cameras from Your UNV NVR
Overview
Updating your camera firmware ensures that you have the latest and more functional cameras you possibly can. This tutorial will guide you through the steps needed to upgrade your cameras via the cloud from your UNV NVR.
Prerequisites
This tutorial assumes you have already initialized your NVR and connected it to the internet. If you have not yet done so, please CLICK HERE for our tutorial section to learn how to do so.
Step 1
Right click anywhere on the Live View screen. A small pop-up menu will appear. At the top, click “Menu.”

Step 2
Sign into the admin account using the username of ‘admin’ and the password you created while initializing the device.
Step 3
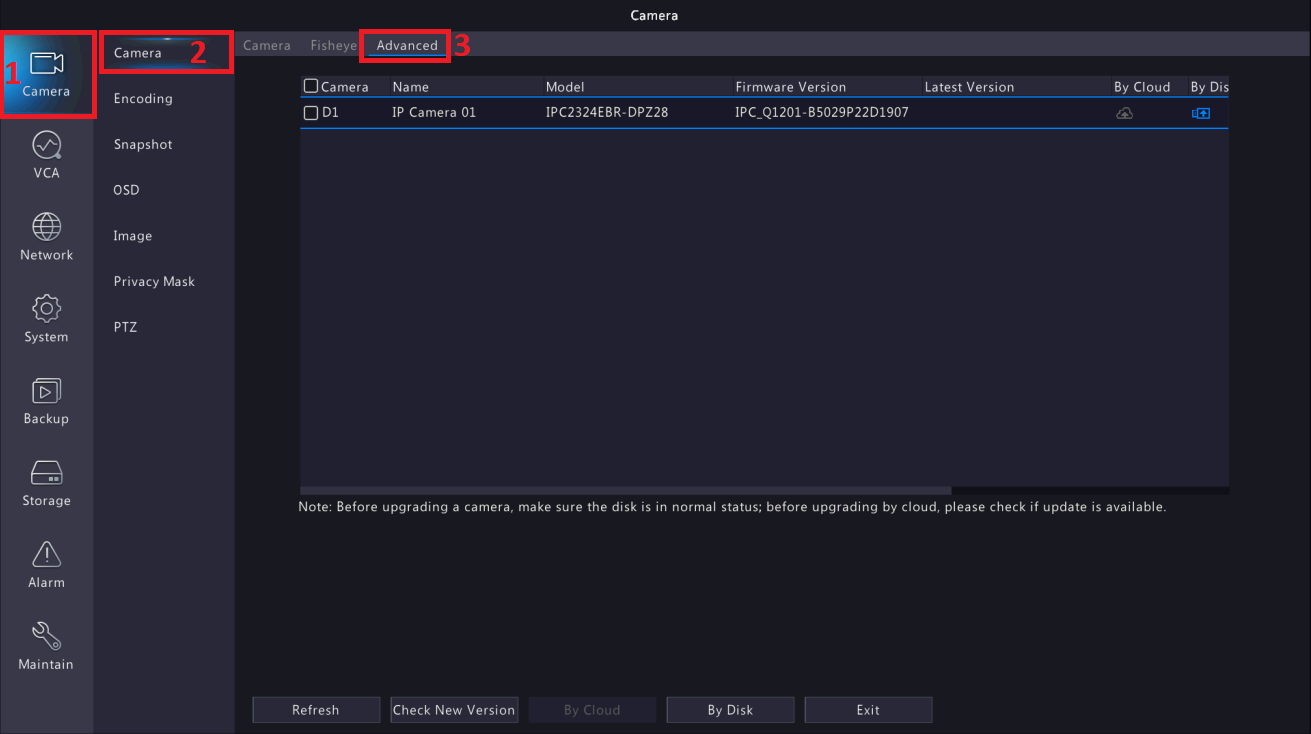
Once you have signed in, you will be greeted with the main menu of the NVR. On the left-hand side, click “Camera”.
In the submenu, click “Camera”.
At the top of the screen, you will have three tabs. Click the “Advanced” tab.
Step 4
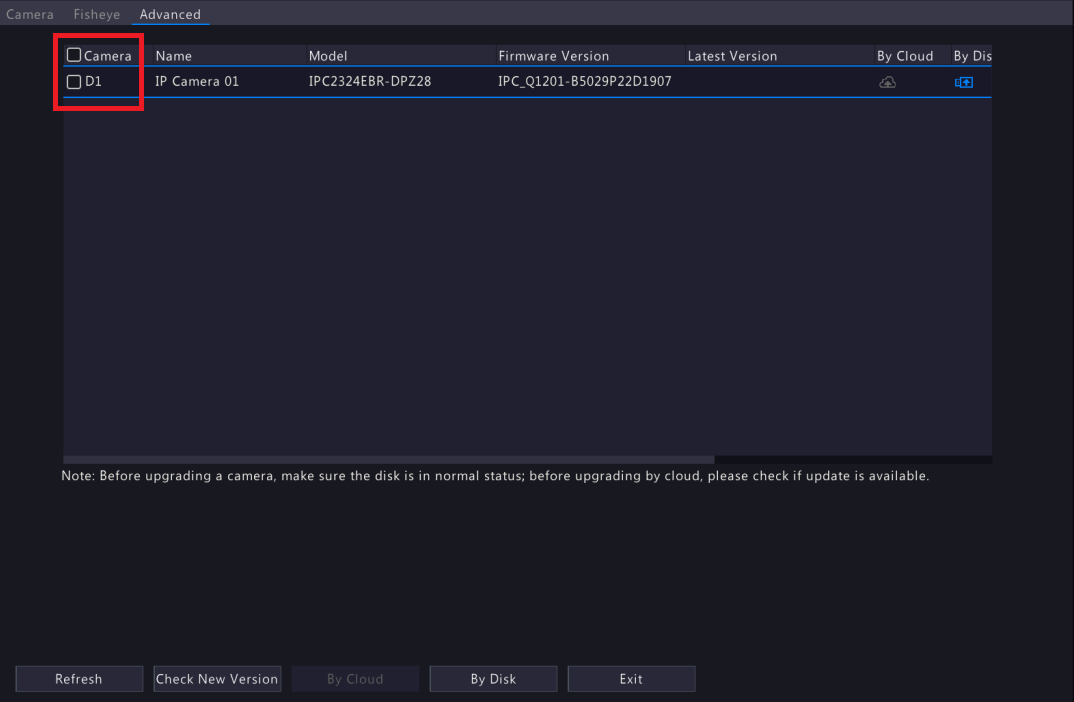
Select the cameras you want to update by clicking the checkbox next to the camera’s name. You may also select the top checkbox to select all cameras.
Step 5
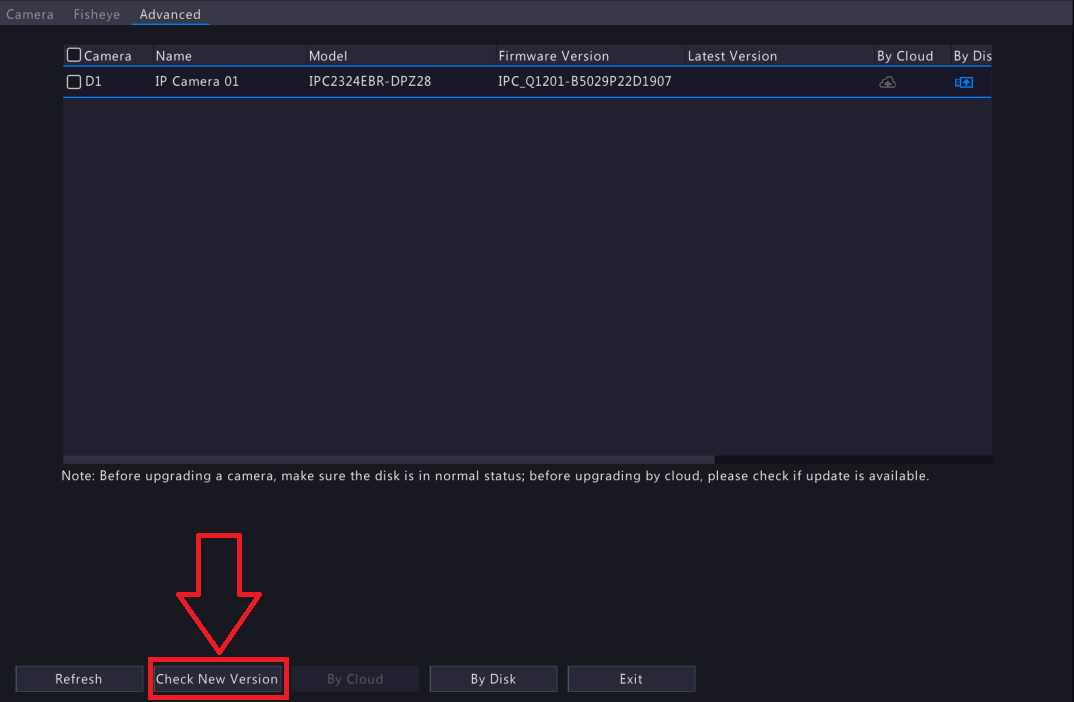
Once you have selected your cameras, click ‘Chew New Version” at the bottom of the screen.
Step 6
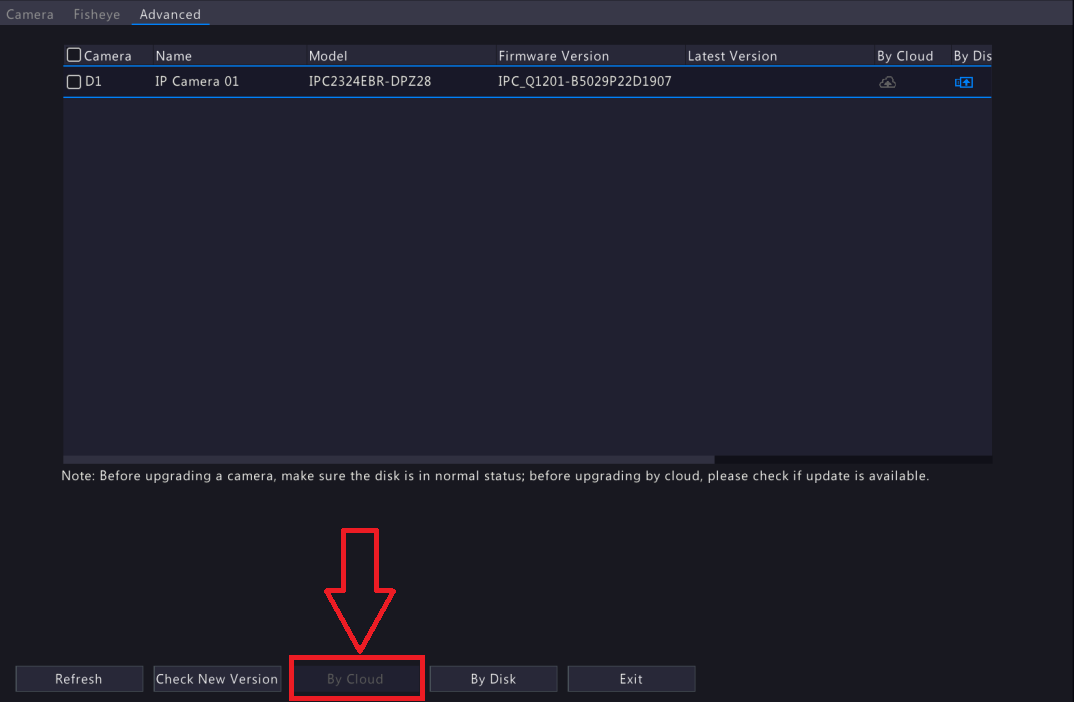
If there are upgrades available, the “By Cloud” button will light up. Click the ‘By Cloud” button to begin your upgrade.
Step 7
You will be prompted to confirm the upgrade to your cameras. Please be aware that your cameras will need to reboot in order to complete their upgrade. Please allow for up to 15 minutes for your cameras to upgrade and reboot.
Cloud Upgrading Your UNV NVR/Cameras from the Web
Overview
Keeping your UNV NVR and cameras up to date is a great way to ensure that your unit runs smoothly and efficiently. This tutorial will guide you through the steps needed to cloud upgrade your UNV NVR and cameras.
Prerequisites
This tutorial assumes you have already initialized your NVR and added it to your EZCloud account. If you have not done so already, please CLICK HERE to visit our tutorial section on how to do so.
Step 1
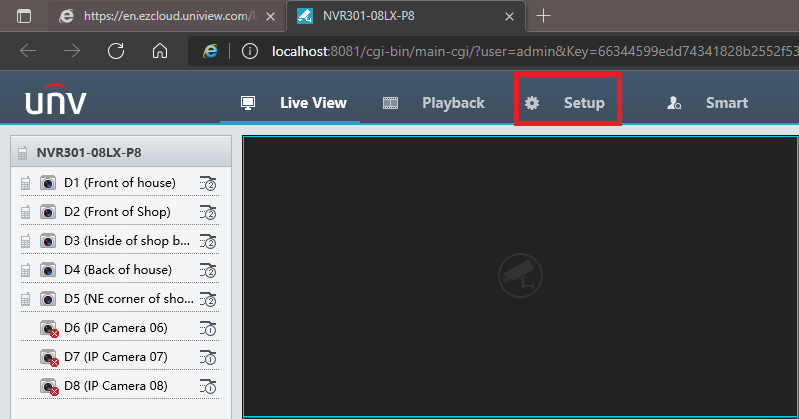
Navigate to your NVR on your web page. You can do this by accessing it via the EZCloud or by the local IP address. If you are unsure how to do this, CLICK HERE for a tutorial on how to do so. Please keep in mind that if you access your NVR via the local IP address, it will ask you to log in. This log in is the same username and password you created for your NVR directly.
As you can see in the figure below, this particular NVR was accessed via the EZCloud, meaning no password was needed to log into the unit.
Once you have reached the Live View screen, click on the word “Setup” at the top of the screen.
Step 2
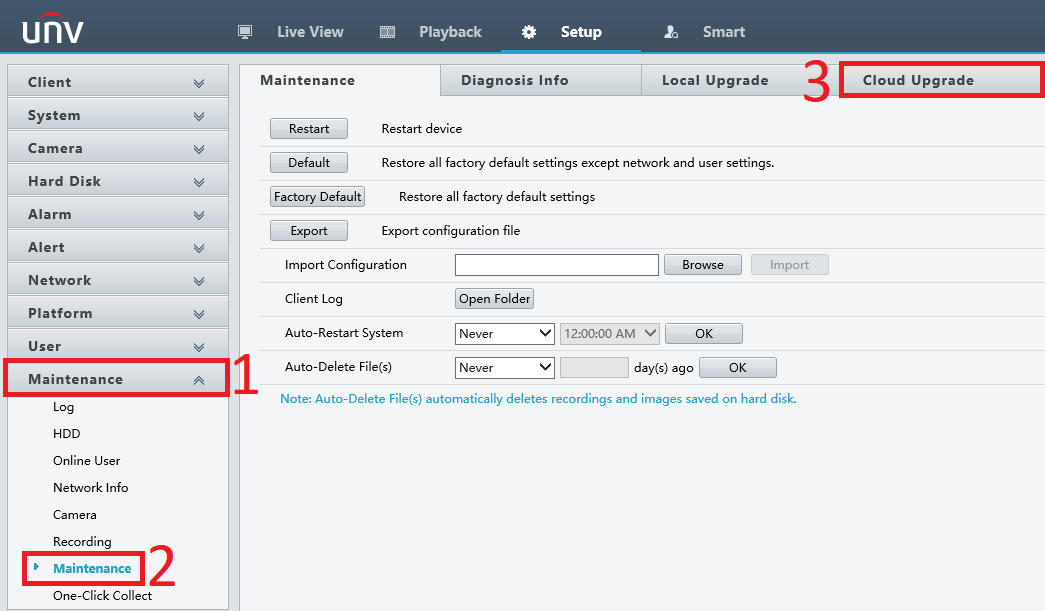
Once you’re in the setup menu, you will see several options on the left side of your screen. Please click on the “Maintenance” menu to proceed.
Once you have clicked on the Maintenance menu, you will see a small submenu appear. Click on the “Maintenance” submenu to proceed.
Once you have entered the Maintenance submenu, look at the top of the menu. You will see four tabs available, the last one being “Cloud Upgrade”. Click there to proceed.
PLEASE NOTE: Some units with older firmware will not have the “Cloud Upgrade” tab. However, you can still cloud upgrade your firmware. Instead of looking for the tab at the top, look in the maintenance submenu and find a button that says “Check” or “By Cloud”, depending on what firmware you have. This will allow you to upgrade your NVR.
Step 3 (Updating your NVR Firmware)
Once in the Cloud Upgrade tab, you will see two options.
Device Type: This is where you will pick which piece of hardware you want to upgrade. By default, this is set to NVR, meaning you will be upgrading the firmware on your NVR. For the IP screen, skip to Step 5.
Cloud Upgrade: This is where you will check for Updates. To do so, click the “Check for Update” button.

Step 4
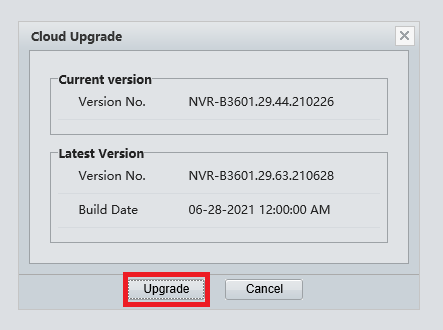
If there is a firmware upgrade available for your NVR, you will be prompted with the screen below. To upgrade your NVR’s firmware to the latest version, click “Upgrade”.
Step 5 (Updating your IPC Firmware)
To upgrade your IP Cameras, first select “IPC” for the “Device Type” Row.
Once you have selected “IPC”, click “Check for Update” in the Cloud Upgrade Row.
If your cameras have an upgrade available to them, you will see this reflected in the “Firmware Version/Latest Version” box. As you can see in the figure below, out of the three available cameras, only one has an upgrade, while the others are up to date.
On the left-hand side of your screen, make sure to select all the checkboxes for your cameras. This will ensure that any cameras that need an upgrade will be queued for one.
There are two options for finalizing the upgrade. You may click “Batch Upgrade” in the Cloud Upgrade Row, or you may click the Cloud Upgrade icon in the “Cloud Upgrade” column on the bottom right of the below figure. Typically, if you have multiple cameras with available upgrades, it’s easier to click “Batch Upgrade”.

Step 6
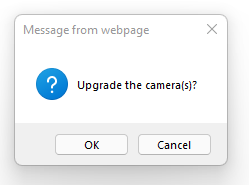
Once you are sure that all available cameras are selected for an upgrade and have clicked the upgrade button, you will see a message pop up on your screen. This message is to confirm that you wish to upgrade your IP Cameras. Click “Okay” to proceed.
PLEASE NOTE: After beginning the upgrade for your cameras, they will need time to update and restart. We recommend leaving the system alone for fifteen minutes to allow for all upgrades to take place and for the devices to restart.
Updating the Firmware of your UNV NVR via the Cloud
Overview
Updating the firmware for your UNV NVR is important to maintain a functional and healthy system. This tutorial will guide you through updating the firmware of your NVR via the cloud.
Prerequisites
This tutorial assumes you have already initialized your NVR as well as connected it to the internet. If you have not done so, please CLICK HERE for our tutorial section to learn how to do so.
Step 1
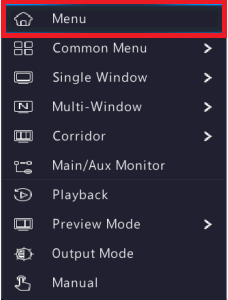
Right click anywhere on the Live View screen. A small pop-up menu will appear. At the top, click “Menu.”
Step 2
Sign into the admin account using the username of ‘admin’ and the password you created while initializing the device.
Step 3
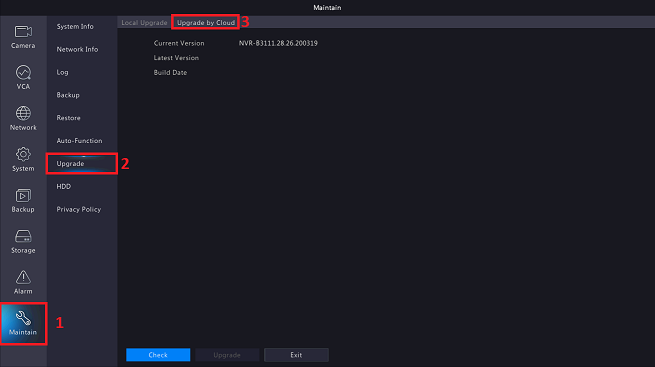
Once you have signed in, you will be greeted with the main menu of the NVR. On the left-hand side, click “Maintain”.
In the submenu, click “Upgrade”.
At the top of the Upgrade screen, click “Upgrade by Cloud”.
Step 4
At the bottom of the screen, you will see a blue “Check” button. Click the “Check” button to see if there is a newer firmware version available.
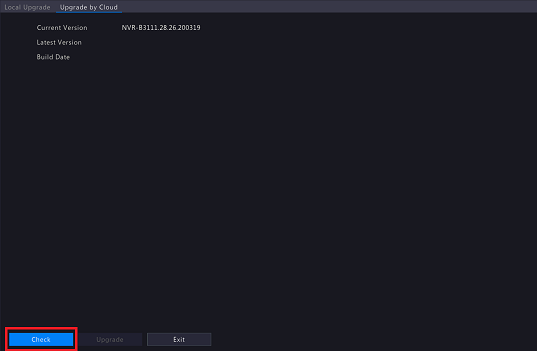
Step 5
If an update is available, you will see the new version at the top in the “Latest Version” row. To upgrade your NVR, click the “Upgrade” button on the bottom of the screen.
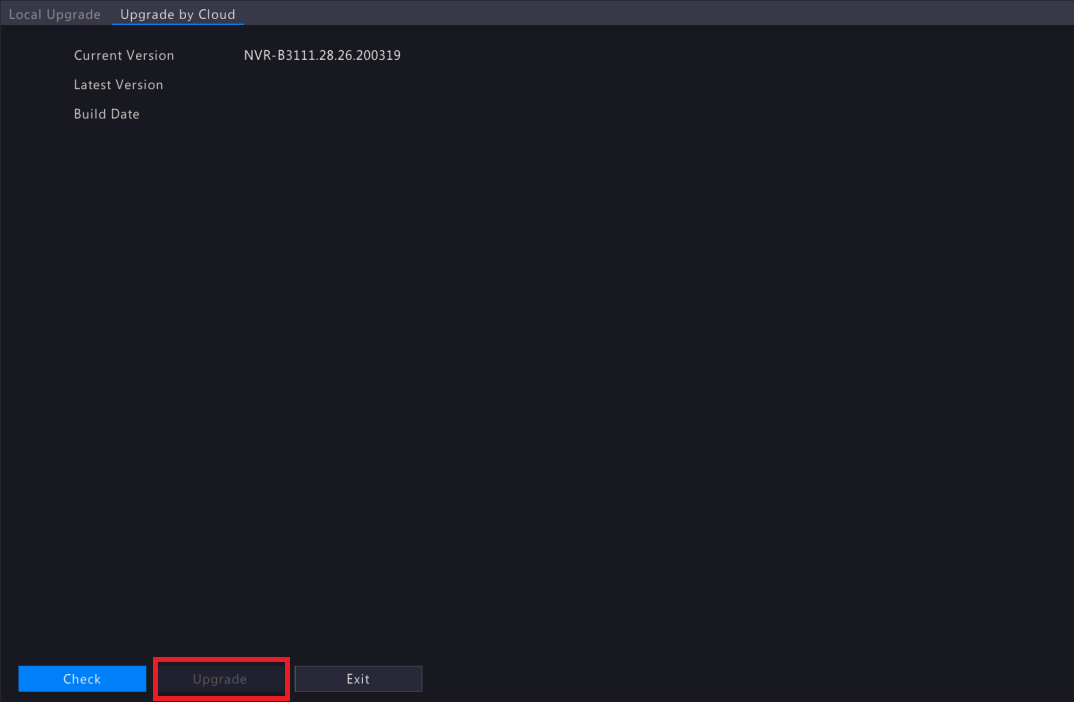
Please Note: You will be greeted with a popup box that will ask for confirmation. When upgrading your NVR, your NVR will need to reboot. Once clicking “OK”, allow up to ten minutes for your NVR to upgrade and reboot.






Add Comment