Dashcam Troubleshooting Guide Boot – Shutdown – Power, Dashcam Boot – Shutdown – Power Troubleshooting Guide, Choosing the right power accessory and troubleshooting power issues is essential for your BlackVue dashcam’s reliable performance. This guide covers compatibility for common accessories—including cigarette lighter plugs and hardwire kits—as well as proven solutions for typical problems.
Compatibility and troubleshooting for power accessories (cigarette plug, hardwire kit, etc.)
Choosing the right power accessory and troubleshooting power issues is essential for your BlackVue dashcam’s reliable performance. This guide covers compatibility for common accessories—including cigarette lighter plugs and hardwire kits—as well as proven solutions for typical problems.
Dashcam Troubleshooting Guide Boot – Shutdown – Power
1. Power accessory compatibility
A. Cigarette lighter power cables
• Plug-and-play installation:
Connects to the vehicle’s standard 12V power outlet (cigarette lighter socket).
• Compatible BlackVue models:
Most DR series dashcams support cigarette plug cables, including:
• DR970X, DR770X, DR900X/X Plus, DR750X/X Plus, DR750-2CH LTE, DR590X
• S-series models: DR590W, DR750S, DR900S
• Older models: DR650S, DR650GW, DR450, DR430, DR470, DR500, DR3500, DR550 series
• Cable length:
Standard length is about 4.5m (14.7ft), suitable for most installations.
B. Hardwire kits
• Direct fuse box connection:
Hardwire cables connect directly to your vehicle’s fuse box for clean installation and full parking mode support.
• Supported models:
BlackVue hardwire cables (including the discontinued Power Magic Pro and newer 3-wire kits) are compatible with most BlackVue models such as DR590X, DR770X, and DR970X.
• Enables parking mode recording.
• Built-in voltage cut-off protects your car’s battery from draining.
• Some kits have adjustable voltage/timer settings.
• Professional installation is recommended if you are unfamiliar with car electrical systems.
C. Battery power packs
• Accessory kits are available for BlackVue battery models like B-124/B-124X, B-130X, and Cellink Neo, including both hardwire and cigarette input cables. Always check model-specific compatibility.
Compatibility summary table
| Accessory type |
Typical cable SKU / Name |
Supported models |
| Cigarette plug cable |
CL-2P, CL-DC |
DR970X, DR770X, DR750S, DR900S etc. |
| Hardwire kit |
3-wire kit, Power Magic Pro, XT-60 |
X-Series, S-Series, DR590X, B-124X |
| Battery accessory kit |
B-130X-AK, B-112-AK |
B-124, B-124X, B-130X, B-112 |
| Output cables |
CL-OUT, 4P3 |
For battery to dashcam link |
.
.
2. Common troubleshooting scenarios
A. Dashcam won’t power on
• Check power cable and fuse (in cable or fuse box); replace fuse if blown.
• Try a different socket or new cable.
• For battery packs, ensure the pack is charged and cable connections are secure.
• Confirm the cable is compatible with your dashcam model and securely fitted.
B. Power off or frequent reboots
• Ensure a proper connection at both the dashcam and vehicle side.
• For hardwire kits, confirm connections: ACC (ignition), BATT (battery), and GND (ground) are correct
4.
• Adjust voltage cut-off to avoid premature shutdowns.
• Replace the SD card if reboots persist, as SD card errors can mimic power issues.
C. Parking mode not working
• Hardwire connection is required for true parking mode—cigarette cables cut power when the car is off
4.
• Double-check hardwire cable settings and installation—incorrect wiring or grounding may prevent parking mode.
• Ensure voltage settings on the kit are aligned with your battery type (e.g., 12V or 24V vehicles).
D. Incompatible or missing power
• Not all BlackVue hardwire kits fit every model—check your dashcam’s manual and accessory specs before purchase.
• For long vehicles or special installs, cable extensions may be needed for proper reach.
3. Tips for selecting and maintaining power accessories
• Use only genuine BlackVue OEM cables for best reliability and compatibility.
• Replace old cables if frayed or if connectors/wires are loose.
• Periodically check installation points for corrosion or damage.
• For battery accessories, refer to the accessory’s SKU or kit reference for model support.
4. When to seek help
• If your dashcam stays off despite good installation and a working vehicle socket, contact support for repair or hardware check.
• For hardwiring difficulties or fuse box confusion, professional installation ensures safety and function.
By choosing the right power accessory and following these troubleshooting steps, you’ll keep your BlackVue dashcam running smoothly—powering reliably in both driving and parking modes.
Solutions for reboot loops or failed startup (beeping, etc.)
When your BlackVue dashcam experiences a reboot loop, continuous restarting, or emits beeping/high-pitched sounds without booting, quick troubleshooting can often resolve the problem. Here’s a thorough guide to common symptoms, causes, and solutions for these issues.
Note: Screenshots in this guide are based on the BlackVue app and may vary slightly depending on your camera model or app.
.
1. Common symptoms
• Dashcam repeatedly restarts or is stuck in a boot loop
• Continuous beeping or high-pitched sounds, but no normal startup chime
• LED lights stay off or blink abnormally
• Camera does not record or is not recognized by the app/computer
2. Main Causes
• Faulty or corrupted microSD card
• Damaged, incompatible, or incorrectly wired power cables or blown fuse
• Firmware corruption or interrupted update
• Overheating (especially in summer or with inadequate ventilation)
• Internal hardware fault
3. Step-by-step troubleshooting
A. Inspect and replace the SD card
1.Remove the SD card and inspect for visible damage.
2.Format the SD card using BlackVue Viewer or your computer.
• Download the latest official firmware for your model and copy it onto the empty SD card.
3.Re-insert the card and power on the dashcam.
• If the dashcam boots normally, the issue was the card. Use only recommended or BlackVue-branded SD cards for best results.
If the camera still reboots or beeps, try a new, high-endurance SD card. SD card errors are the most common cause of boot loops or startup failures.
.
B. Double-check the power supply and wiring
• Ensure all cables are firmly connected (no loose or worn connections).
• Replace the fuse in the hardwiring kit or cigarette lighter adapter if necessary.
• If using a backup battery or Power Magic Pro, test by powering directly from the cigarette lighter/USB adaptor to rule out power accessories as the problem source.
• If available, test with another power cable or even another power source (different car or outlet).
C. Recover or reinstall firmware
• Download the latest firmware for your exact model from the official BlackVue website.
• Format the SD card and copy only the necessary firmware files to its root directory (not in a subfolder).
• Insert the SD card and boot the camera. Wait at least 2 minutes for recovery. Overwriting corrupted firmware often resolves startup issues.
D. Remove and test add-ons
• Disconnect all accessories (rear camera, external battery modules) and try booting the front unit alone to isolate potential hardware faults.
• Faulty rear cameras or cabling can sometimes prevent proper startup; booting the main camera alone can help diagnose this issue.
E. Address overheating
• Let the camera cool down indoors for 30+ minutes, especially if it feels hot to the touch.
• If rebooting only happens on hot days or after parking in direct sunlight, overheating might be the cause. Park in the shade or leave windows slightly open when possible.
F. When to contact support or repair
• If all the above steps fail (good SD card, correct firmware, tested power, no accessories connected) and the dashcam still fails to boot, emits only high-pitched noise, or shows no LEDs, it is likely a hardware fault.
• Contact BlackVue Customer Support for possible RMA or repair. Provide details on your troubleshooting steps for faster service.
4. Troubleshooting summary table
| Symptom |
Possible Cause |
Solution |
| Continuous reboot/loop |
Bad SD card, power issue |
Replace card, check cables/fuse, reload firmware |
| Only beeping, no chime/LEDs |
Power or hardware fault |
Inspect cables, check fuses, remove rear camera, try new card |
| Restarts when hitting bumps |
Loose cable, SD error |
Re-seat all connectors, replace cable, test with new SD card |
| Startup failed after update |
Firmware corruption |
Reformat card, copy new firmware, boot and wait |
| Works only on some power setups |
Wiring/Power Magic Pro |
Test with different cable or outlet, check all voltages |
| Still no fix |
Internal defect |
Seek support for repair or replacement |
.
.
5. Best practices
• Always use high-endurance, official, or BlackVue-branded SD cards and replace them yearly for reliability.
• Format your SD card monthly to prevent file errors.
• Keep firmware up to date, but never interrupt a firmware update.
• Never disconnect power while the dashcam is operating.
• If you hear only beeping and no normal sounds, or nothing works after card/power checks, do not attempt further DIY repair—seek service promptly.
Restoring normal startup operation typically resolves most reboot loop and beeping issues. If following these instructions does not work, official support can advise on next steps or arrange a professional repair.
Booting and powering off your dashcam, checking vehicle/battery power
Properly managing your BlackVue dashcam’s power ensures reliable operation and protects your recordings. Use this guide to understand the correct way to power your dashcam on/off and check your vehicle or battery power supply.
.
How your dashcam boots and powers off
Most BlackVue dashcams automatically turn on and off with the vehicle’s ignition or according to the connected power source.
Typical booting process
• Ignition-based power (hardwired or cigarette lighter):
• When you start the car, the dashcam automatically receives power and begins booting.
• You’ll hear a boot chime (“BlackVue for your safe driving”) and see the LEDs light up.
• Boot sequence usually takes 10–20 seconds for full readiness.
• With external battery pack (e.g., B-124X, B-130X):
• Dashcam powers on as soon as the external battery is activated, even if the vehicle is off (for parking mode).
• The external battery provides a stable voltage and can keep the dashcam running for hours when parked.
Powering off the dashcam
• Turning off the vehicle ignition removes power and the dashcam safely shuts down. Wait for power and recording LEDs to turn off fully before ejecting the SD card or removing cables.
• The dashcam powers off when the battery reaches its preset cutoff or the battery pack itself is switched off.
• Manual shut-off (rare):
• Some dashcams may be turned off via a physical switch or by disconnecting the power cable.
• Never unplug while files are being written or before the camera’s LEDs have fully turned off to avoid data corruption.
Checking vehicle and battery power
Ensuring stable power prevents unexpected shutdowns and data loss.
Vehicle power supply checks
• Check the power cable and fuse in the cigarette lighter or hardwiring kit.
• Replace a blown fuse if the dashcam doesn’t turn on when the ignition starts.
• Wiring (hardwiring installations):
• Confirm all connections are tight and correct (ACC, BATT, GND).
• Use a voltmeter to verify correct voltage at the power input.
• For frequent power drops or restarts:
• Inspect cable and socket for wear/damage.
• Consider using a voltage monitoring accessory (like Power Magic Pro) for added protection against battery drain.
Battery and external battery checks
• Battery packs with Bluetooth or a companion app (e.g., B-124X, B-130X) show charge status and estimated runtime.
• Inspect battery health:
• Ensure status LEDs behave as expected (see your battery’s user manual).
• Replace the battery if it cannot hold charge or fails to power the dashcam reliably.
• Troubleshooting no power:
• If no lights or sounds are produced:
• Check all cable connections and ensure battery/main fuse is okay.
• Test the power source (vehicle outlet or hardwiring kit).
• If issue persists, try another cable or contact support as internal repairs may be necessary.
Troubleshooting table
| Symptom |
Possible cause |
Solution |
| No LEDs or chime when car starts |
Blown fuse, loose cable, no power |
Replace fuse, check connections, test cable |
| Dashcam shuts off after a few minutes |
Voltage cutoff, low battery |
Adjust cutoff on Power Magic or recharge battery |
| Restarts or random shutdowns |
Unstable connection, SD card error |
Check wiring/SD card, replace if needed |
| Only some LEDs on, camera does not boot |
Power supply interruption |
Test with fresh SD card, reset connections |
| Dashcam won’t power on at all |
Defective hardware or battery |
Try different power/battery, service if needed |
.
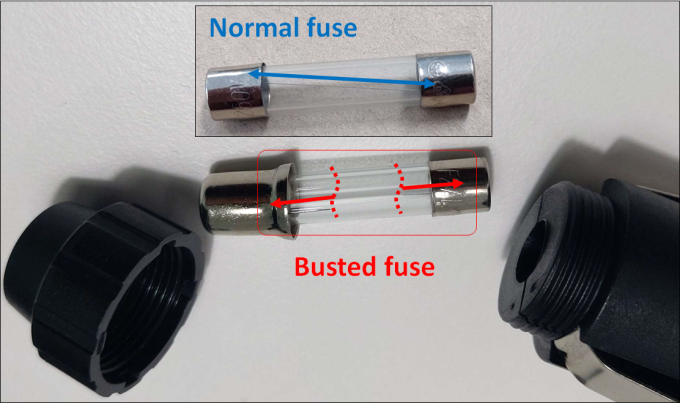
Example of blown fuse:

.
.
Best practices
• Wait 10 seconds after shutting off vehicle before unplugging cables or removing the SD card.
• Regularly clean and check power cables, and replace at first sign of damage.
• For battery packs, recharge regularly and store above freezing to preserve health.
• If using parking mode, ensure your battery protection device is set to prevent excessive vehicle battery drain.
Proper booting and power management keep your dashcam ready to record every trip and event, while ensuring the integrity of your video files and the longevity of your device. For persistent power or booting issues, consult BlackVue Customer Support for further assistance.
Frequent Rebooting /Restarting Issue
If your BlackVue dashcam is experiencing random reboots, please follow the steps below to isolate and resolve the issue:
1. Check SD Card Health
• Format your microSD card using the BlackVue Viewer (PC/Mac) or the BlackVue App.
• If the issue persists, test with another BlackVue microSD card to rule out SD card corruption or compatibility issues.
2. Verify Power Supply
• Ensure all power cables (power port, coaxial cable for rear camera, etc.) are securely connected.
• Confirm your vehicle battery or external dashcam battery (e.g., B-130X or B-124X) is fully charged and functioning properly.
3. Update or Reinstall Firmware
• Download the latest firmware from www.blackvue.com.
• Follow the firmare upgrade instruction through this
link 4. Overheating Protection
• If parked under direct sunlight for extended periods, the dashcam may shut down or reboot due to high temperature.
• Allow the unit to cool down and avoid mounting it directly behind tinted or heated areas that trap heat.
5. Persistent Rebooting
• If all troubleshooting steps have been followed and the dashcam continues to reboot:
• It may indicate a hardware issue.
• Please contact BlackVue Support or visit your authorized reseller for RMA service or evaluation.
Battery Management & Protection
BlackVue dashcams offer Battery Protection Settings to prevent your car battery from being drained when the camera is in Parking Mode. These settings are available under Settings > Firmware settings > Recording Mode> Parking Mode Recording.
.
1. Voltage Cut-Off
This defines the minimum voltage threshold at which the dashcam will automatically shut off to prevent excessive battery drain.
• 12V system (most passenger cars)
Range: 11.8V to 12.5V
• 24V system (trucks, buses)
Range: 22.8V to 24.0V
Tip
• Higher voltage cut-off = more conservative protection.
• If unsure, 12.0V (for 12V cars) and 24.0V (for 24V vehicles) are safe starting points.
.
2. Timer Cut-Off
• Sets how long the dashcam will remain in Parking Mode before automatically turning off, regardless of battery voltage.
• Options typically range from 1 hour up to 48 hrs.
• Helpful if you only want to monitor for a fixed period while parked.
.
3. Priority Setting
• When both Voltage Cut-Off and Timer Cut-Off are enabled, the dashcam will shut down based on whichever condition is met first.
• Choose Voltage Priority if protecting the car battery is more important.
.
Note
• Battery Protection Settings are only applicable to 3-wire dashcam models (ACC + BATT + GND) and only when using the Hardwiring Cable or OBD-II Power Cable.
• Use BlackVue’s Ultra batteries accessories for worry-free parking protection.
Managing High/Low Temperature Operation (Thermal Shutdown, Auto Cut-Off)
Proper temperature management is crucial for reliable dashcam operation and device longevity. BlackVue dashcams and power accessories use internal sensors and auto shut-off functions to protect against heat and cold. This guide explains how these mechanisms work, what to expect in extreme conditions, and how to avoid common temperature-related malfunctions.
Note: Menus and notifications may differ depending on your BlackVue model and firmware.
.
1. How Thermal Shutdown Works
High Temperature (Overheat) Auto Cut-Off
• Temperature threshold:
Most BlackVue dashcams will automatically power down when the internal temperature reaches approximately 75°C (167°F) to prevent hardware damage.
• Typical operating range:
-20°C to 70°C (-4°F to 158°F) for the main unit.
• Parking mode recommendations:
In hot weather, switch to Time-lapse Parking Mode to reduce in-device heat.
• Symptoms of thermal shutdown:
• Sudden power-off during parking or direct sun exposure
• Notification sounds or push alerts about overheating (on supported models)
Low Temperature Auto Cut-Off
• Cold weather behavior:
BlackVue dashcams and external batteries may refuse to power on if ambient or internal temperature falls below -20°C (-4°F), or, for batteries, below 0°C (32°F).
• Symptoms of cold auto cut-off:
• Dashcam or battery does not start until the car’s interior warms up
• Delayed boot after cold nights or severe winter conditions
Power Accessories (Batteries/Hardwire Kits)
| Accessory |
High Temp Cut-Off |
Low Temp Cut-Off |
Storage Temp |
| B-124X/B-130X Battery |
~80°C (176°F) |
0°C (32°F) |
-20°C~45°C |
| Power Magic Pro/Ultra |
Adjustable (based on dashcam) |
Not automatic |
– |
.
2. Preventing Temperature-Related Shutdowns
In Hot Weather
• Park in shade or use sunshades on windows when possible
• Vent the car slightly (crack windows) to reduce interior heat buildup and help dissipation
• Use Time-lapse Parking Mode or reduce dashcam recording quality/features when parked
• Do not use reflective windshield covers directly behind the dashcam, as this can concentrate heat
• Avoid blocking the camera vents and ensure airflow around the unit
In Cold Weather
• Allow the interior to warm up before expecting the dashcam to power on, especially after freezing nights
• External dashcam batteries will not charge/discharge if temperatures are too low; wait for car to heat up to above freezing
3. Important Details and User Controls
• Firmware notifications:
Modern dashcams may provide voice alerts or push notifications before shutting down due to high temperature (or upon resumption).
• No manual override:
Thermal protection is automatic—manual override is not available to prevent device damage.
• Power accessory settings:
For hardwire kits, set appropriate voltage cut-off so that the dashcam won’t drain the car battery in extreme climates.
4. Troubleshooting & Best Practices
| Problem/Symptom |
Possible Cause |
Solution |
| Dashcam shuts off in hot weather |
Internal sensor triggers |
Park in shade, lower settings, try time-lapse mode |
| Frequent cutoff in cold weather |
Temp. below safe operating |
Wait for interior warm-up, don’t force power-on |
| Dashcam reboots unexpectedly |
Overheating/SD card error |
Check device installation/ventilation, replace SD card |
| Auto shut-off at low voltage |
Power kit protection enabled |
Adjust voltage cut-off in power accessory settings |
.
Key Takeaways
• Thermal shutdown is by design and protects your dashcam and battery from damage.
• Use recommended modes and parking practices for your climate.
• Understanding temperature and voltage safeguards ensures your dashcam always operates safely—whether in a heatwave or a deep freeze.
.

Add Comment