Wireless CCTV Security Camera System Setup Guide, Wireless Security Camera Systems from Sansco are the perfect hassle-free system designed for quick installation and efficient monitoring. This system comes with FOUR security bullet cameras and a security grade NVR (Network Video Recorder) with a 1TB hard drive. This ability to store recordings locally provides personal safety and no additional monthly fees. The NVR also gives you easy smartphone access to live or recorded footage from wherever you are.
Coupled with wire-free cameras that include professional motion detection, 1080p HD video resolution, infrared night vision, and a weatherproof IP66 rating, this system has you covered day and night, no matter what the elements have in store.
– See more at: https://isansco.com/cctv_system/show/78.html

Connect Your System
Step 1. [Important] Properly install the Antennas for the cameras Step 2. Power up the cameras using the power supplies (12V 1A)
Step 3. Connect the NVR to your wall socket with its power supply (12V 2A) Step 4. Connect the NVR to your router with an Ethernet cable
Step 5. Connect the NVR to a HD monitor (at least 1920x1080p) with either a HDMI or VGA Step 6. Plug the mouse (included) into the USB port at the rear panel of the NVR.
Once you complete the steps above, it should be pretty much ready to go. Within seconds, there will be a live video showing up on the screen.
Username: admin
Password: By default, there is no password for initial login (Please just leave it blank and click login)
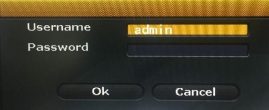
Tips: To protect your privacy, you may right click the mouse > Go to System Setup > System Admin > User > Set password to change your password.
If you plan to install the camera somewhere out of the Wi-Fi range, you may need to connect the camera to your router (with an Ethernet cable) in order to get better video streaming.
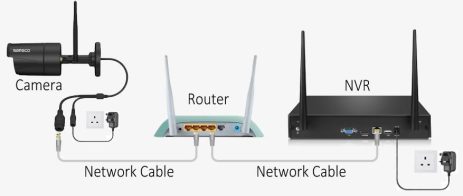
Tips: Use Auto Add (Per 4.2 above) when you are doing a wired connection between the camera and your router. However, if you want the camera to work wirelessly (without connecting to the router), use Match Code to add camera to NVR. See instruction below on Add camera by Matching Code.
Wireless CCTV Security Camera System Setup Guide
Read Mor e: EseeCloud Wireless Security Camera System Installation

View on Mobile Devices (iOS / Android)
Step 1: Connect the NVR to the Internet
Connect the NVR to your router with an Ethernet cable. In a few minutes, you should be able to see the Cloud ID and
Status (showed as ONLINE) at the bottom right corner of your screen. See below


H.264 Video
H.264 Video
H.264 Video
H.264 Video
Cloud ID: 662023312 ONLINE
Tips: If the NVR status does not show as “ONLINE”, please go to System Setup > Network Setup > Check the box for DHCP or manually assign an IP address to the NVR. If this does not fix the status issue, please contact your Internet Service Provider (ISP) or your network administrator. (For example: port number 80 should be opened on the router.)
Step 2: Download the App (You can use IP Pro, or EseeCloud3)
Search IP Pro in Apple Store or Google Play. Or Scan the QR Code below to download the application.

IP Pro Apple Store Google Play
Step 3: Run the App
Download and run the app. On the login screen, tap Register, enter your Username, Password, and Email Address to create a new account.
Tips: You will receive an email to verify your email address, in that email, click the link to verify the email address. By doing this, you will be able to reset your password in case you forget it.
Once you complete the registration, login the App, press “+” at top right corner > Add device > Add Recorder:
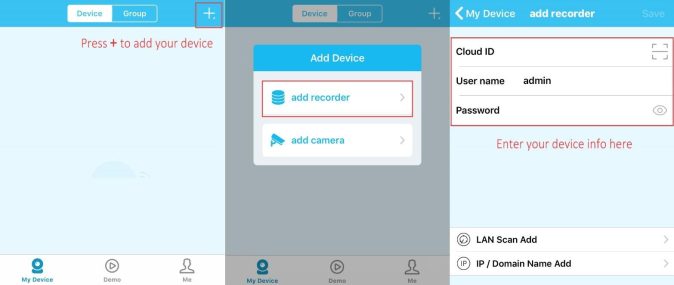
Enter your device information below:
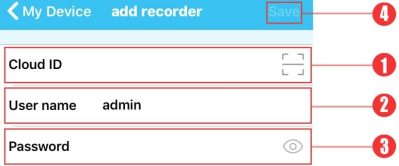
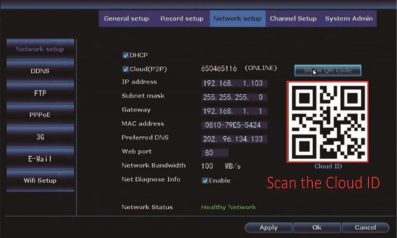
![]() Cloud ID: The Cloud ID can be found at right bottom corner of the screen, you can manually enter this ID. Or you can scan the Cloud ID here: right click the mouse > go to System Setup > Network Setup > Show QR code. See below:
Cloud ID: The Cloud ID can be found at right bottom corner of the screen, you can manually enter this ID. Or you can scan the Cloud ID here: right click the mouse > go to System Setup > Network Setup > Show QR code. See below:
OR

Cloud ID: 662023312 ONLINE
![]() Username: admin
Username: admin
![]()
![]()
Password: Default: No password required, just leave it blank)
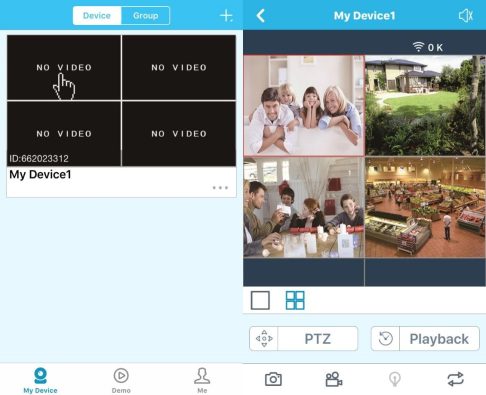
Tap SAVE. Tap on any channel to go to live view screen, see below:

View on PC using Software Client
Step 1: Download EseeCloud.exe from CD and install it to your computer.
(If your CD is broken, contact us for the link to download EseeCloud.exe)
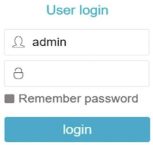 Double click EseeCloud on your PC to run the software client, on the User Login, enter username, password and click login. You may want to check the box to the left hand side of Remember password so you don’t need to enter password each time you login.
Tip: Default username is admin, no password required for initial login, just leave it blank.
Step 2.1: Add Device by Cloud ID

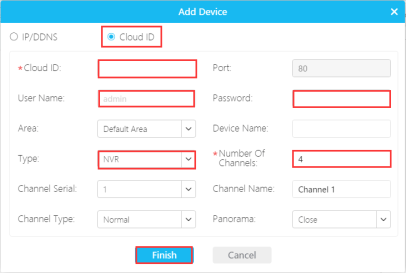
Go to Device Management > Add Device > Cloud ID.
Cloud ID: Please refer to the instruction above on how to find the cloud ID.
Username: Default: admin
Password: Default: No password required, just leave it blank
Type: Choose NVR
Number of Channels: If your NVR is a 4-Channel one, enter 4.
Step 2.2: Add Device within LAN

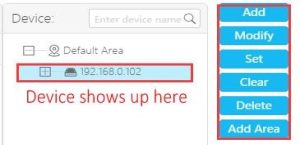
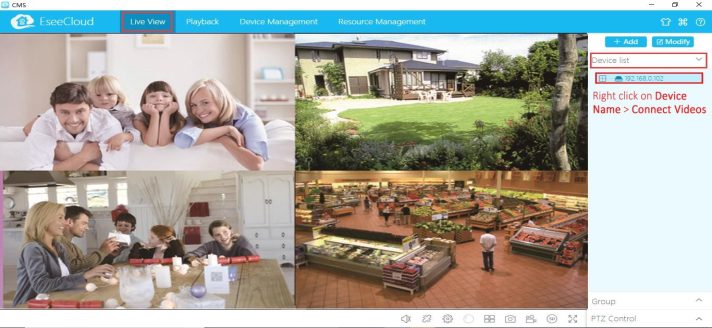
Step 3: Image Preview
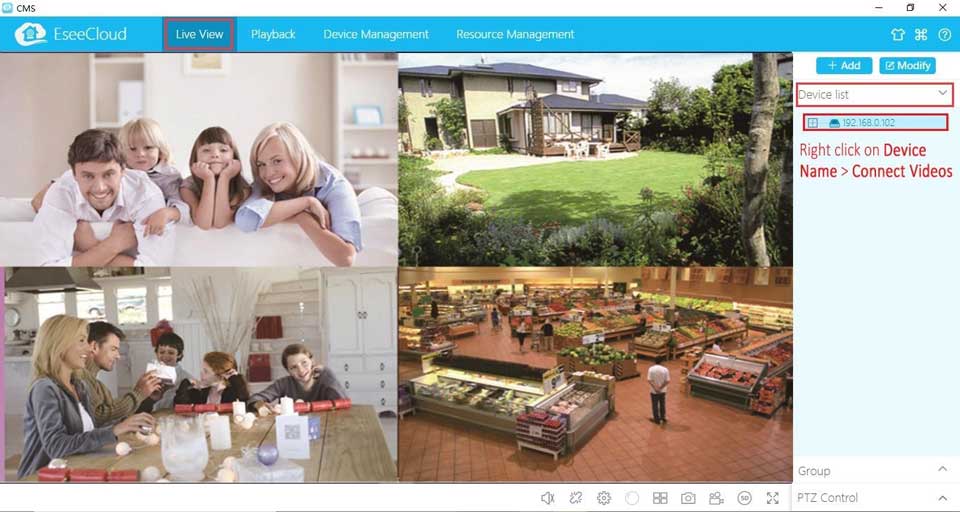
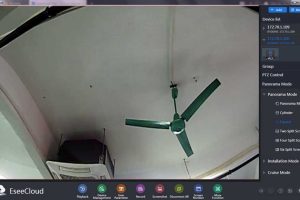
After you add the device successfully, click Live View > Device List, right click on the Device Name > Connect Videos, see below:

View on Your Web Broswer: Internet Explorer
If your PC is located in the same LAN as the NVR (normally means they are connected to the same router).
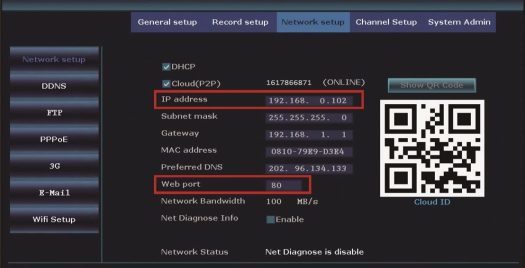
Step1: Find the IP address and Web port of your NVR (IP address can be found in System Setup > Network Setup), see below:
Step 2: Enter the NVR’s IP address into your IE browser like this: http://your-ip-address, for example: http://192.1.0.102 (If the default port number 80 has been changed e.g. to 100, you will also need to add the new port number at the end of the IP address, for example: http://192.168.1.100:100).
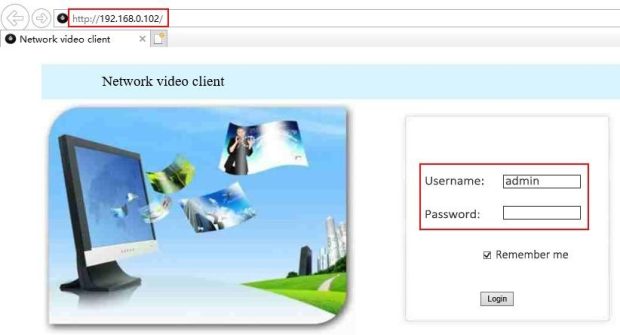
User Name: admin
Password: By default no password required, just leave it blank
If your PC is NOT within the same LAN as the NVR (For example, you want to remotely access your home cameras while you are in your office):
⑴ Open your Internet Explorer (IE) and go to www.e-seenet.com
⑵ Enter Cloud ID, Username and Password to login.
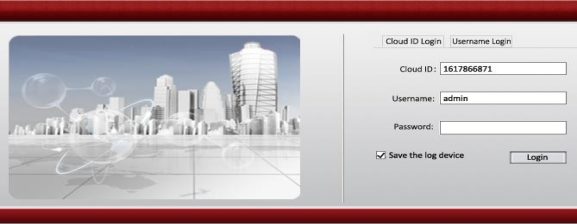
Cloud ID: The Cloud ID can be found at right bottom corner of your monitor.
User Name: By default, admin
Password: By default no password required, just leave it blank
Step 3: If this is the first time that you use IE to view your cameras, you may be asked to download and install some add-ons (i.e. WebClient.exe) in order to gain full access, please go on and follow the on-screen instruction to install the add-on. Once it is installed, close your IE and re-open it to enter the NVR’s IP address. Meanwhile, on your IE, please go to:
⑴ Tools > Internet Options > Security > Internet > Custom Level.
⑵ Scroll down the mouse until you see ActiveX controls and plug-ins. If you have Internet Explorer 9 or 11, disable
Allow ActiveX Filtering.
⑶ Choose Prompt for the following: Download signed ActiveX controls
Download unsigned ActiveX controls
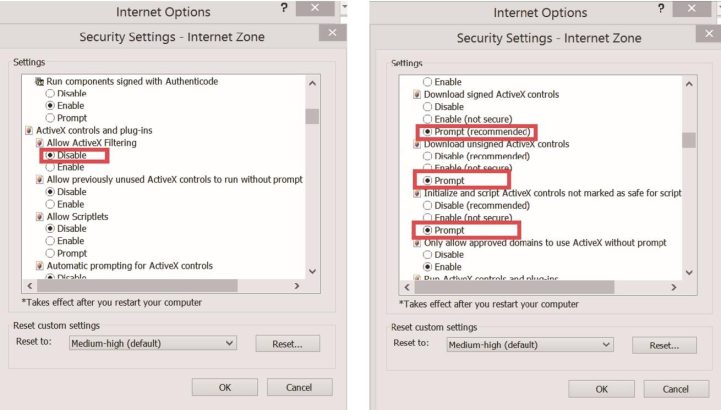 Initialize and script ActiveX controls not marked as safe for scripting
Step4: Click OK to exit the Security Settings after you complete the settings.

Add Cameras by Matching Code
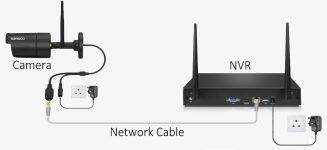 Power on the new camera connect it to the NVR through Network cable.
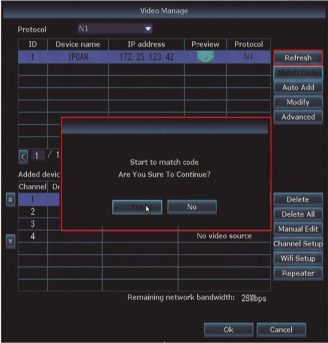
 Click Refresh > Find the camera’s IP > Click Match Code. The NVR will start to match code with the camera. After it matches code successfully, the “status” will show as “Connect success”, which means the camera has been added to the NVR successfully. See below:
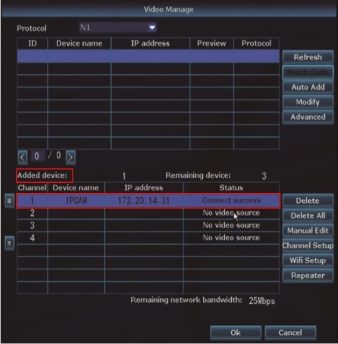
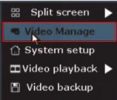
To do Match Code, you will need to delete the failed channel first, Right click > Video Manage > Added device, choose the failed channel, then click Delete to the right hand side. Then follow step 2.3 as stated above.
Tips: All cameras provided in the box are already pre-paired with the NVR, so normally you don’t need to do Match Code for the cameras supplied.

Video Recording
Your system may not include an internal Hard Drive. (This depends on which model you bought, we sell systems with or without hard drive). If your system does not include a hard drive, please install one of your own, the system works with most 3.5 inch SATA Hard Drive.


⑴ Power off the NVR system and unplug all cables, NVR cover is secured with screws. Remove the screws and slide the cover off.
⑵ Find the two SATA Connections (power and data) on the NVR main board, plug the two cable connections into the hard drive (They only go one way), place the HDD over the screw slots of your NVR and slide the HDD into place, then install the hard drive with the screws.
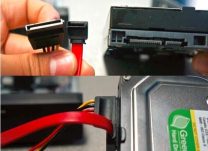
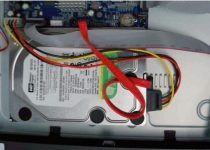
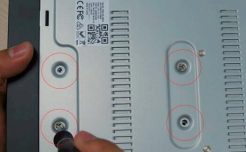
Tips: Once the hard drive is installed go to the NVR setting and find HDD Setup: Right click the mouse > Go to System setup > General setup > HDD Setup > Format, then click on Format. The hard drive should format then after a restart be ready to use.
Right click the mouse > Go to System Setup > Record Setup > Choose the Channel > Click Time > Set up the time frame on the grid > Click Copy to > All > OK > OK.
Tips: When you are setting up the time frame for recording, you can left click and drag your mouse, or you can left click the little box on the grid, the color of the little box will change, which means it has been selected. Each day of the week is corresponding to 3 lines, the first line for Time (regular recording), the second line for Motion (motion recording), and the third line for Alarm (alarm recording). You should click Time, Motion, or Alarm above the grid first before you configure the timing below.

Video Playback
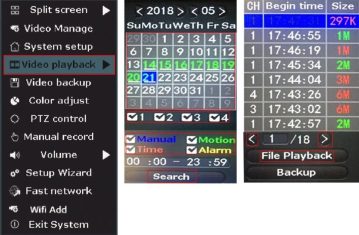 Right click the mouse > Video playback. You can set the search criteria: Date, Time, Channel, Record Mode (Manual/Motion/Time/Alarm), and click Search. Left click or drag your mouse on the time bar (at the bottom) to start the playback. Under Search, you can see all episodes of the recording, navigate to your desired page and episode, and click File Playback to play.

Motion Detection Recording
Step1: Right click the mouse, go to System Setup > Record Setup > Choose the Channel > Click Motion > Set up the time frame on the grid > Click Copy to > All > OK > OK. You may click Reset to erase all the selection on the grid, and configure again. If you schedule the recording the way below (green line from Sun to Sat, 00:00-24:00), it means your NVR will only record when movement is detected within this time frame (Sunday-Saturday, 24/7).
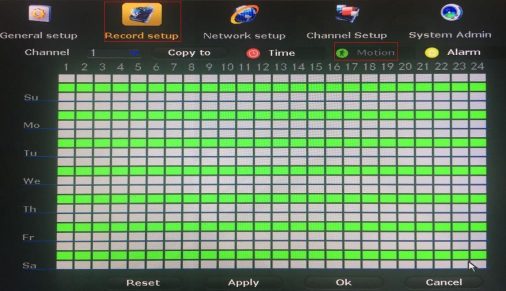
Step2: Go to Channel Setup > Video detection > Choose the Channel, then from the drop-down menu of Detection, choose Motion > Set up the Sensitivity > Check the boxes below for Alarm, Buzzer, Email Notice or App Alarm per your needs > Click Copy to > Choose All > Click OK to save the setting.
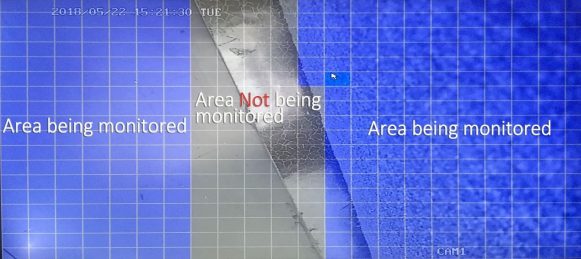
Tips: The area being monitored for motion can be edited under Area Edit. Click Area Edit, by default, the whole screen was selected and being monitored, if you want to mask specific area, left click and drag your mouse, or simply left click your mouse on specific boxes of the grid to unselect them. You can also right click your mouse to unselect the whole screen, or select the whole screen over again, right click your mouse and choose Return to exit.

How to Do Video Backup via USB Device
Step 1 Find a USB memory stick. Since there is only one USB port on the NVR, please find the USB adapter provided in the package, connect it to the USB port of your NVR, it will then allow you to connect multiple USB devices (mouse and the memory stick) into the same USB port.
Step 2 Right click the mouse > Choose Video backup > Choose the Channel, Record mode, Search time > Click
Search > Select the video you want to backup > Click Backup.
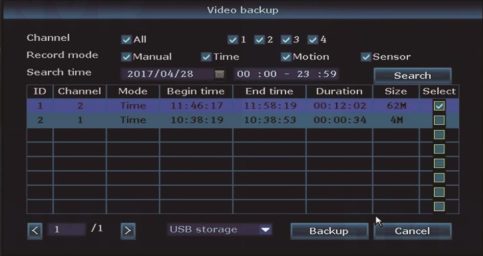
Tips: The maximum backup capacity is 32GB. Recordings will be backed up at hourly intervals.

Frequently Asked Question
Question: I have connected the system, but nothing is showing on my monitor?
Answer:
Question: The system worked for a while then some channels started to lose signals, why?
Answer:
Question: Does the NVR record sound?
Answer: This NVR does not record audio, it records video only.
Question: The night vision of my camera is terrible?
Answer:
Question: My camera is getting misty inside, is there a known fix?
Answer: Condensation occurs in a humid environment as a result of the difference of the temperatures of the air and the object on which it occurs. In most cases it will clear up itself. The mist is more or less a rapid drop in temperature – one solution might be the use of a see-through rain cover, or a large enough zip-lock bag with appropriate cuts, applied before taking the camera out of doors to minimize the humidity trapped in it.
Otherwise, the same humidity will still condense within the rain cover itself instead of in the camera just like when one uses a rain cover in cold weather with a warm camera. Another, not as practical, but effective solution might be to regulate the temperature around the camera, but isolating it from humidity is the more guaranteed solution, even if it is only applicable in very few situations. If the issue remains, you may send it back for replacement, please contact us via email.
Question: My NVR is not recording, why?
Answer: We sell NVR with / without hard drive, so make sure your NVR comes with a preinstalled hard drive. If your NVR does not include a hard drive, you can source one on your own, or you can purchase one from us. If you have a spare hard drive and you can install on your own, make sure it is a 3.5 inch internal hard drive with SATA connector.
If your NVR comes with a hard drive but it is not recording, please verify the hard drive info, if it is not showing hard drive info, open the NVR case and verify the cable connection. If it shows up error under the hard drive info, Right click the mouse > Go to System setup > General setup > HDD Setup > Format, then click on Format.
Note that because the hard drive records continuously (24/7), it may become corrupted after some time, we warrant the hard drive up to 12 month following the purchase date, if your hard drive is not recording anymore, you may still contact us via email.
Question: The NVR kept shutting down or rebooting.
Answer:
Question: I forget my login password and I am locked out?
Answer: You can use the following method to reset your system manually.
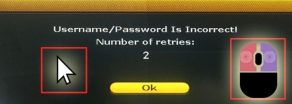
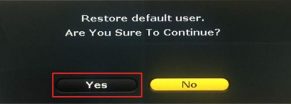
On the log-in screen, if you enter the wrong password, it should give you the above error message. Don’t click the OK button yet, instead, hover your mouse there, left click, right click, left click, right click, repeat this operation a few more times, until you see the following screen, which indicates you can reset your system now, click Yes to proceed.
Question: How to set up email notification (for example, Gmail)?
Answer:
Step 1. Right Click > System setup > Network setup > Check the NVR status and make sure it is online, see below:

Step 2. Right Click > System setup > Channel Setup > Video detection, make sure E-Mail Notice is checked. See below
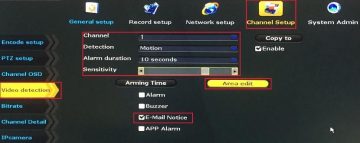
Step 3. Log into your Gmail account, and go to this link to turn on Access for lower secure apps (Allow less secure apps: ON). Link: https://myaccount.google.com/security?pli=1#connectedapps.

Step 4. Go to System setup > Network setup > E-Mail, enter the following info: SMTP server: smtp.gmail.com
Port: 587
Username/Password: Your Gmail account/Password Encryption Type: SSL (or TLS).
Sender: Your Gmail.
Sendee 1/2: Receiver email address.
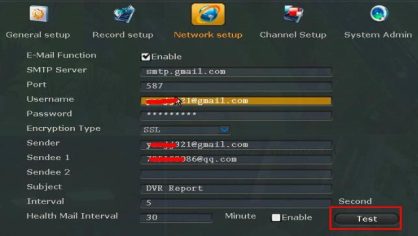
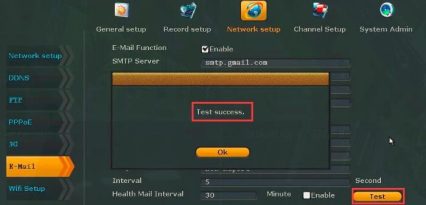
Step 5. Click Test.
Question: My NVR shows Offline all the time, how to get it to show Online?
Answer: 1. Login to your router setup portal (i.e 192.168.x.x) and find the DHCP option, make sure it’s enabled.




Add Comment