

MaxRanger4K Wireless Camera Setup Guide, Welcome to our NVW-MAXV2CAM – MaxRanger4K™ Wireless Camera resource hub! Whether you’re just starting or have been using it for a while, we’re here to help you get the most out of it. We’ve put together all the essential resources you might need, all in one place.
Feel free to explore each section below to find what you need. And if you have any questions, don’t hesitate to reach out to our support team. Let’s dive in!
Quick reminder! An add-on camera must be connected to a compatible recorder to be viewed on a phone or computer. Refer to this Camera Compatibility Chart to check the compatible recorder for this camera.
NOTE: Visit swann.com to check the specifications and deals available (make sure to choose the right country).
Check out the Product Specification Sheet article if you want to compare specifications of the same product line side-by-side.
MaxRanger4K Wireless Camera Setup Guide
How Do I Get the Best Out of my Built-in Solar Panel
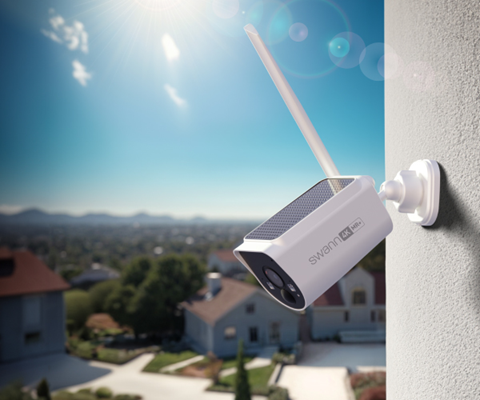
Answer: Place it where it can get a lot of sun and regularly inspect and clean the solar panel.
Cameras with integrated solar panels will charge quickly when positioned where it gets full sun. Consider this when fitting your camera and try to minimize how much shade it gets and adjust the direction it faces to ensure it can receive the most sunlight while covering your area of interest. It is also a good idea to clean the solar panel, freeing it from any object or dirt that might block the sun; NO CHEMICALS REQUIRED. Anything that blocks the sun from reaching the solar panel can impact the charging efficiency, keep this in mind when installing the cameras as well.
How to Extend the Battery Life of Your MaxRanger4K™ Camera
MaxRanger4K™ cameras have a lithium battery (and a built-in solar panel for the NVW-MR4KCAM to keep it charged with the power of the sun) to stay on while away from an outlet. However, just like every other battery-operated system, it will get drained at some point due to several factors.
In this article, you will learn how to get the most out of your camera’s battery life.
Efficiently Use the Integrated Solar Panel
(If your camera doesn’t have built-in solar panel, click HERE for the next advice)
The MaxRanger4K™’s built-in solar panel will ensure the camera is charged even during its operation. To get the best results:
Check out the NVW-MR4KCAM Instruction Manual to see Camera Location Tips.
Use the PIR Sensor Wisely
The Passive Infrared (PIR) sensor is mainly used to detect moving body heat. When there’s no such activity, the camera goes on idle. If you are receiving an average of 20 or more motion triggers a day after adding the detection area, you probably need to make adjustments to optimize your camera. That said, to ensure that the camera only activates when it detects movement, here are a few things you could do:
To adjust the sensitivity of your camera, it needs to be done on your recorder’s settings. Check out the Motion Detection Setup on your MaxRanger4K™ Power Hub’s manual.
Efficient Charging Options

While the solar panel does a great job, sometimes you’ll need to charge the battery manually. The MaxRanger4K™ offers flexible options:
Optimize Standby Mode
The MaxRanger4K™’s standby mode is key for extended battery life. Adjust the Sleep Duration for when the camera goes into standby mode. This tells you how long the camera stays inactive before entering power-saving mode.

NOTE: Sleep Duration is available in MaxRanger4K™ Power Hub with Software version V8.2.2-20240403 or newer and MaxRanger4K™ Camera with V3.2.0.2403221614.
Check out this article to update the recorder to its latest firmware, while this article is to update to the latest camera firmware.
Regular Maintenance and Updates
Routine maintenance and keeping your camera’s software up to date can also help improve battery performance. Make sure your system’s firmware is always up to date. You will get notified in the Swann Security app when there’s an update available.
You can also check these articles to see if there’s a newer firmware available: How to Update Your Swann Security Recorder Firmware: A Step-by-Step Guide and Essential Steps to Update Your Wireless Add-on Camera Firmware
Conclusion
By following these tips, you can ensure MaxRanger4K™ cameras remain a trusted part of your security system, providing ongoing protection and peace of mind.
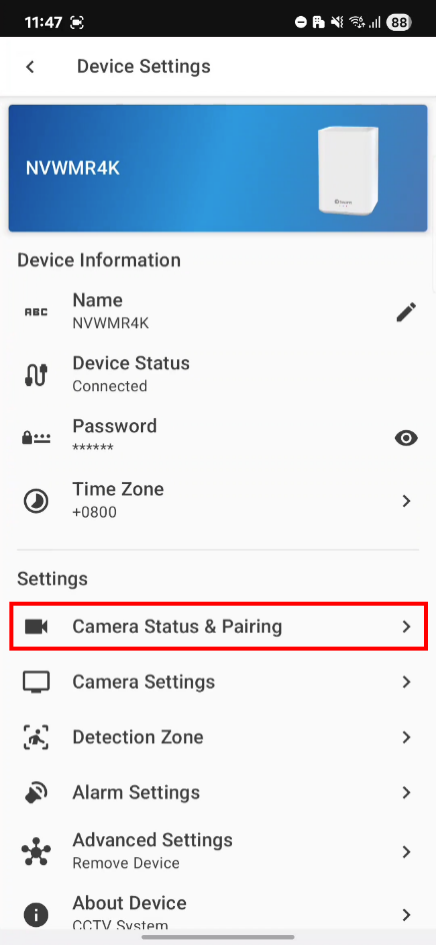
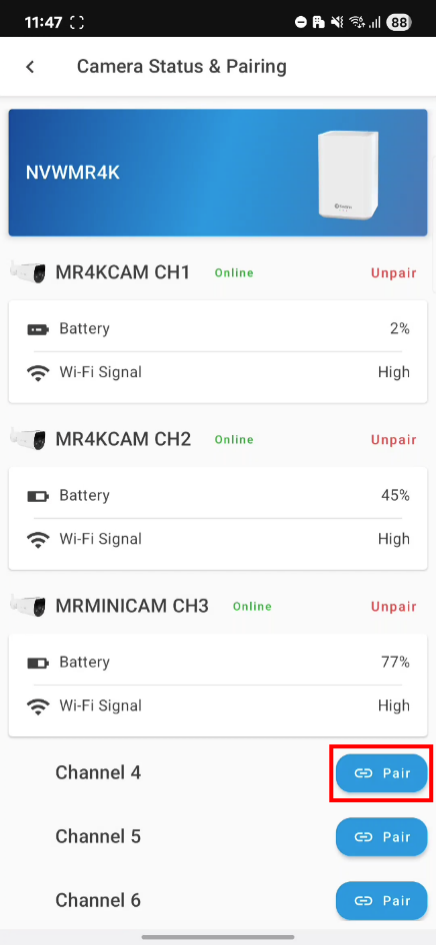
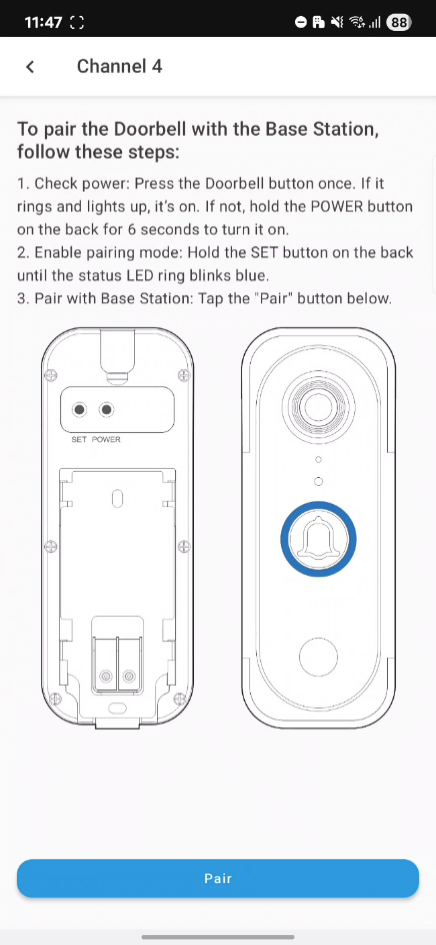
How to Pair a MaxRanger4K™ Add-on Camera or Doorbell
This guide shows you how to pair a MaxRanger4K™ Add-on Camera or Doorbell using either the Swann Security app or via the Power Hub’s interface (not applicable for Base Station).
Before You Begin:
Choose Your Setup Path
Trouble connecting or unsure where to begin? Start here:
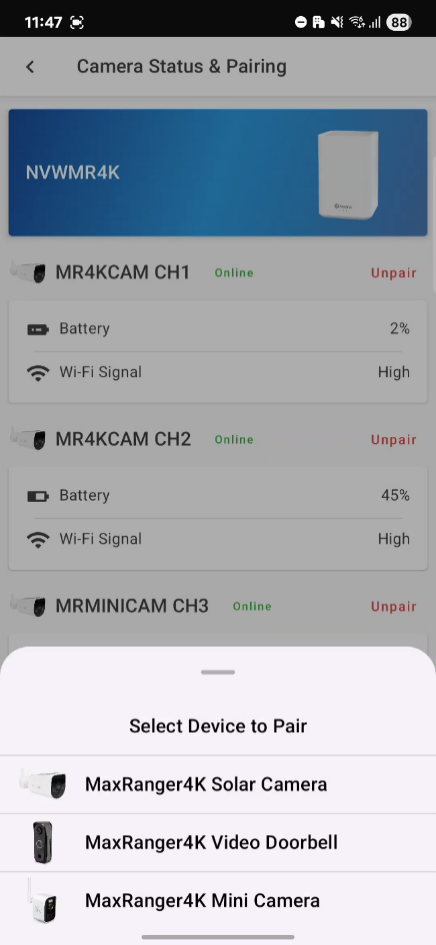
Pairing Using the Swann Security App
Best for users who has the MaxRanger4K™ Base Station or already accessing their MaxRanger4K™ system via the app.
Pairing via the Power Hub (optional)
Ideal for users who have the Power Hub (NVW-MR4K) and prefer physical interfaces. Requires mouse + monitor connected to the hub
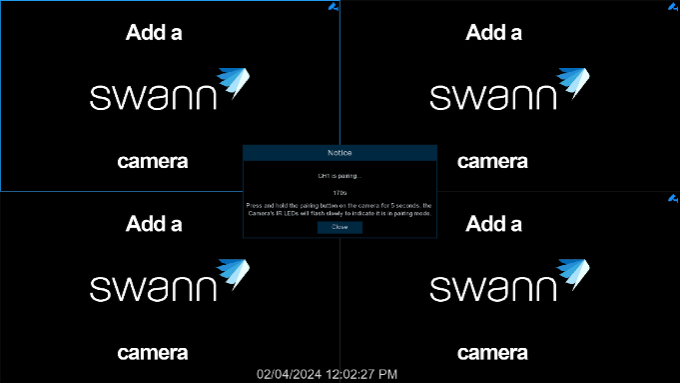
Why this helps: This process ensures the hub directly detects a camera in pairing mode.
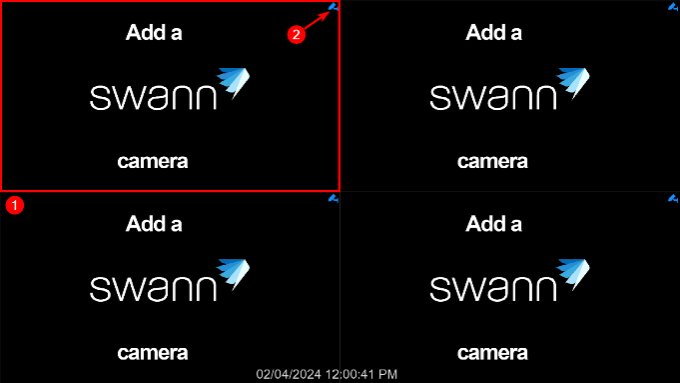
Troubleshooting and Fallback Options
If pairing doesn’t work the first time, try these quick fixes:
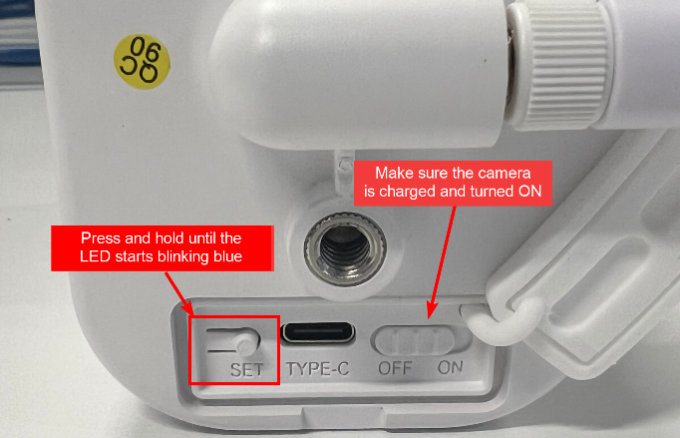
LED Not Blinking Blue?
Still Not Pairing?
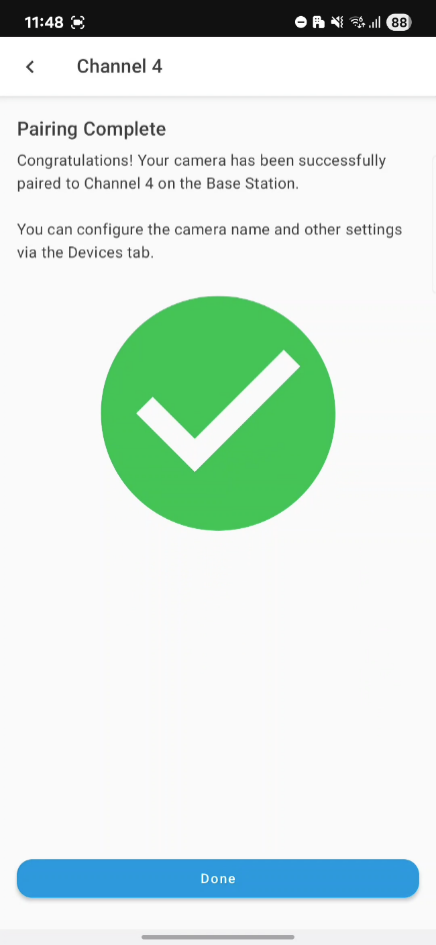
Summary & Next Steps
By now, your add-on camera should be successfully paired and displaying a live feed.
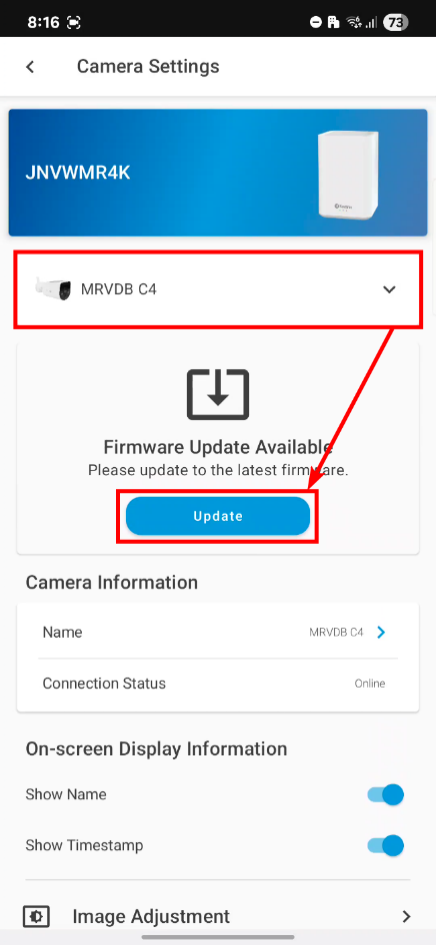
How to Update a MaxRanger4K™ Add-on Camera or Doorbell
This guide walks you through updating your MaxRanger4K™ add-on camera using the Swann Security app. Keeping your camera firmware up to date ensures optimal performance, bug fixes, and compatibility with the latest features.
Before You Begin:
Choose What You Need Help With
Not sure where to start? Jump to what fits you best:


Troubleshooting If the Update Fails
Why this helps? Low battery can cause the update to stop midway.
Camera Won’t Stream or Connect
Summary & Next Steps
You’ve learned how to update your MaxRanger4K™ camera and troubleshoot common issues. Most updates complete smoothly, especially when the camera is fully charged and near the hub.
How to Manually Activate the Deterrent Feature
Your security camera’s deterrent features, such as lights and sirens, are vital tools for protecting your property. While these features can be set to activate automatically when motion or unusual activity is detected (by following this article: How to Set Up the Deterrent Feature on Your Recorder), there may be times when you need to take control and manually activate them.
In this guide, we’ll walk you through how to manually trigger these features. This process allows you to immediately turn on the lights and siren without changing any automatic settings. You maintain full control without interfering with the automated security system you’ve set up.
Two Ways to Activate the Deterrent Features
Recorder’s Live View
You can activate the lights and siren using the Camera Toolbar that appears when you select a camera on your live view by clicking on it. This can only be done if you have a display and mouse connected to the recorder.

The number of icons shown in the camera toolbar depends on the model of your record. The ‘bulb icon’ will appear if the camera has lights, siren, or SwannForce / Enforcer (red and blue lights). Click the icon to show the deterrent controls.

Each deterrent feature will have the option to enabled or disable it. This will not affect the settings where it will activate when there’s detection.
When you activate the Siren, a prompt will appear to confirm. Click OK to proceed or Close to leave it disabled.

Swann Security App
When you load your camera in the app, you will see the an icon for each deterrent features as shown below. Tap an icon and a bigger button will appear to let you turn it on or off.
| Deterrent Feature | Android | iOS |
|---|---|---|
| Lights |  |
 |
| Siren |  |
 |
| SwannForce™ / Enforcer |  |
 |
ANDROIDIOS


NOTE: On Android, a bigger button will show which you need to tap to turn on or off the selected deterrent feature.
Conclusion
Manually activating your camera’s deterrent feature is a simple and effective way to enhance your security system. Whether it’s responding to a live situation or just making your presence known, the ability to quickly trigger the lights and siren adds an extra layer of protection to your property.
By understanding how to manually control your deterrent features, you gain peace of mind knowing that your security system is always ready, and so are you.
How to Set Up the Deterrent Feature on Your Recorder
Deterrent features like floodlights or spotlights, siren, and SwannForce™ or Enforcer lights can take your security system to the next level by actively discouraging unwanted activity.

In this guide, we’ll walk you through the process of how to activate these features automatically, ensuring you have all the tools and knowledge you need to make the most of your security recorder’s capabilities.
NOTE: If you want to know how to activate them manually, check out this article instead: How to Manually Activate the Deterrent Feature
Things To Prepare

How to Automatically Activate Lights, Siren, or SwannForce™ or Enforcer
Set a Schedule
Access the Menu then go to Alarm > Deterrent. Click the “gear” icon under Schedule.

By default, the spotlight and siren (if enabled) will not trigger between 06:30 a.m. and 04:30 p.m. however, you can change this according to your needs. Each square represents 30 minutes. Using the mouse, click on a particular square to change or click and drag the mouse over the squares corresponding to your desired period.
Click Save to save changes made. Right-click the mouse to exit.

How to Deactivate or Turn Off the Deterrent Features
In the system’s Menu, go to Alarm > Deterrent, you can uncheck the checkbox of the Deterrent that you want to disable (e.g. “Light”) to stop it from turning on when it gets triggered.

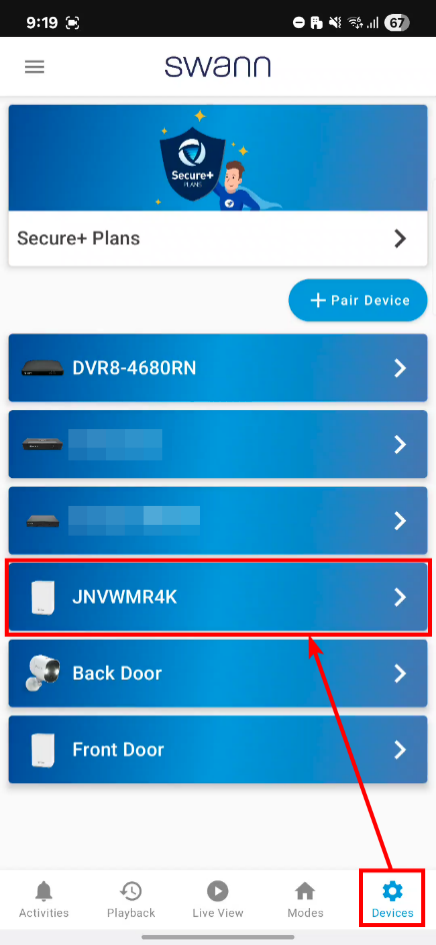
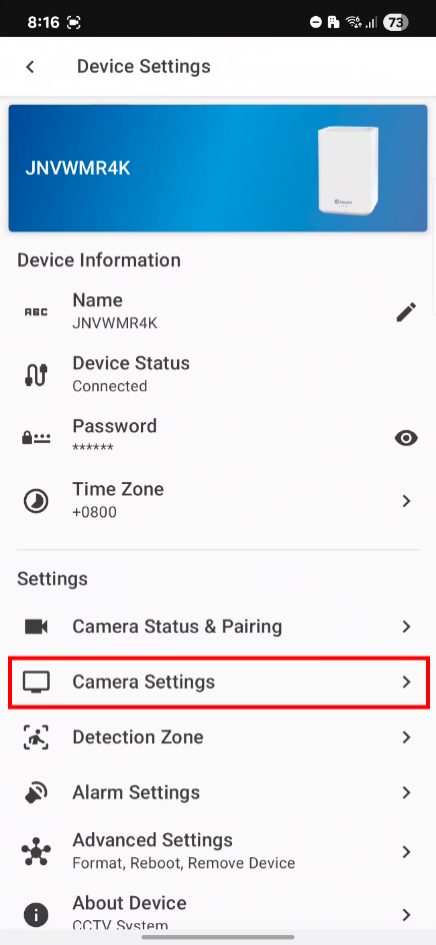
On some recorders, you can also do this via the Swann Security app. Go to Devices / Device Settings (bottom-right) then choose your recorder. Go to Channel Settings then select a channel and disable “Light on Motion” or “Siren on Motion” – it is similar to unchecking the checkbox via recorder’s Menu.

Conclusion
By enabling the deterrent features on your recorder, you’re adding a proactive layer of security to your system. Once these features are activated and set up to work automatically, you can trust your system to work harder for you around the clock.
Add Comment