

How to Set Face Detection Function, Face recognition, also known as facial recognition, is a biometric technology that identifies or verifies an individual by analyzing and comparing their unique facial features from a digital image or a video frame against a database of known faces.1 It’s a type of computer vision that uses artificial intelligence (AI), machine learning, and deep learning algorithms to “understand” and interpret human faces.2
How Face Recognition Works:
The process generally involves several key steps:
This analysis transforms the analog information of the face into a set of digital data, often called a “faceprint” or “facial signature.”12 This is essentially a mathematical formula or a unique numerical code representing the individual’s face.13
Algorithms calculate the similarity or distance between the faceprints.20 If the similarity exceeds a predefined threshold, a match is confirmed.21
Applications of Face Recognition:
Face recognition technology is widely used across various sectors due to its convenience and efficiency:22
Challenges and Concerns:
Despite its widespread use, face recognition technology faces several challenges and ethical concerns:42
Due to these concerns, there’s ongoing debate and development of regulations to govern the ethical and responsible use of face recognition technology globally.
How to Set Face Detection Function (WEB 3.0)
Any model and firmware with Face Detection supported.
(This tutorial is based on WEB 3.0 firmware)
Interface may vary on some models and firmware.
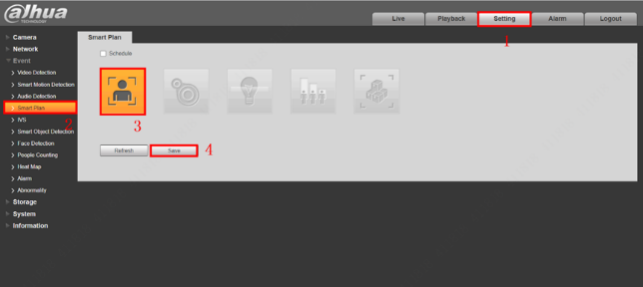
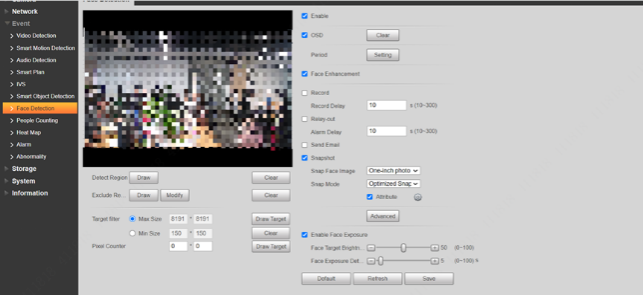
Click icon, you can draw a detect region or an exclude region, and the target filter, Pixel Counter can be set as well.

Here you can set the effective period, record and alarm delay time, face snapshot, and face exposure according to the requirements.
.
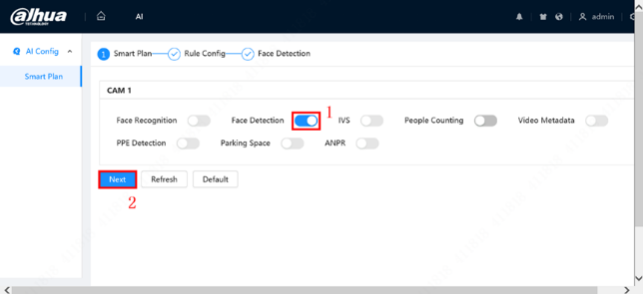
How to Set Face Detection Function (WEB 5.0)
Any model and firmware with Face Detection supported.
(This tutorial is based on WEB 5.0 firmware)
Interface may vary on some models and firmware.


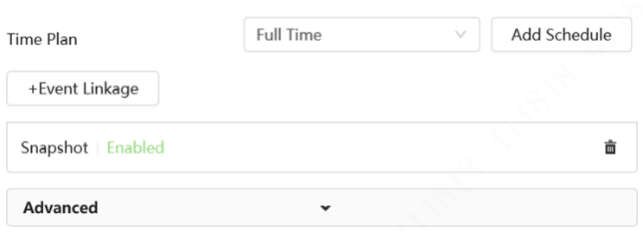
Event Linkage: You can select what operation will be done when event triggered.
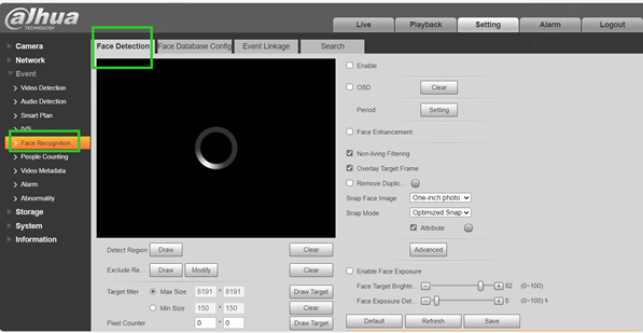
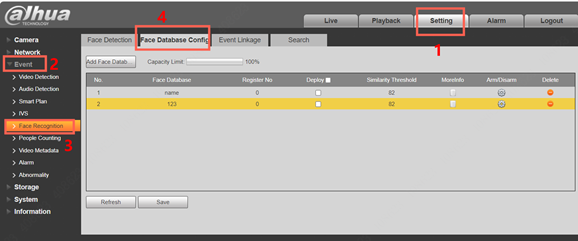
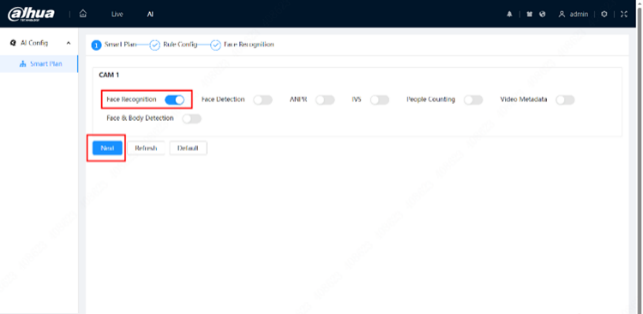
How to Set Face Recognition (WEB 3.0)
Any model and firmware with Face Recognition supported.
(This tutorial is based on WEB 3.0 firmware)
Interface may vary on some models and firmware.
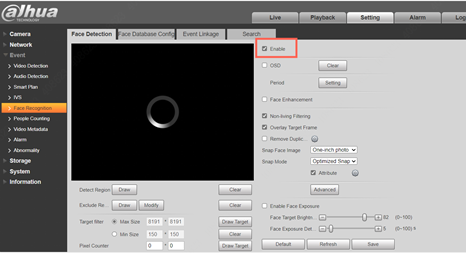
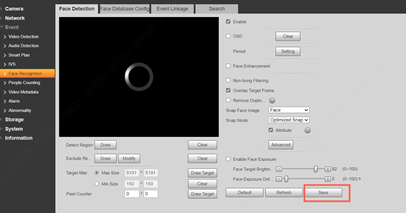
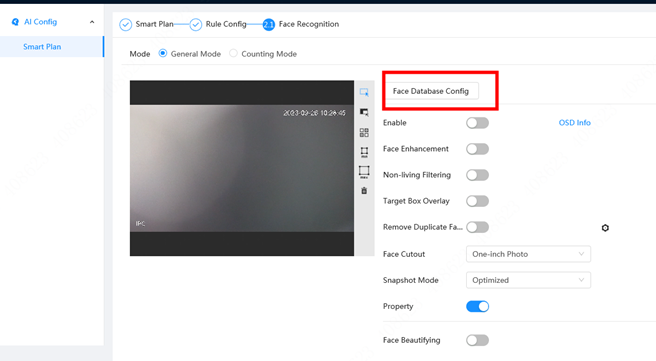
Face Recognition:
When a face is detected in the area, the system compares the captured face image with the information in the face database, and links alarm according to the comparison result.

| Parameter | Description |
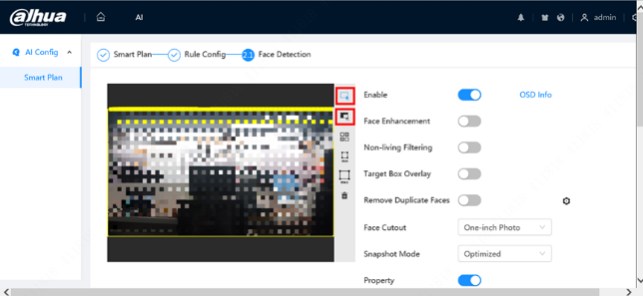
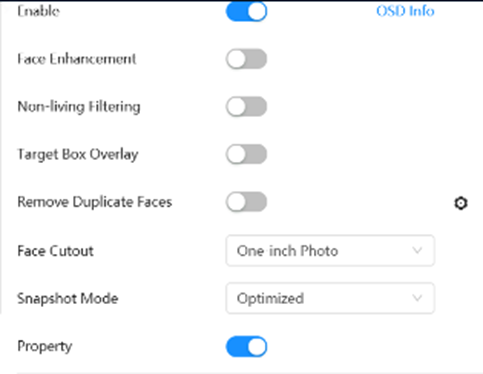
| OSD Info | Click OSD Info , and the Overlay page is displayed, and then enable the face statistics function. The number of detected faces is displayed on the Live page. |
| Face Enhancement | Click to enable face enhancement, and it can preferably guarantee clear face with low stream. |
| Non-living Filtering | Filter non-living faces in the image, such as a face picture |
| Snap Face Image | Set a range for snapping face image, including face picture, one-inch picture, and custom. |
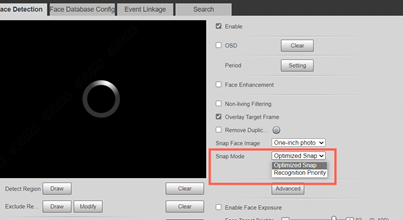
| Snapshot Mode | Optimized Snapshot : Capture the clearest picture within the configured time after the camera detects face.
Recognition Priority : Repeatedly compare the captured face to the faces in the armed face database, and capture the most similar face image and send the event. We recommend you use this mode in access control scene
|
| Attribute | Select the Attribute check box, and click to set the display of face attribute during the face detection. |
| Face Beautifying | Enable Face Beautifying to make face details clearer at night. After enabling this function, you can adjust the level. The higher the level, the higher the beautifying level. |
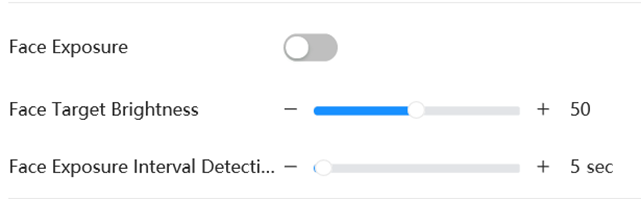
| Face Exposure | Select the Enable Face Exposure check box. When a face is detected, the camera can enhance brightness of the face to make the face image clear. |
| Face Target Brightness | Set the face target brightness. It is 50 by default |
| Face Exposure Detection Interval | Set the face exposure detection interval to prevent image flickering caused by constant adjustment of face exposure. It is 5 seconds by default. |
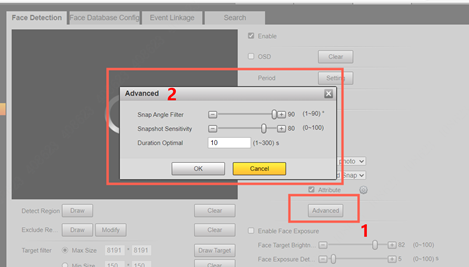
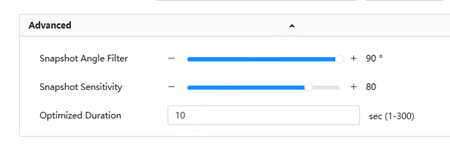
| Advanced | Snapshot Angle Filter : Set snapshot angle to be filtered during the face detection. Snapshot Sensitivity : Set snapshot sensitivity during the face detection. It is easier to detect face with higher sensitivity.Optimized Time : Set a period to capture the clearest picture after the camera detects face.
|
| Pixel Counter | Click Draw Target next to Pixel Counter, and then press and hold the left mouse button to draw a rectangle, the Pixel Counter then displays its pixel. |
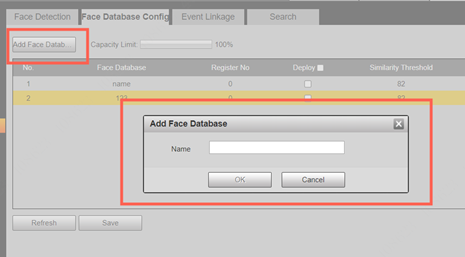
By setting face database, the face database information can be used to compare with the face detected.
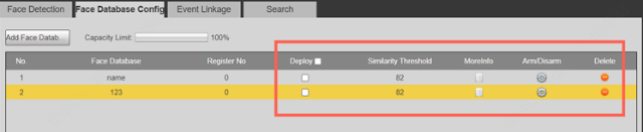
Select the Deploy check box, and the face database deployment is enabled. The captured face picture is compared to the armed face database.
The detected face matches the face database only when the similarity between the detected face and the face feature in face database reaches the configured similarity threshold.
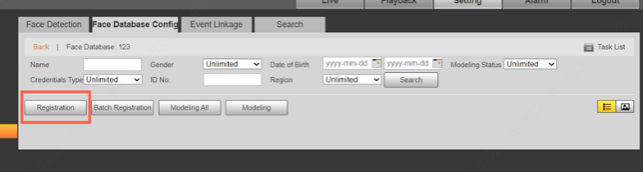
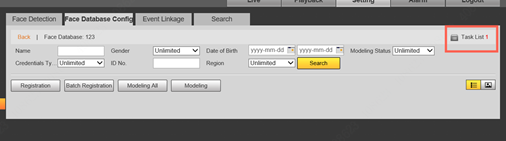
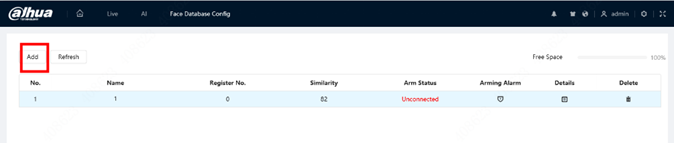
Click MoreInfo to manage face database. You can search face images by setting search conditions, register personnel, and modify personnel information.
Set the alarm time period. Alarm event will be triggered only within the defined time.
Delete the selected face database.


Change the pictures according to the details.
How to Set Face Recognition (WEB 5.0)
Any model and firmware with Face Recognition supported.
(This tutorial is based on WEB 5.0 firmware)
Interface may vary on some models and firmware.
Face Recognition:
When a face is detected in the area, the system compares the captured face image with the information in the face database, and links alarm according to the comparison result.

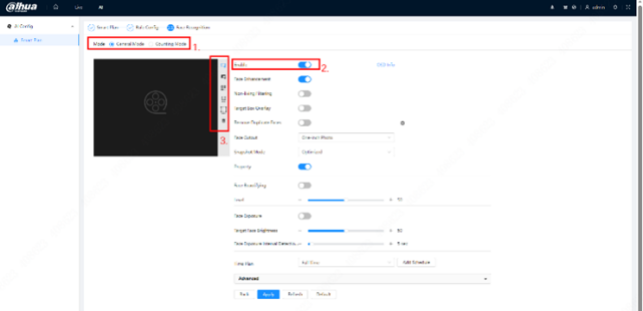
Click other icons at the right side of the image to draw detection area, exclusion area, and filter targets in the image.
| Image | Description |
 |
draw a face detection area in the image, and right-click to finish the drawing |
 |
draw an exclusion area for face detection in the image, and right-click to finish the drawing. |
 |
draw the minimum size of the target. |
 |
draw the maximum size of the target. Only when the target size is between the maximum size and the minimum size, can the alarm be triggered. |
 |
press and hold the left mouse button to draw a rectangle, the pixel size is displayed. |
 |
delete the detection line. |
| Parameter | Description |
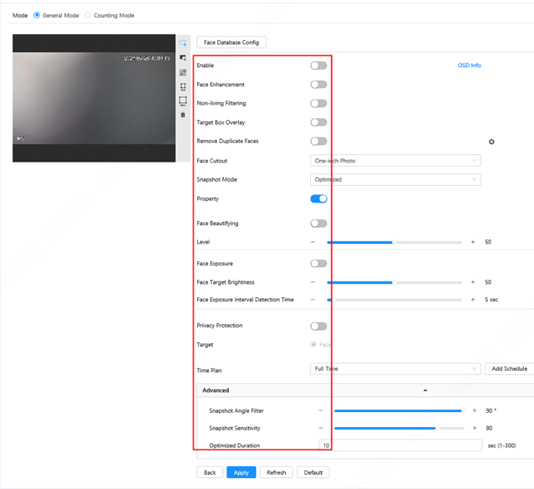
| OSD Info | Click OSD Info , and the Overlay page is displayed, and then enable the face statistics function. The number of detected faces is displayed on the Live page.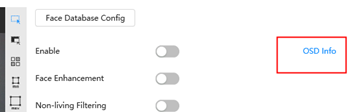 |
| Face Enhancement | Click to enable face enhancement, and it can preferably guarantee clear face with low stream. |
| Non-living Filtering | Filter non-living faces in the image, such as a face picture |
| Target Box Overlay | Click to enable the function, and then you can add a bounding box to the face in the captured picture to highlight the face. The captured face picture is saved in SD card or configured storage path. |
| Remove Duplicate Faces | During the configured period, the duplicate faces are displayed only once to avoid repeated counting. |
| Face Cutout | Set a range for the captured face image, including face, one-inch picture, and custom. |
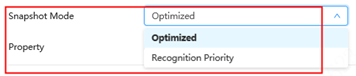
| Snapshot Mode | General mode:
Optimized Snapshot : Capture the clearest picture within the configured time after the camera detects face. Recognition Priority : Repeatedly compare the captured face to the faces in the armed face database, and capture the most similar face image and send the event. We recommend you use this mode in access control scene |
| Property | Click next to Property to enable the properties display |
| Face Beautifying | Enable Face Beautifying to make face details clearer at night. After enabling this function, you can adjust the level. The higher the level, the higher the beautifying level. |
| Face Exposure | Enable Face Exposure. When a face is detected, the camera can enhance brightness of the face to make the face image clear. |
| Face Target Brightness | Set the face target brightness. It is 50 by default |
| Face Exposure Detection Interval | Set the face exposure detection interval to prevent image flickering caused by constant adjustment of face exposure. It is 5 seconds by default. |
| Privacy Protection | Enable this function, and the faces will be blurred by mosaic when they are detected. |
| Advanced | Snapshot Angle Filter : Set snapshot angle to be filtered during the face detection. Snapshot Sensitivity : Set snapshot sensitivity during the face detection. It is easier to detect face with higher sensitivity.Optimized Time : Set a period to capture the clearest picture after the camera detects face.
|
By setting face database, the face database information can be used to compare with the face detected.
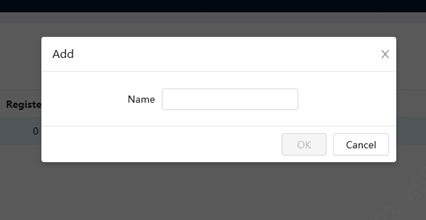
Click the text box under Name to edit the name of the face database.

Click to configure the parameters of arm alarm.

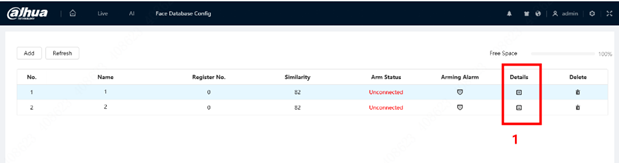
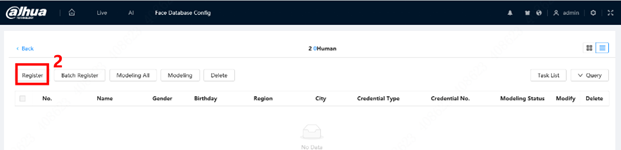
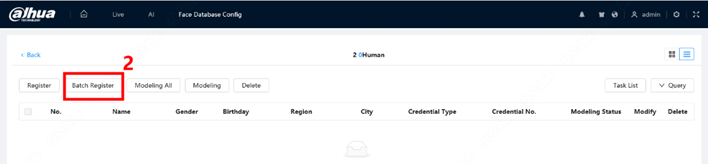
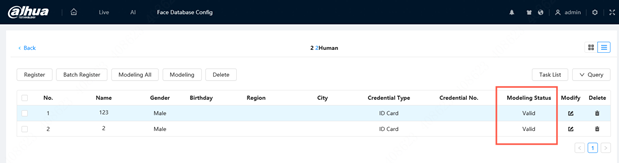
Clickto manage the face database. You can search face, register, batch register, modeling all, modeling, and delete faces

Click to delete the face database.

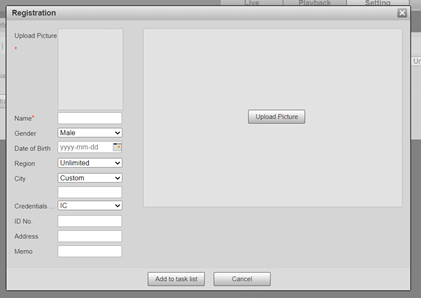
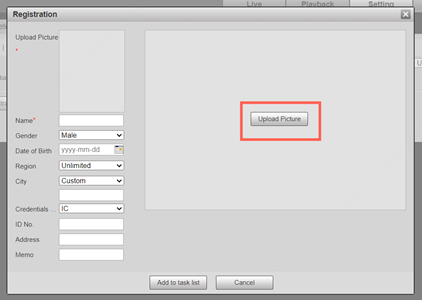
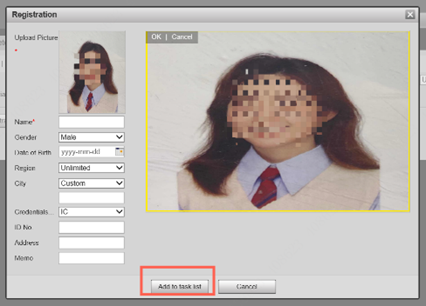
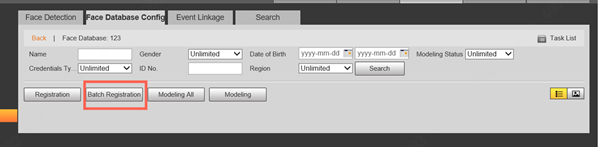
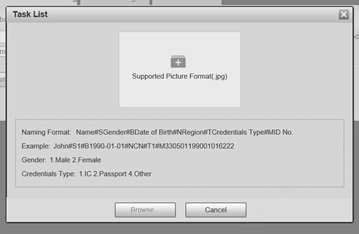
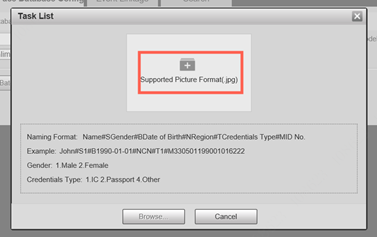
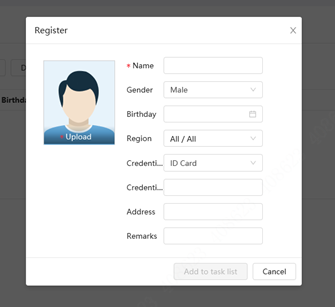
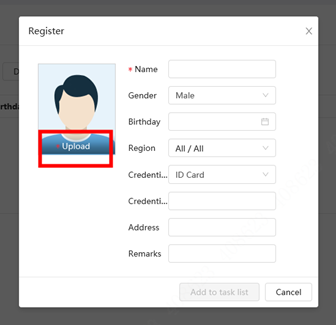
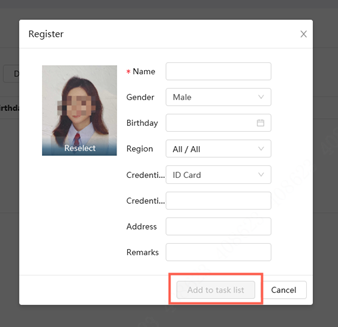
Add face picture to the created face database. Single adding and batch importing are supported. Requirements on face pictures.
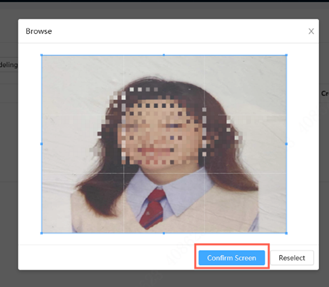

, and then click Operation


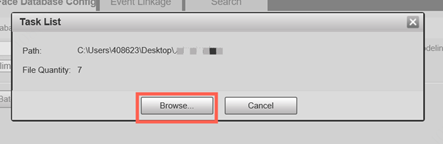
Face Database Config > details > Batch Register > Click Select Picture, and select storage path of the file > Click Import to import the face pictures

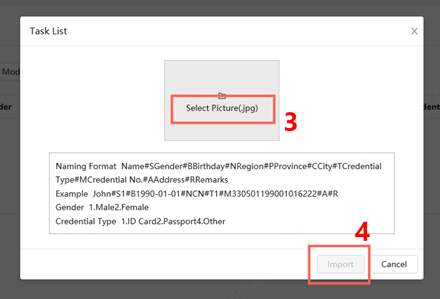
When the modeling status is Valid in the list or is displayed at the lower-left corner of the thumbnail, it means the modeling succeeded
Add Comment