
Tenda NVRs FAQs All Model, The TN3108-8P are high-performance NVRs featuring 4K 8MP video input and output, 250m PoE long-distance transmission, and plug-and-play simplicity. With smart encoding to save storage and compatible with ONVIF protocol, it integrates seamlessly with other camera brands. Intelligent video categorization enables quick searches, while support for PC, App, and Web platforms ensures effortless management. Ideal for restaurants, shops, offices, parks, and schools.
What should I do if the NVR cannot be powered on
What should I do if the camera cannot be powered on?
This FAQ applies to all models of Tenda’s NVR device.
Method 1: Please change to a 1080P or higher resolution monitor, or log in to the device’s web page to change the output resolution to fit the monitor.
Method 2: Please use a NVR’s dedicated power adapter, or remove the hard drive first and try to boot.
Method 3: If the NVR device stays on this page, please contact technical support to obtain the firmware package for upgrade.

If the above steps still do not solve your problem, it may be the camera’s hardware failure. Please contact the supplier for exchange or return to the factory for repair.
Tenda NVRs FAQs All Model
[NVR-1.6] How to upgrade the nvr’s firmware version
This FAQ is designed to help users understand how to update the nvr’s firmware version and the different update methods.
The firmware upgrade function enables the NVR to get new or more stable performance.
Local Management(GUI):The NVR only supports Local Upgrade for now.
Navigate to Maintenance > Device Upgrade.
Method 1:It is applicable for the NVR that cannot be connected to the mouse and the USB storage device at the same time.
Step 1 Visit www.tendacn.com to download the latest upgrade firmware of the corresponding camera model, and unzip it to the root directory of the USB device.
Step 2 Save the upgrade file to the root directory of the USB storage device.
Step 3 Log in to the GUI of the NVR to upgrade firmware.
1. Navigate to Maintenance > Device Upgrade, and click Local Upgrade.
2. Unplug the mouse and connect the USB storage device to the USB port of the NVR within 1 minute.
Note:
(1)To avoid damage to the NVR, use the correct upgrade file. Generally, the firmware upgrade file is suffixed with .bin.
(2)During upgrading, do not directly cut off the power supply of the NVR; it may cause upgrade failure or NVR damage.
(3)The NVR can recognize USB storage devices formatted as FAT32, exFAT and NTFS.
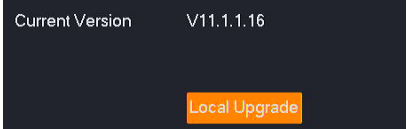
After the system detects the upgrade file, the upgrade starts automatically. Please wait with patience. After the upgrade completes, unplug the USB storage device, re-plug in the mouse to enter the GUI of the NVR and check the Current version of the NVR on the Device upgrade page to confirm that it is the same as the firmware version you just upgraded.
Method 2: It is applicable for the NVR which can be connected to the mouse and the USB storage device at the same time.
Step 1 Visit www.tendacn.com to download the latest upgrade firmware of the corresponding camera model, and unzip it to the root directory of the USB device.
Step 2 Save the upgrade file to the root directory of the USB storage device.
Step 3 Log in to the GUI of the NVR to upgrade firmware.
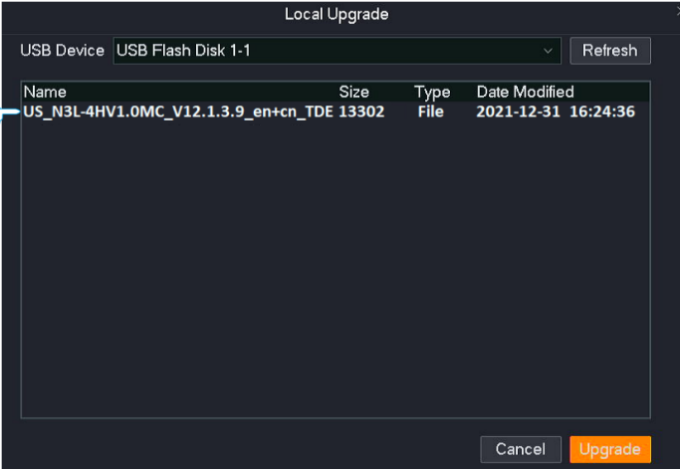
1. Navigate to Maintenance > Device Upgrade, and click Local Upgrade

2. Click the drop-down list to select your USB storage device, then select upgrade file (the suffixed with .bin.), and click Upgrade.
Wait for a moment until the ongoing process finishes. Log in to the GUI of the NVR again. Check the Current Version of the NVR on the Firmware Upgrade page to confirm that the firmware version of your NVR is the same as the latest firmware version
Web Management:
Step 1 Log in to the web UI of the NVR.
Step 2 Navigate to System Management > System Maintenance > Device Upgrade.
Step 3 (If you have got the upgrade file, skip this step) Click Tenda Download Center, and then download the latest upgrade file of the corresponding model NVR to the local computer and unzip it.

Step 4 Click Select File

Step 5 Target the firmware file downloaded previously, and click Open. The following figure is for reference only
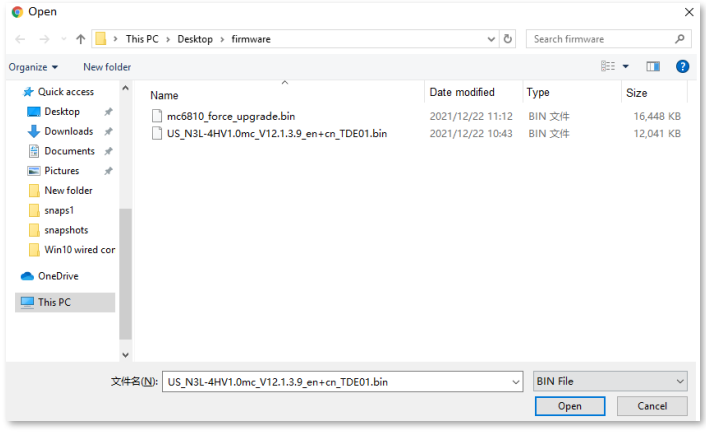
Step 6 Click Local Upgrade.
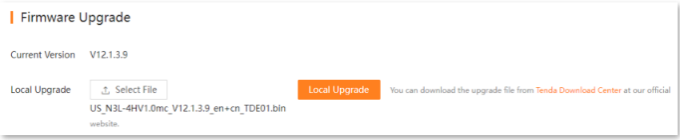
Wait for a moment until the ongoing process finishes. After the upgrade completes, log in to the web UI of the NVR again, and check the Current Version on the Firmware Upgrade page to confirm whether the firmware version is correct.
Why Tenda HTTPS Web Interface Is Detected As Unsecure by Some Web Browsers
Sometimes, we receive some feedbacks which are related to the security issue of Tenda web interface management via HTTPS. When customers enable Local Management via HTTPS option on Tenda router to stay extra safe, some web browsers still report Not Secure when accessing HTTPS Tenda web interface however. This article will explain why this happens with details.
The error message reported by some web browsers for Tenda https web interface would be like the following picture:

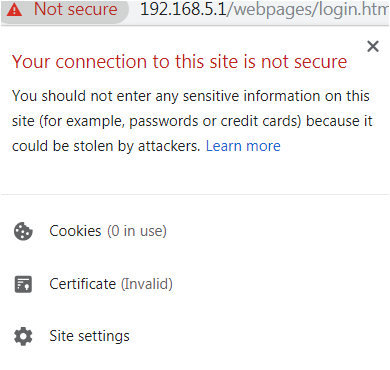
The reason why our browsers recognize tendawifi.com as “insecure” is that tendawifi.com’s Certificate is a self-signed Certificate. Most browsers do not accept this kind of Certificate because tendawifi.com is not an authoritative CA.
However, even if our self-signed Certificate is not trusted, the connection between your browser and the tendawifi.com server is secure.
A Certificate’s purpose is only to allow a client verify an unknown server. It has nothing to do with the encrypted connection. The data transmitted between the browser (client) and tendawifi.com (server) remains safe and encrypted. No one else could decrypt these data except the client and the server.
How to find your Tenda router’s IP address
How to find your Tenda router’s IP address?
Sometimes you may fail to access http://tendawifi.com or http://192.168.0.1 to manage your Tenda Router and would like to access the Router’s IP address directly as a workaround.
Normally your Tenda Router’s default IP address is http://192.168.0.1 or http://192.168.1.1; Tenda’s default IP address is http://192.168.0.1.
While if your network manager has changed it before, you can refer to the following methods to find your Tenda Router’s IP address according to your operation system.
Windows/MacOS/Linux/iOS/Android/Chrome OS
Find your Router’s IP address on Windows
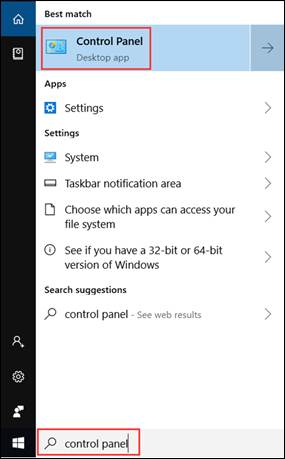
1. Open Control Panel.
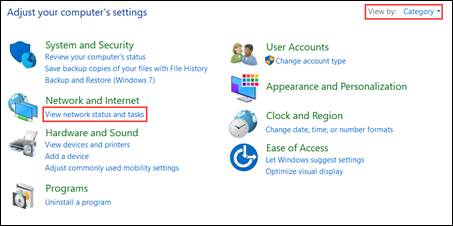
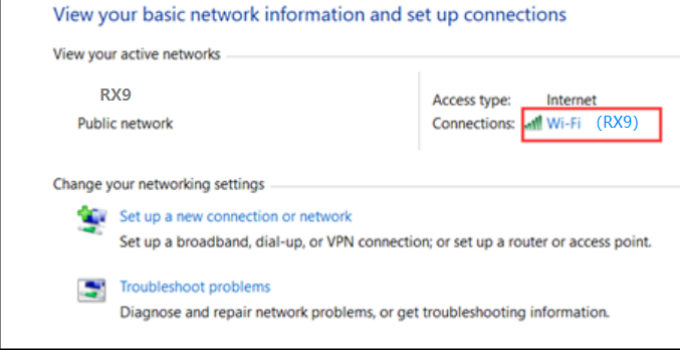
2. On the top right, choose to view by Category. Then click View network status and tasks in Network and Internet category.
3. Click your network connections.
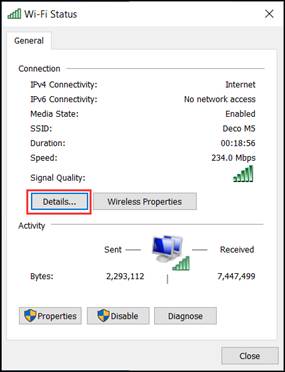
4. Click Details in the network status window.
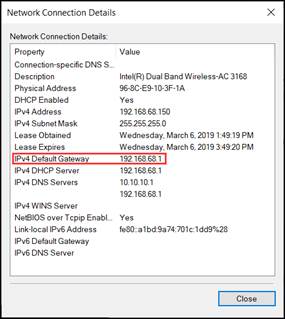
5. You can find your router’s IP address show as IPv4 Default Gateway.
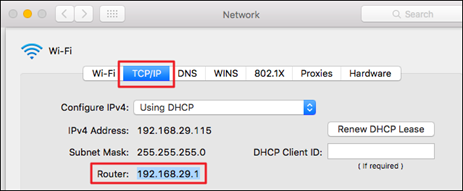
Find your Router’s IP address on Mac OS
1. At the top, click Apple > System Preferences > Network.
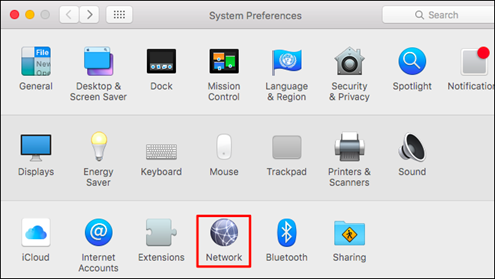
2. Click your network connection. then click Advanced at the bottom right.
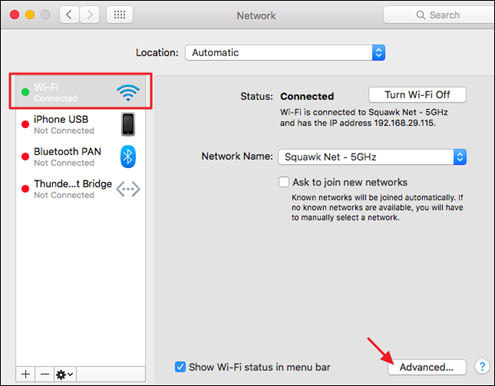
3. Click TCP/IP. Then you can find your router’s IP address show as Router.
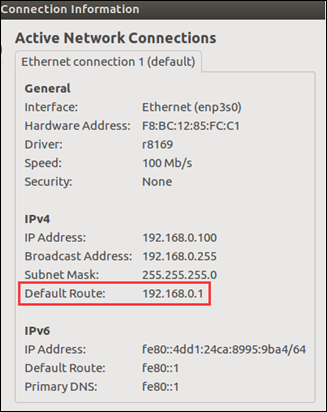
Find your Router’s IP address on Linux
1. Click the setting icon in the taskbar.
2. Click Connection Information. Then you could find your Router’s IP address show as Default Router.
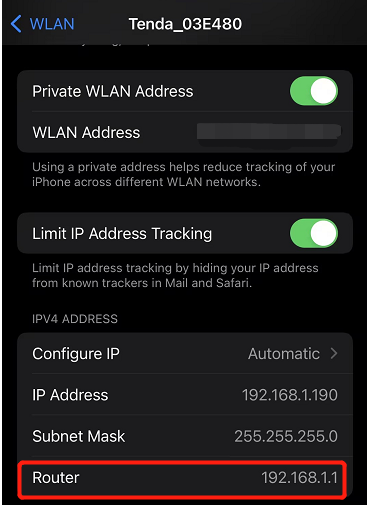
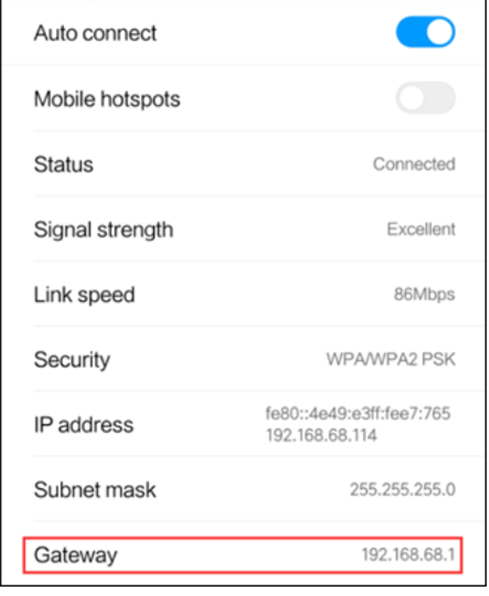
Find your Router’s IP address on iOS
Go to Settings > WLAN. Click your Wi-Fi network. Then you can find your Router’s IP address show as Router.
Find your Router’s IP address on Android
Go to Settings > WLAN. Click the details icon. Then you could find your Router’s IP address show as Gateway.
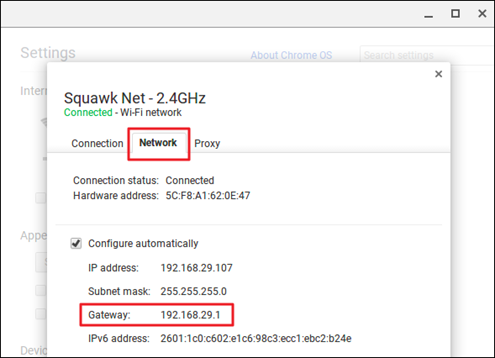
Find your Router’s IP address on Chrome OS
1. Click the notification area at right side of your taskbar, click Connected to. Then click your network connection.
2. Click Network. Then you can find your Router’s IP address show as Gateway.
How to reset Tenda device to factory default
How to reset Tenda router to factory default/What should I do if I forget my WiFi password?
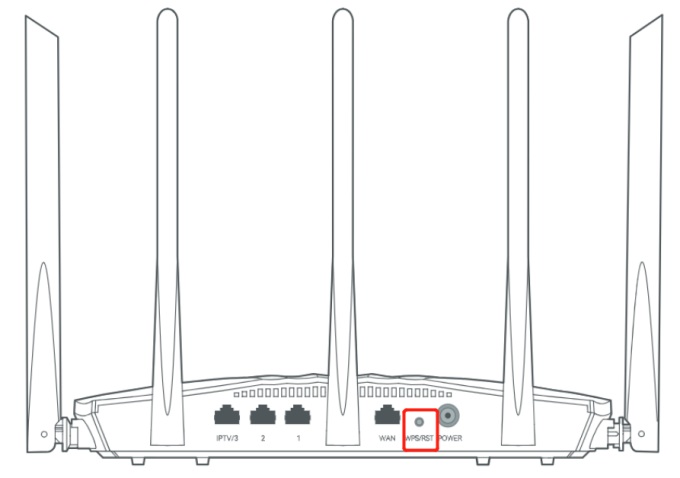
Long press the reset(RST) button (It’s on the back side of the router) like for 8-10s, then the LED will start to blink. It means you successfully get back to the factory default.
Notice:
1. A hard reset will restore your device to factory default settings. You should reconfigure the device from scratch or you can load the configuration file you have backed up before the reset.
2. For these models, we could see WPS/RST button on the rear panel/the Front Panel. To use WPS function, please push the button for less than 5 seconds, and then the WPS LED will flash; to reset the router, please push the button for at least 10 seconds.
There are two methods to reset to the Router’s factory defaults:
Method 1: Hard reset/By pressing the RST button
With the Router powered on, press and hold the WPS/RESET button (more than 10 seconds) until the SYS LED becomes quick-flash from slow-flash. Then release the button and wait the Router to reboot to its factory default settings.
By default, Tenda routers broadcast their network name (SSID) to make it easier for users to see and connect to the network. Otherwise, the users need to know the network name and manually connect to it. Disabling SSID broadcasting is a good way to reduce the risks of being an easier target of network intruders. You can choose to hide SSID to disable the SSID broadcasting.
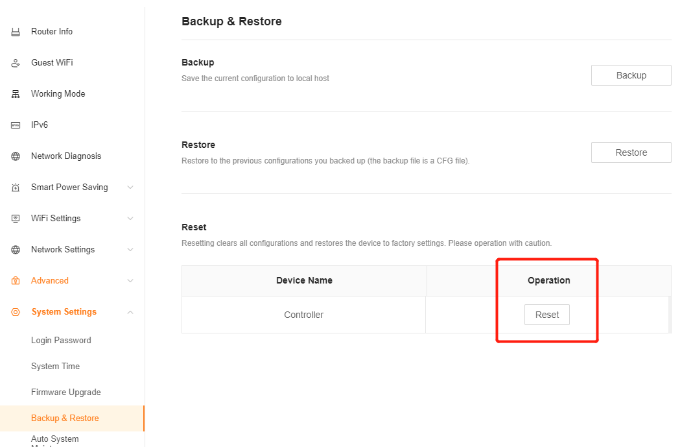
Method 2: By Router’s Web Interface
Go to the router web UI configuration page, then go to More > System Settings > Backup & Restore > Reset page, then click on the Reset and wait the Router to reboot to its factory default settings.
Note:
1. Make certain that the router is powered on before it restarts completely.
2. The default IP address/domain name can be found at the bottom label of the product, and the default login username and password both are admin for older routers (all lower case), newer routers are longer this anymore.
How to add a camera to an NVR
Function introduction:
Tenda NVR supports manual and automatic addition of camera devices, and also supports setting scheduled restart plans for SMB cameras.
Operation Introduction:
Ⅰ. Use Google browser first, connect the computer and NVR via a wired cable or let the computer and NVR use the same WIFI to ensure that the computer and NVR are in the same LAN.
Ⅱ. Enter the IP address of the NVR in the address bar of the browser page, enter the login interface of the NVR, and log in after entering the username and password.

Ⅲ. Click Configure, then select Channel-Camera. You can choose to add devices manually or automatically.
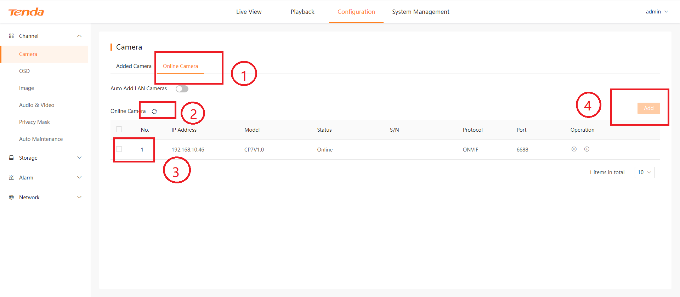
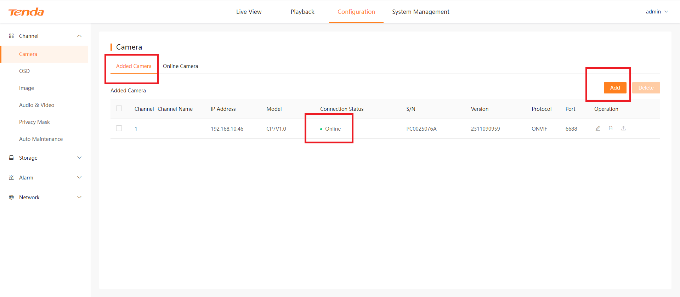
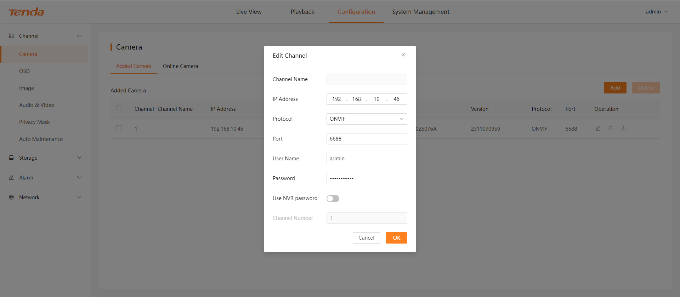
Ⅳ. Click Added Camera, then click Add, fill in the ip address ,protocol, port number, user name, and password. If the camera displays “Online”, it means it has been added successfully.
Ⅴ. When the camera and NVR are in the same LAN, you can use the automatic adding method. Click online camera, then click refresh to search for devices in the current LAN, check the corresponding device, and click add.

Wireshark capture Router interface packet operation guide
 Introduction to Wireshark Tools:Wireshark is a popular network protocol analysis tool that can capture and analyze network packets。Download address:www.wireshark.org
1、Tool preparation,Network line connection。
Grab the WAN port packet of the router and prepare netting twine, HUB, or switch or router with port mirroring function.The Wireshark is installed on the PC。
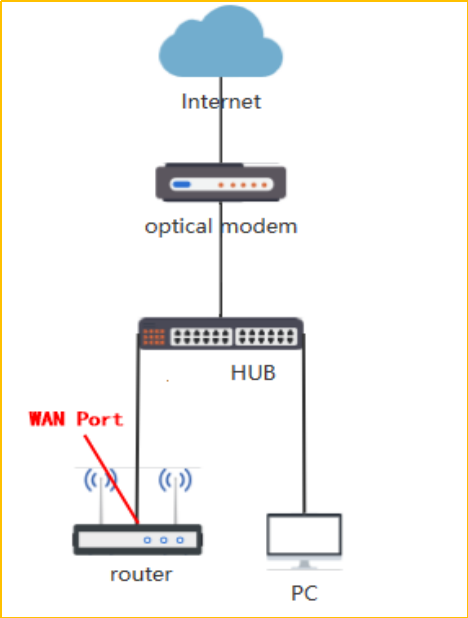
Network topology diagram:
2、Start capturing packets
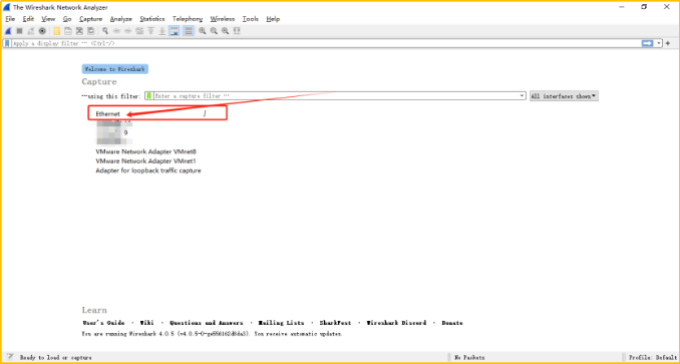
2.1 Check the network card used to connect the computer to the HUB port.
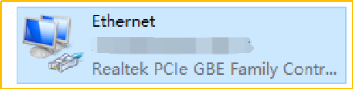
3.2The computer starts the Wireshark and starts to capture packets。find this network card, and double-click “Ethernet” (start wireshark to capture packets first, After starting the problematic router, perform packet capture and reproduce the problem)
.
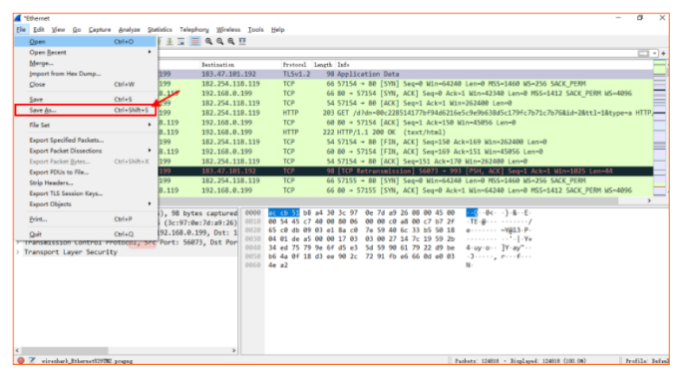
3.3 save the captured packets
Click the red button to stop capturing packets
Notice :If the data packet is too large and the email cannot be sent, you can log in to https://we.tl/t-IoLeaGqKac website to upload the file and send the link to us
.

Click File –> Save As
 .
.
Select the save path–> Name the packet–> Click Save
Finally, please send the captured data packets to us for analysis
How to find the hardware version on a Tenda device
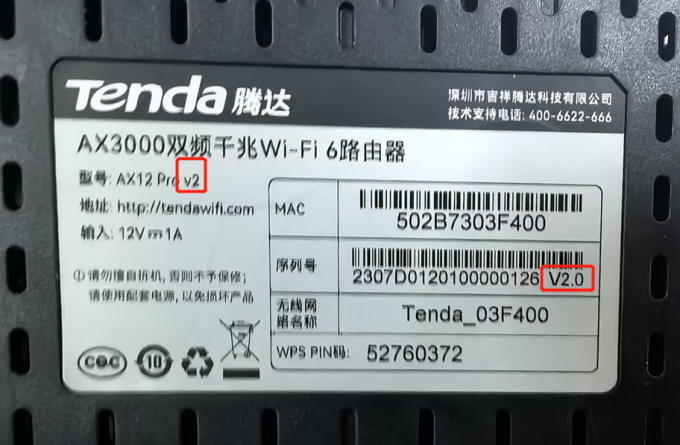
For most of products
Turn over the device so you can see a label on the back or bottom of the unit. Look for a character string next to the serial number, the looks like: “V: X.X”. This is the hardware version of the device.
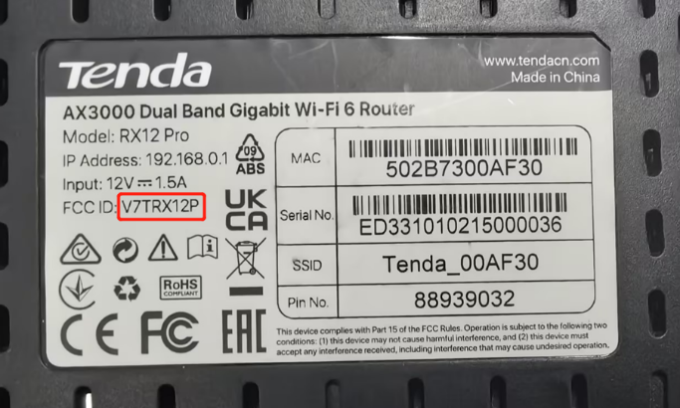
For products without labels:
The number at the end of the FCC ID indicates the hardware version. If there is no version number, like V7TRX12P, after the model number, that means it’s version 1.
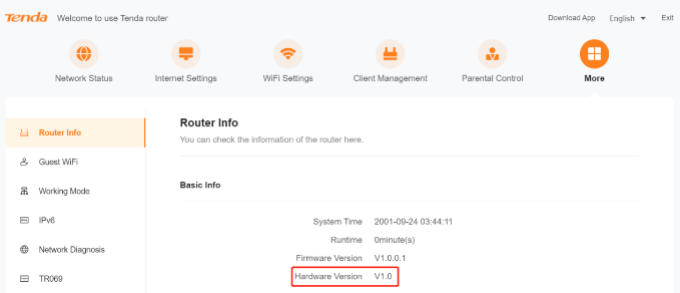
For products with management interface:
Open a web browser and enter the domain name which can vary between units in the address bar. The address for your device can be found on the label on the back or bottom of the unit.
Below are the official domains currently in use:
Router – http://www.tendawifi.com
Range Extender – http://re.tenda.cn
There is a character string “Ver:X.Y” (for example, Ver:1.0) in the Serial Number field, and the number X is the hardware version of the device. If the string is “Ver: 1.1”, normally it means that the hardware version is V1. Different model has different management interface.
.
Add Comment