
Smart Alarm Security Camera is a battery-operated security camera that’s designed for indoor use. It records at 1536p and has a wide field of view at 125 degrees. The battery in the Smart Alarm Indoor Camera can also last up to 3 months on a single charge
Overview
The SimpliSafe® Smart Alarm Wireless Indoor Security Camera is a battery-operated security camera that’s designed for indoor use. It records at 1536p and has a wide field of view at 125 degrees. The battery in the Smart Alarm Indoor Camera can also last up to 3 months on a single charge.
Need to purchase a Smart Alarm Indoor Camera? You can find it available for purchase on our website .
Before Getting Started
You’ll want to unbox your Smart Alarm Indoor Camera and plug it into power to charge it before installation. You also have the option to install the camera while it is plugged into an outlet; however, we recommend you fully charge the camera before placing it in its final location.
You will need the following tools before installing your Smart Alarm Indoor Camera:
You’ll also need to make sure your system is running the latest firmware version.
Watch the video below for a hands-on experience from our team of experts for the installation process
To install the Smart Alarm Indoor Camera, follow the steps outlined in the guided flow below:
Open the SimpliSafe® Mobile App
Open the SimpliSafe® Mobile App on your phone or tablet.
Tap on the three-bar menu in the upper left corner of the screen. Then choose Add Device or Camera from the list of menu options.
Choose Let’s Go to continue, then select your camera from the list of available products.
Formun Altı
What’s Included in the Box:
– Smart Alarm Indoor Camera
– USB Charging Cable
– Wall Plate
– Mounting Screws (x2)
– Wall Anchors (x2)
What You’ll Need
– USB Power Adapter (7.5W Minimum)
– Phillips Head Screwdriver
We recommend fully charging your camera using the provided USB cable prior to installing your camera.
The battery may take up to 6 hours to fully charge when using a 7.5W USB power adapter. You’ll know the battery is fully charged when the LED on top of the camera turns to a solid white.
If you plan on using the camera plugged into power, you may choose ‘Continue with Wired Power’ to proceed.
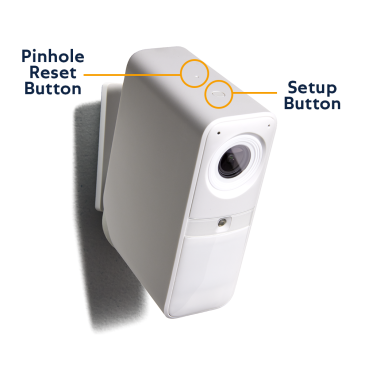
Press and release the setup button on top of the camera to wake it up. Stay close to the Base Station (~30 ft) until the camera is successfully added to the Base Station.
Error: Unfinished Setup for Cameras

This error can occur within the SimpliSafe® Mobile App when the camera has been partially removed from the Base Station but failed to fully remove itself from the mobile app.
As a first step, we recommend tapping on Finish Setup and see if it allows that camera to connect. If that step fails, the best path forward would be to remove the camera from your system using the Keypad.
Using the Keypad
Once the camera has been removed from the Keypad, you’ll need to refresh the SimpliSafe® Mobile App. To do this, open the mobile app on your phone or tablet and pull down from the top of the Camera’s tab to refresh the information presented. You can also force close the app on your phone or tablet, and relaunch it to refresh the app.
Unable to Set Up a Camera Because it is Already Associated With Another Account
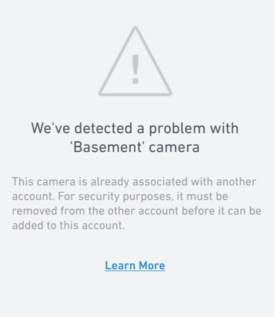
Why does this error happen?
This error usually occurs because this camera is already associated with another account. To deter theft, we do not allow a camera to be added to an account without being fully removed from the original account.
This tends to occur when a camera is purchased second-hand. The previous owner may have forgotten to remove the camera from their account. Unfortunately, SimpliSafe is unable to override this. The previous owner must remove the camera from their account.
How can I resolve this?
If you are able to contact the previous owner and ask them to remove the camera from their account, you should be able to resolve this matter rather quickly. The previous owner would need to visit the settings page of the camera in question, scroll to the bottom, and press the button for “Remove Camera”.
Smart Alarm Wireless Indoor Security Camera Wi-Fi Troubleshooting
This article will walk you through various scenarios where Wi-Fi troubleshooting may be needed to connect to and stream from your Smart Alarm Wireless Indoor Security Camera. You can scroll through the article, or click on one of the sections below to be taken directly to those steps:
Trouble Connecting To Wi-Fi
You’ll want to make sure that you are connecting to a 2.4GHz (802.11b/g/n) network, as the Smart Alarm Indoor Camera can only connect to this network type. The indoor camera is not compatible with 5GHz networks. If your network shows up on the list of available Wi-Fi networks to connect to on the App, it is 2.4GHz compatible. For the best results, we recommend connecting to the same Wi-Fi network as your Base Station and having all of the devices within a short distance of each other if you are having trouble with the Finish Setup step.
Next, let’s test the Base Station connectivity. From the Keypad, establish a fresh connection between your Base Station and network by re-entering your Wi-Fi password. You’ll do this by going to Menu > Entering your Primary PIN > System Settings > Wi-Fi > Edit Network. Then confirm the connection was successful by accessing System Settings > Diagnostics > Wi-Fi and look for Internet: Reachable. If the test was unsuccessful, please check your router’s settings to confirm that it is working properly for other devices on your network.
If the Base Station test was successful, please try the following to reset your camera.
Red LED During Setup
A solid red LED on your Smart Alarm Indoor Camera during setup may indicate that the camera is too far from the Base Station. Please move the camera closer to the Base Station to complete the setup.
‘Connecting’ Screen Times Out
If you’re connecting your Smart Alarm Indoor Camera to the same network as your Base Station and the ‘Connecting’ screen times out or fails, we recommend attempting to connect one more time.
If that fails, exit the app and press the pinhole reset button on the top of the Smart Alarm Indoor Camera (the pinhole reset button can be found behind the larger setup button on top of the Smart Alarm Indoor Camera). Then return to the app, and on the Cameras page, find the camera you began to set up and finish the setup.

Poor Connectivity Or Live Stream Quality
We recommend performing a connection check for your Smart Alarm Indoor Camera in the SimpliSafe® App. You can find this using the following steps:
You’ll want to ensure that your results meet our Wi-Fi requirements for cameras.
You can try moving the camera closer to your router to see if this helps your connectivity to see if that improves the connection speeds or alternatively, you can reduce the Picture Quality for your camera to use less bandwidth. To lower the Picture Quality, go to:
Why does my camera keep losing its Wi-Fi connection?
Updated
20 days ago
There are two main reasons that a camera may lose its Wi-Fi connection. It may be installed too far from your Wi-Fi router, or it may not have sufficient bandwidth.
If Your Camera Will Not Connect to Wi-Fi During Initial Setup
If you are having trouble connecting your camera to Wi-Fi during a first-time setup, we recommend making sure that your home network is configured to meet our system requirements.
We recommend troubleshooting your network by following the steps in the guided flow below.
If Your Camera Will Not Connect After Its Setup
If your camera had previously been set up but is now failing to connect to your Wi-Fi network, the Connection Check tool in the SimpliSafe® mobile app will tell you if there are any issues between your network and camera.
How to Run a Connection Check:
Using your results, you can improve your camera’s connection with the tips below.
Camera Wi-Fi Requirements:
Smart Alarm Wireless Indoor Security Camera Settings & Customisations
The Smart Alarm Wireless Indoor Security Camera is a battery-operated security camera designed for indoor use. It’s part of SimpliSafe’s award-winning home security system and features:
You can make adjustments to the camera’s settings and the way it behaves during different arming states by using the SimpliSafe® Mobile App.
Using the SimpliSafe Mobile App
Camera Behavior
You can control your camera’s behavior as well as its built-in privacy shutter by changing the motion detection to coincide with your system’s arming state. This means you can now adjust when your camera records as it is directly tied to your system’s arming state.
For example, if you don’t want your camera to record when the system is set to OFF, but do want it to record when it is in AWAY mode, you can now control these settings.
Motion notifications are determined by your monitoring subscription. You can learn more about which monitoring plans include push or SMS notifications on our Help Center.
Motion Detection
Motion Detection settings control how your camera will respond to motion events, such as someone walking in its view, or a car driving by.
In this menu, you can use the slider to choose the sensitivity of motion detection. We typically recommend setting this to medium. You can also set it to People Only or All Motion to better filter motion events.
Activity Zones allow you to exclude certain areas from motion events. This is good if you want to ensure that motion isn’t detected from a high trafficked area within your home, or want to exclude a window.
Note, we recommend you never point the Smart Alarm Indoor Camera at a window or entry way. Instead, place it where someone would walk across its field of view like a room or hallway.
Video Quality
Video Quality manages what quality of your streams and recordings will be at. For the Smart Alarm Indoor Camera, you can adjust this to 1536p, 960p, or 640p. The higher the stream, the more bandwidth it will use on your network. So if you’re having trouble streaming at 1536p, you can try lowering the quality to troubleshoot on your end.
Night Vision
The Night Vision setting allows you to see potential intruders or threats in the dark, by using infrared to capture video. This can be toggled to Auto, On, or Off. We recommend using Auto for the most optimal experience, however, if your camera is in a persistently dark room you may want to opt for On for better results.
Status Light
The Status Light for your camera will show you that the camera is online and functioning, at a quick glance. Toggling this off will disable the light on the front of the camera. From within the Status Light menu you can also view the different light patterns your Smart Alarm Indoor Camera can produce , and learn their meanings.
Mic & Audio
The Mic & Audio setting allows you to hear audio from your camera and also allows you to speak through the camera’s mic when viewing live streams.
Siren
The Smart Alarm Indoor Camera comes with a whopping 80dB built-in siren to relay active alarms across your system.
Add Comment