

IPC360 Home Camera Manual, IPC360 Home Explore the full range of IPC360 Home Camera features with our comprehensive guide, catering for both beginners and advanced users. Use the IPC360 Home APP to control all your IPC360 Home Camera. Download the IPC360 Home APP for free and create your user account today.
Downloads and install IPC360 Home APP
Method 1: Scan the QR code below to quickly download and install it;
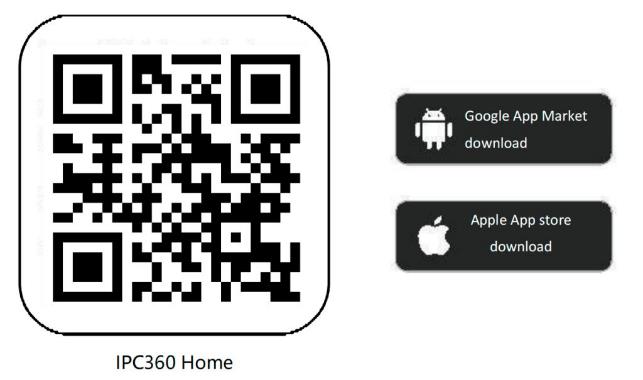
Method 2: Search for “IPC360 Home” and download the installation in the mobile app store.
Start the IPC360 Home camera
Note: Before downloading and installing, it is recommended to connect to the wireless network
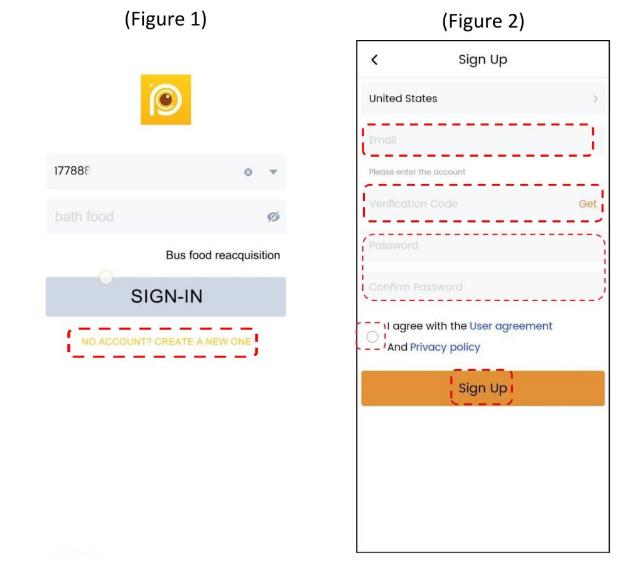
Login to IPC360 Home
Connecting the IPC360 Home Camera
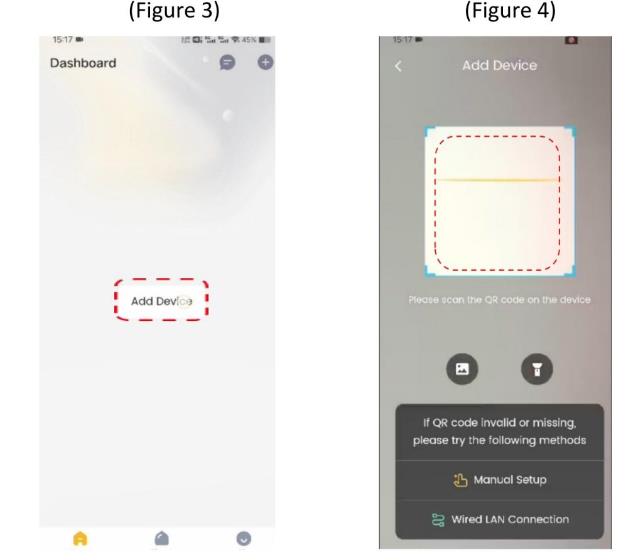
1. After logging in the APP, click the ‘+’ button in the upper right corner to add a camera (Figure 3)
2. Scan the QR code on the camera and add it (Figure 4).
3. Follow the instructions in the APP interface to connect
Note:
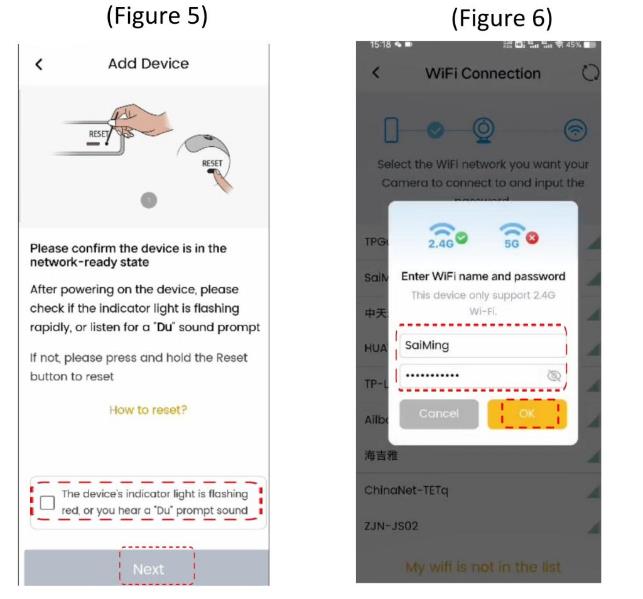
4. When the connection process prompts you that the WLAN is at risk, click Trust (Figure 5).
5. When the WiFi list pops up, please select the WiFi name you need to connect to and fill in the password, click OK (Figure 6)
6. When you hear the Internet connection, the connection is complete.
Note:
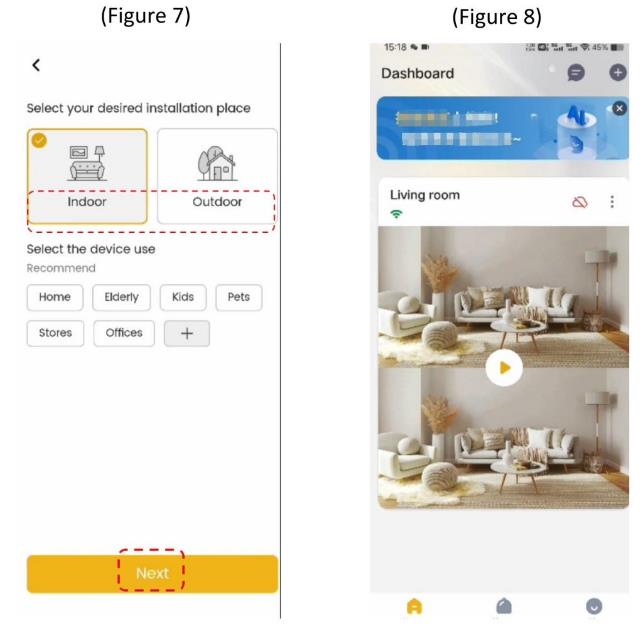
7. If the addition was successful, the interface will prompt you to enter the camera name (you can also use the default) (Figure 7).
8. Once the camera name has been set, click OK (Figure 7)
After a successful connection, the camera will appear in theAPP device list interface, which means that the camera has been successfully connected (Figure 8).
Opens the video
1. Click the “play icon” in the list of devices to enter the video interface (Figure 9)
2. Click the playback icon (position in the top left corner of thered box) to enter the video screen and can operate the relevant functions (Figures 9,10)

FAQ
Why does the camera connection fail?
1. Check that the WIFI you are connected to has a normal network or that the installation location is outside of WiFi coverage (it is recommended that you configure and reinstall the camera now).
2. Check that the WiFi you are connected to is 5G WiFi (device only 2.4G WiFi). Please switch to 2.4G WiFi to reconnect.
3.Check that the router has wireless hiding turned on and turn it off to reconnect.
Is wired connection supported?
This camera supports both wired and wireless functions outside of wireless coverage.
Why does it go offline from time to time?
1. Check that the power adapter is working properly and that the power indicator is on.
2. Is the camera too far away from the router or is the signal blocked by other objects?
What if the camera does not recognise the memory card or fails to record video?
1. Format the memory card and insert it into the slot (insert the card when the camera is turned off).
2. It is recommended to use branded memory cards, and the use of poor quality and counterfeit memory cards is prohibited to avoid damage to the device.
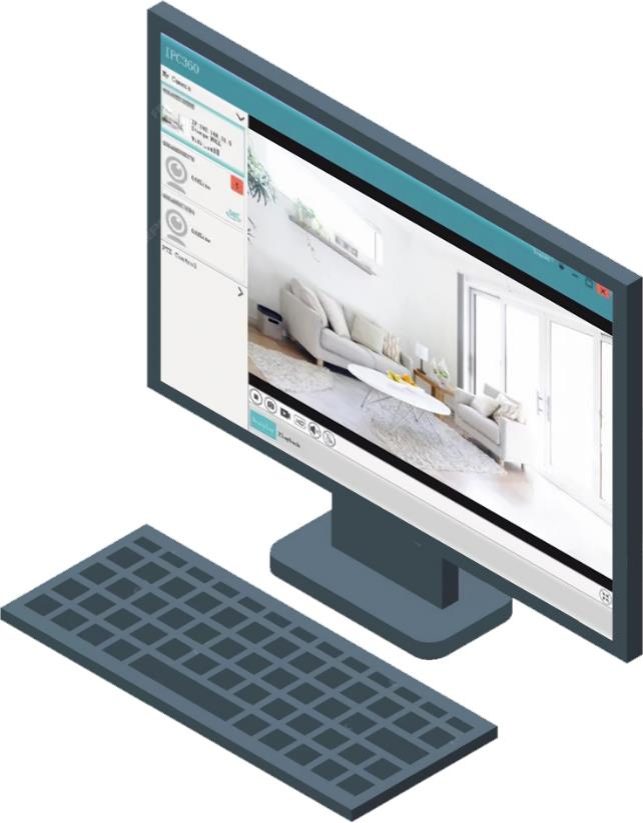
IPC360 Home For PC
IPC360 For PC
IPC360 for PC supports Windows computers but not MAC computers.
This software is only compatible with IPC360 cameras and does not support IPC360 Home.
IPC360 is an older version and is not compatible with IPC360 Home.
IPC360 Home For PC
IPC360 Home doesn’t have a PC version and can only be used on mobile phones; however, you can access it on your computer using alternative methods.
You can install BlueStacks on your computer and then use the IPC360 Home app to install it
How to Use BlueStacks on Your PC and Install IPC360 Home Apps
Step 1: Download and Install BlueStacks
.
Step 2: First Launch and Setup
The first time you launch BlueStacks, it might take a moment to load and will prompt you for some initial setup, similar to setting up a new Android phone:
.
Step 3: Install Apps
There are a couple of main ways to install apps within BlueStacks:
1. Install via Google Play Store (Recommended)
This is the most common and recommended method, just like installing apps on your Android phone:
2. Install via APK File
If you have an APK file (Android Package Kit) for an app, you can manually install it:
FAQ
Account-related
Video viewing
Detection notification
Battery
Night vision
Cloud storage
SD card recording
Share with others
.
How can family and friends access the camera?
When your friends need to access the camera, you need to go to the camera interface and share the camera with your friends. Your friends need to download the app on their phones and register a new account.
Can one camera be added to two accounts?
No, a camera can only be added to one account. However, you can use the “Share” feature to allow multiple accounts to view the same camera feed.
Can an account be logged in on multiple phones at the same time?
To ensure the privacy and security of your account, an account cannot be logged in on multiple mobile devices at the same time. If you want to share the camera view with friends and family, please use the “Share” feature.
What should I do if the email or phone number used to register the account is no longer in use?
You can still use the abandoned email address or phone number along with its password to continue logging into the App. If you cannot remember the original login email and password, please register a new account.
I forgot my account login password.
Please click the “Forgot Password” button on the App login page and follow the steps to reset your password.
Why can’t the camera detect moving objects?
It is recommended that you create specific motion zones for the areas you wish to monitor.
Motion detection is optimised to detect movement when objects cross the field of view horizontally, rather than moving directly towards or away from the camera.
Why can’t I receive alerts on my phone?
How do I adjust the alarm frequency to avoid false alarms?
What should I do if the quality of the night vision image deteriorates?
There are several factors that can affect the quality of night vision images, such as obstacles in front of the camera causing the night vision image to be too bright, or defects in the infrared sensor causing the image to be too dark. We have summarised the factors that lead to poor night vision image quality and their solutions, please check them:
If the above instructions do not resolve the night vision problem, please contact us (click the feedback button below) for assistance.
What should I do if the night vision display is bright white?
If the camera is close to obstacles, such as walls, shelves, door frames, or a lamp next to the camera lens, it will reflect the camera’s infrared light back to the camera, causing only nearby objects to be visible while the rest of the image will be very dark.
To solve this problem, try adjusting the camera’s angle and direction so that nearby surfaces or objects are not within its field of view, or move objects near the camera that might reflect infrared light; alternatively, you can turn off the infrared light in the application.
Why are night vision images so dark?
If the environment is too dark or there is no light, we recommend setting the night vision to black and white mode to get a clearer image.
What should I do if the SD card is not recognized?
Make sure the SD card is properly inserted into the camera. Check if the SD card slot is correctly aligned and ensure there is no resistance when inserting it.
Check if the SD card is damaged. You can try inserting the SD card into another device (such as a computer or another camera) to see if it can be recognized correctly.
If other devices also cannot recognize the SD card, it might be an issue with the SD card itself.
You may consider replacing it with a new one. The capacity of the SD card should be between 32GB and 256GB.
How to delete videos saved on the memory card?v
The videos stored on the memory card cannot be deleted.
Once the memory card is full, new recordings will automatically replace the old ones.
Can I watch videos in the app when my phone is not connected to Wi-Fi?
You can watch videos in the app when you have mobile data. If there is no Wi-Fi and no mobile data, you will not be able to watch videos on your phone.
There is a black spot in my video that I cannot remove.
If the camera is installed upside down, how can you rotate the video?
Due to various installation requirements, you may have mounted the camera on the ceiling or in other locations that require downward installation. If this is the case, the video image will be upside down. To rotate the video image back to its original orientation, you can adjust it in the application.
Why can’t I see my camera video in the app?
Why can’t the camera hear the sound coming from the phone?
Battery Camera Usage Safety Guide
How can I extend the battery life of my camera?
As battery life varies depending on usage and settings, there are several methods you can use to extend your camera’s battery life and protect your home 24/7.
Why does the camera battery drain so quickly?
The battery life of a camera with a built-in battery depends on how often the camera is used. The more often the camera is triggered, the faster the battery will drain.
If your camera’s battery is draining very quickly, check that you are not waking the camera too often. If the battery runs out very quickly, you can contact us (click the feedback button below) for assistance or a replacement.
How to charge a battery?
If your device has a built-in rechargeable battery, you can charge it using the charger cable supplied.
How can I delete cloud recordings that I don’t want?
Please go to the application > enter the device list > click on settings > click on cloud storage > delete the video clips you do not want.
How can I view cloud recordings if my device is stolen or offline?
Please go to the application > enter the device list > click on settings > click on cloud storage > you will see the cloud recording videos.
You can also click on the calendar icon and select the date you want to playback.
I have already subscribed to the cloud plan, but I cannot see any recorded videos. Why is that?
Log in to the app > Click on “My” > Cloud Service > Make sure your camera is added to the “Camera List.” If your camera is not in the camera list, click “Edit” and then add your camera.
Please go to Camera Settings > Detection Settings > Make sure “Motion Detection” is enabled.
Please go to Camera Settings > Click on “Cloud” > Turn on the “Upload Video to Cloud” option.
If you still cannot see the cloud recordings, it is recommended to restart your router or press the sync button at the bottom of the camera, and then reconnect the camera.
If these methods do not work, please provide feedback to us.
How to remove sharing?
If you want to remove a sharing relationship, please go to the app > Device Settings > Share Device > click on the account you want to remove > you will see a “Delete” button at the bottom of the list.
Add Comment