
Whether you’re a tech-savvy guru or a complete novice, our comprehensive guide will take you through everything from connecting your VicoHome camera to Wi-Fi and sharing access with family members, to setting up recording and detection features with ease.
We’ll even dive into the VicoHome interface and address common issues you may encounter along the way.
How To Connect VicoHome Camera To Wifi?
1. Before connecting to VicoHome, please make sure to download the VicoHome app, then create an account and sign in.
2. To turn on the VicoHome camera, press and hold the power button for 3 seconds. You’ll hear a voice prompt when the camera starts up.
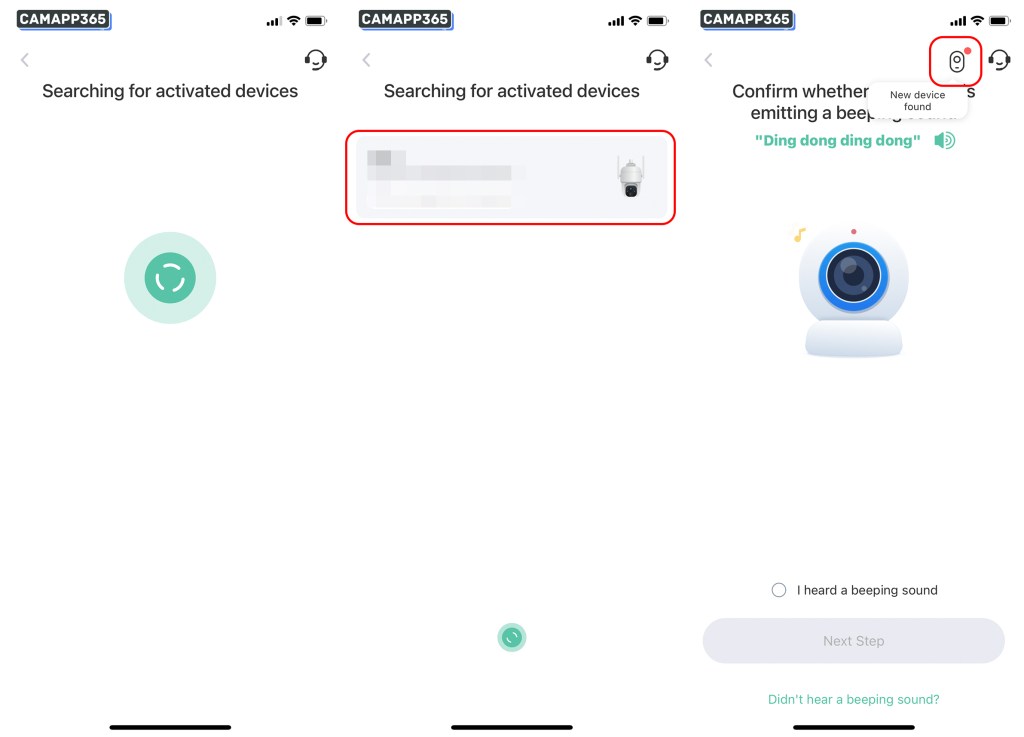
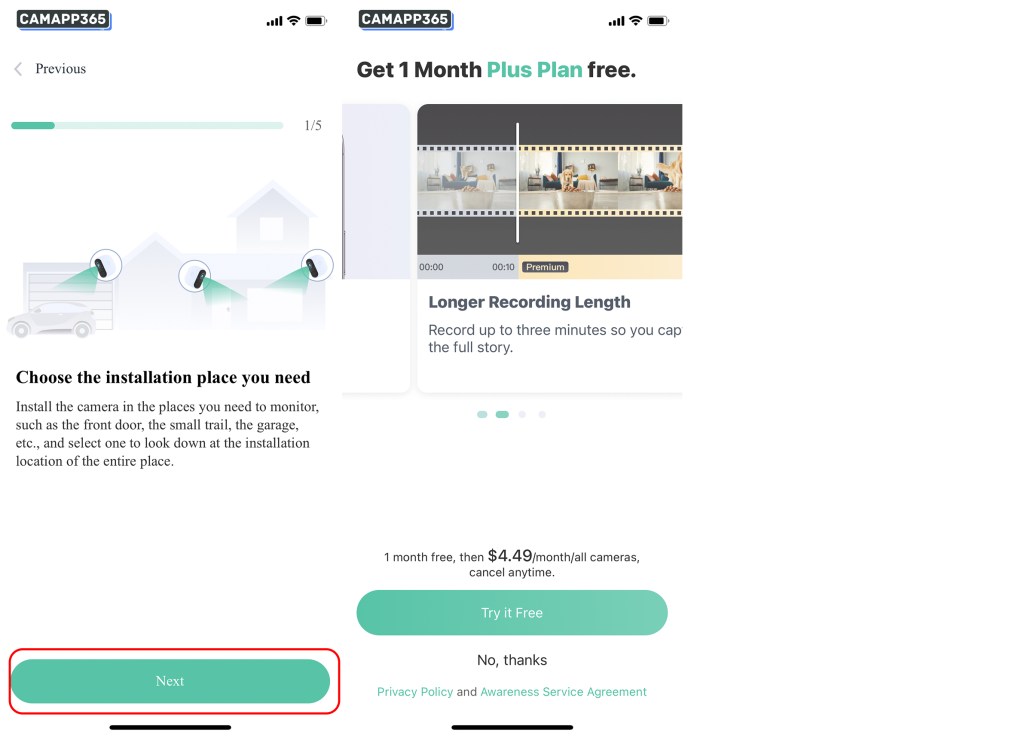
3. Tap on Add camera now or the + icon in the top right corner to link the VicoHome camera. Then, click on I heard the sound or saw the light on followed by Next Step.
![]()
AP mode connection
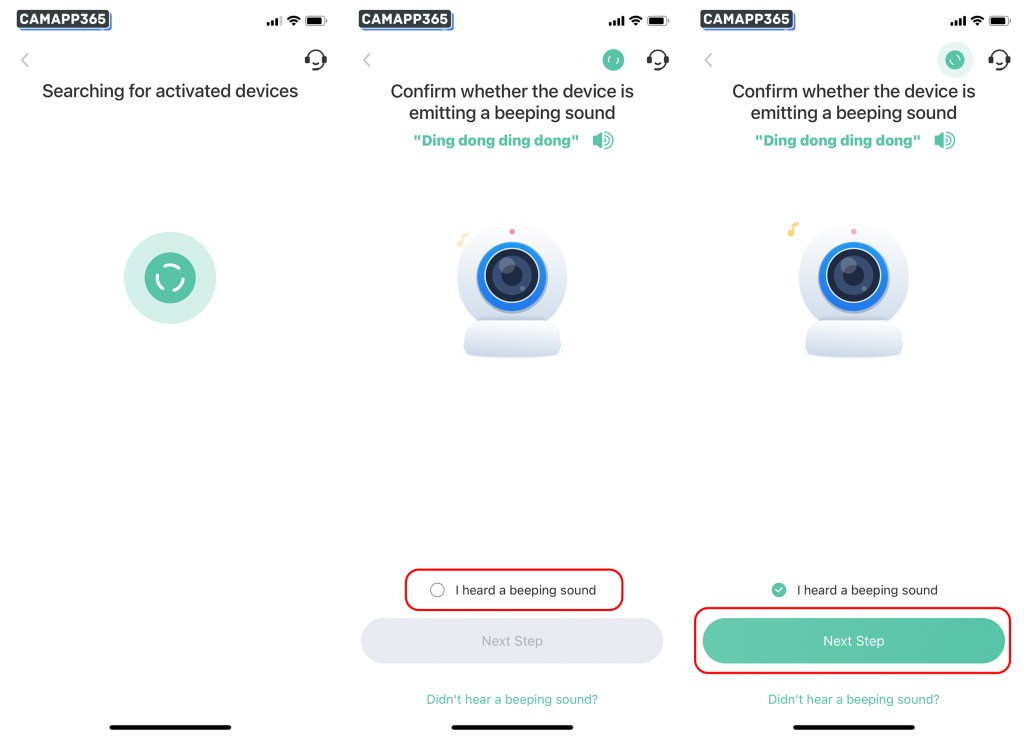
4. The VicoHome APP will search for nearby VicoHome cameras. Click on the camera that’s detected. If the camera isn’t found, make sure your camera is turned on and emitting the “Ding dong ding dong” sound.
💡 The VicoHome camera emits a “Ding dong ding dong” sound when it’s in waiting-for-connection mode. If your camera isn’t making this sound, press the power button twice to put it into connection waiting mode. (Sometimes, if you double-click the power button too quickly, it may not respond, so you might need to try a few times.)
💡 If your VicoHome camera is turned on and making the “Ding dong ding dong” sound, but the APP can’t find it, then your camera may not support AP mode. In this case, please use the QR code mode connection.
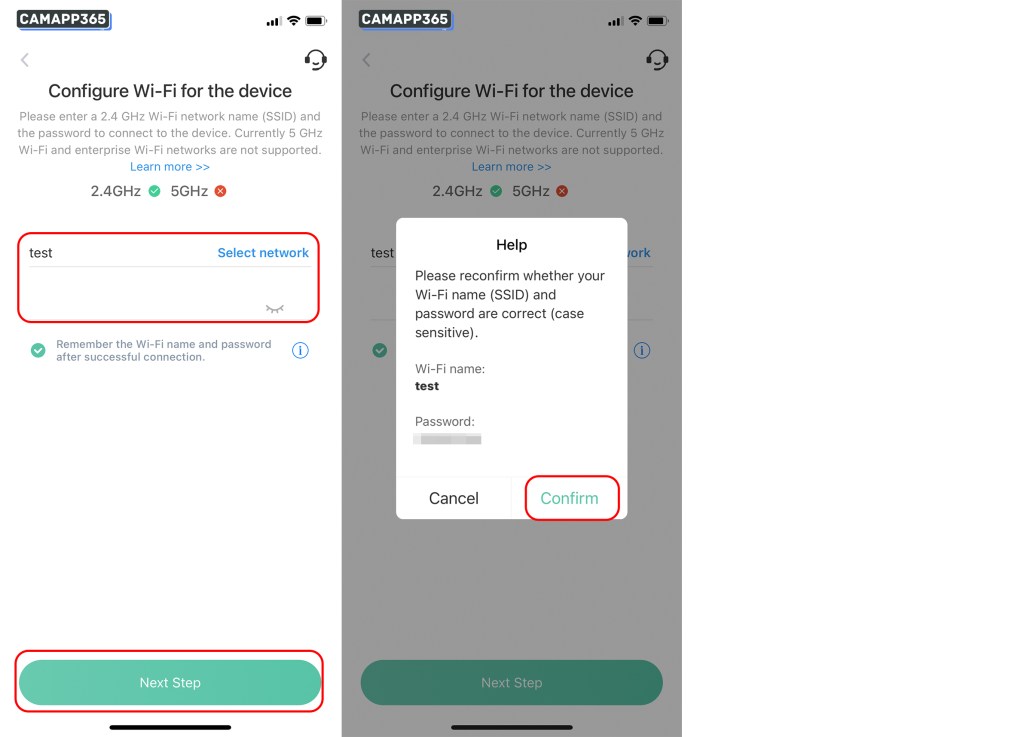
5. Confirm your Wi-Fi name and enter your password. Click Next step. Please note that the VicoHome camera only supports 2.4GHz Wi-Fi, double-check your Wi-Fi and password, then click Confirm.
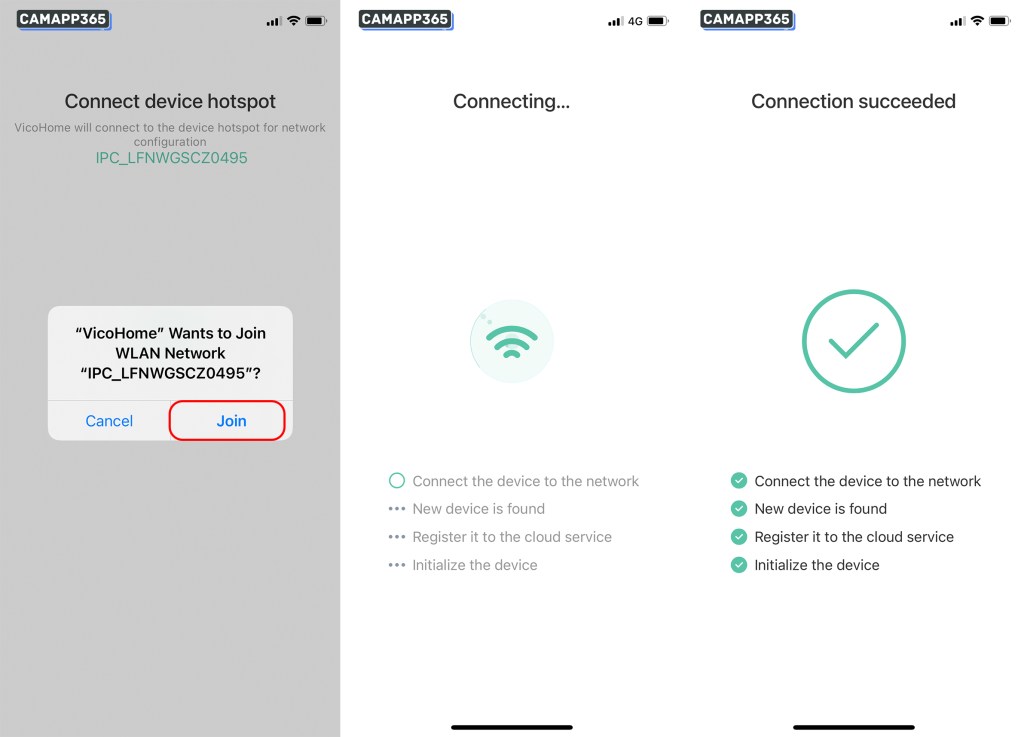
6. Click Join, and then wait for the VicoHome camera to connect to Wi-Fi, which takes about 1-2 minutes.
If you clicked Cancel, it will switch to the QR code connection mode. You can use the QR code connection or exit and start over.
7. After successfully connecting the VicoHome camera, set a name for it and then click Next Step. The VicoHome app will test the Wi-Fi signal at the camera’s current location. If the signal appears weak, it’s recommended to enhance the Wi-Fi signal or change the location.
.
See also Cameras using VicoHome (Buyer’s Guide)
.
Choose the camera’s operating mode. You can change it at any time or click Skip.
8. If it’s your first time using the VicoHome camera, VicoHome offers a one-month free subscription. You can choose to claim it or close the offer. Now you’re all set to start using your VicoHome camera.
QR code connection
4. If you’re connecting the VicoHome camera for the first time, you’ll hear a “Ding dong ding dong” sound. Tap on I heard a beeping sound.
💡 The VicoHome camera emits a “Ding dong ding dong” sound when it’s in waiting-for-connection mode. If your camera isn’t making this sound, press the power button twice to put it into connection waiting mode. (Sometimes, if you double-click the power button too quickly, it may not respond, so you might need to try a few times.)
5. Choose Connect via Wi-Fi (the VicoHome camera only supports Wi-Fi connection), then confirm your Wi-Fi name and enter the password. Click Next Step. Please note that the VicoHome camera only supports 2.4GHz Wi-Fi. Double-check your Wi-Fi and password, then click Confirm.
.
6. Display the shown QR code to the VicoHome camera for scanning, keeping a distance of 6-12 inches. The camera will emit a voice prompt when it successfully scans the QR code. Wait for the camera to connect to your Wi-Fi, which takes approximately 1-2 minutes. After successfully connecting, the app will automatically proceed to the next step.
💡 (If the camera fails to connect to Wi-Fi after 3 minutes, please refer to the VicoHome troubleshooting guide.)
7. After successfully connecting the VicoHome camera, set a name for it and then click Next Step. The VicoHome app will test the Wi-Fi signal at the camera’s current location. If the signal appears weak, it’s recommended to enhance the Wi-Fi signal or change the location.
Choose the camera’s operating mode. You can change it at any time or click Skip.
8. If it’s your first time using the VicoHome camera, VicoHome offers a one-month free subscription. You can choose to claim it or close the offer. Now you’re all set to start using your VicoHome camera.

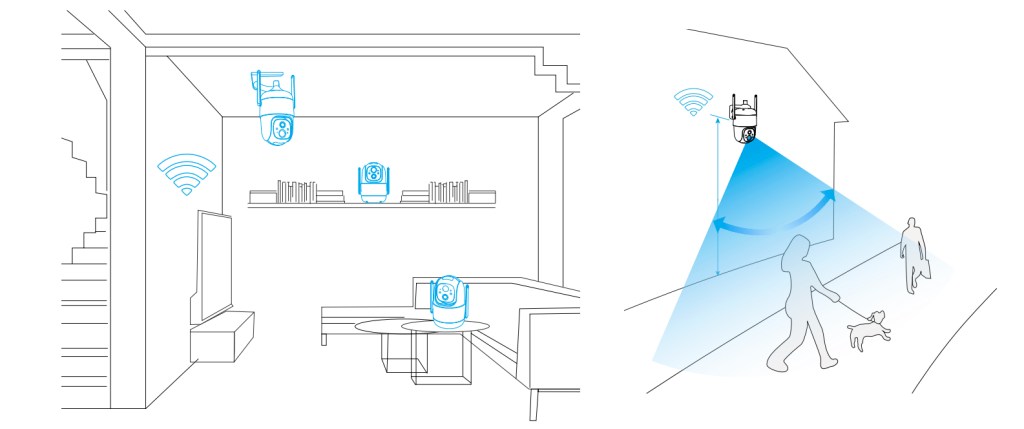
How to install a VicoHome camera?
Share VicoHome Camera
Sharing a camera allows multiple people to use the VicoHome Camera at the same time.
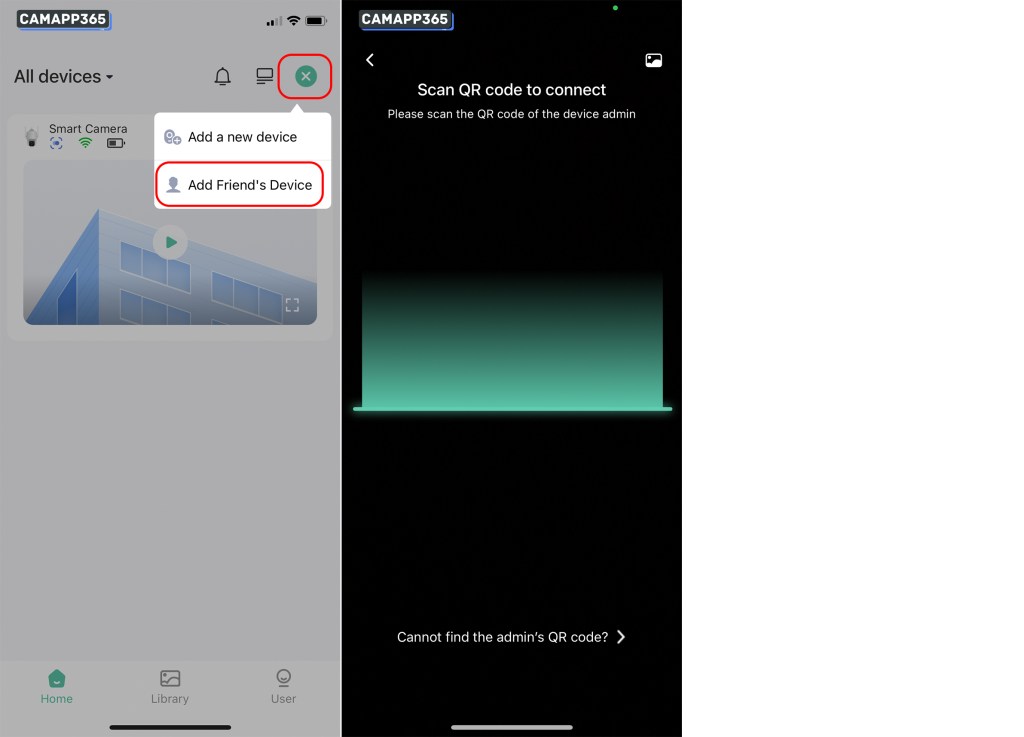
1. Click on the “Share ![]() ” icon and a QR code will appear in the Device sharing options. Save this QR code and share it with your family or friends.
” icon and a QR code will appear in the Device sharing options. Save this QR code and share it with your family or friends.
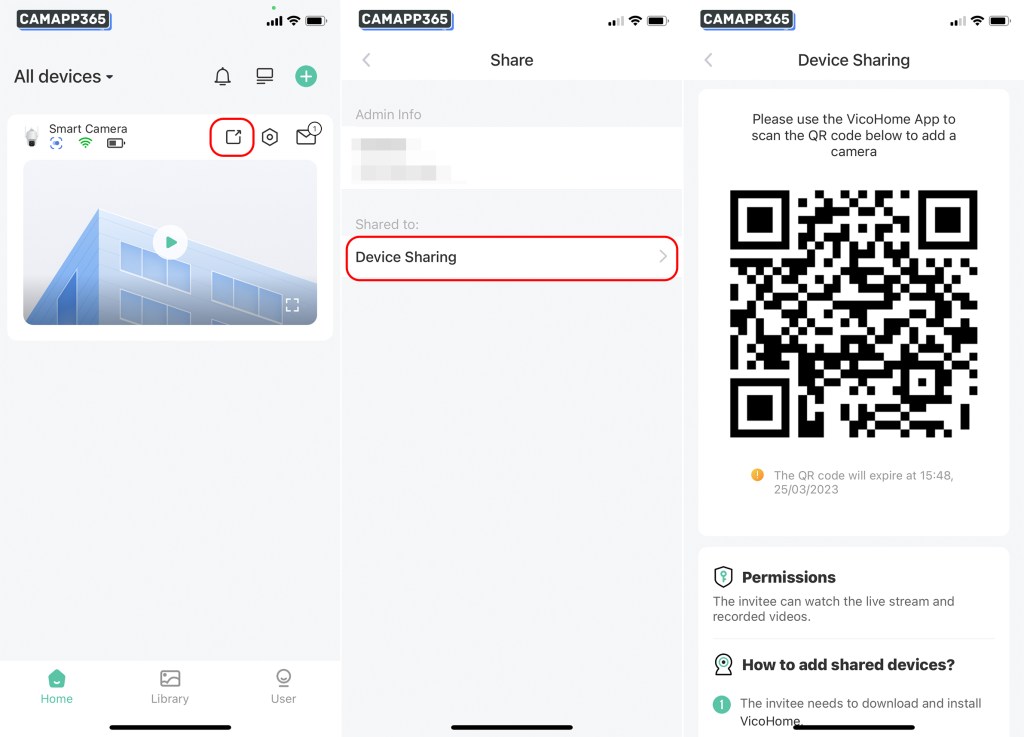
2. Invitees need to download the VicoHome App and sign in, then open the + in the top right corner, select Add Friend’s Device and scan the shared QR code to add the camera.
Motion detection settings
VicoHome cameras are enabled by default for motion detection and alarm notifications. If you need to change the settings, you can do so in the Motion Detection and Notification Setting screen.
In Motion Detection, you can adjust the detection sensitivity and recording time.
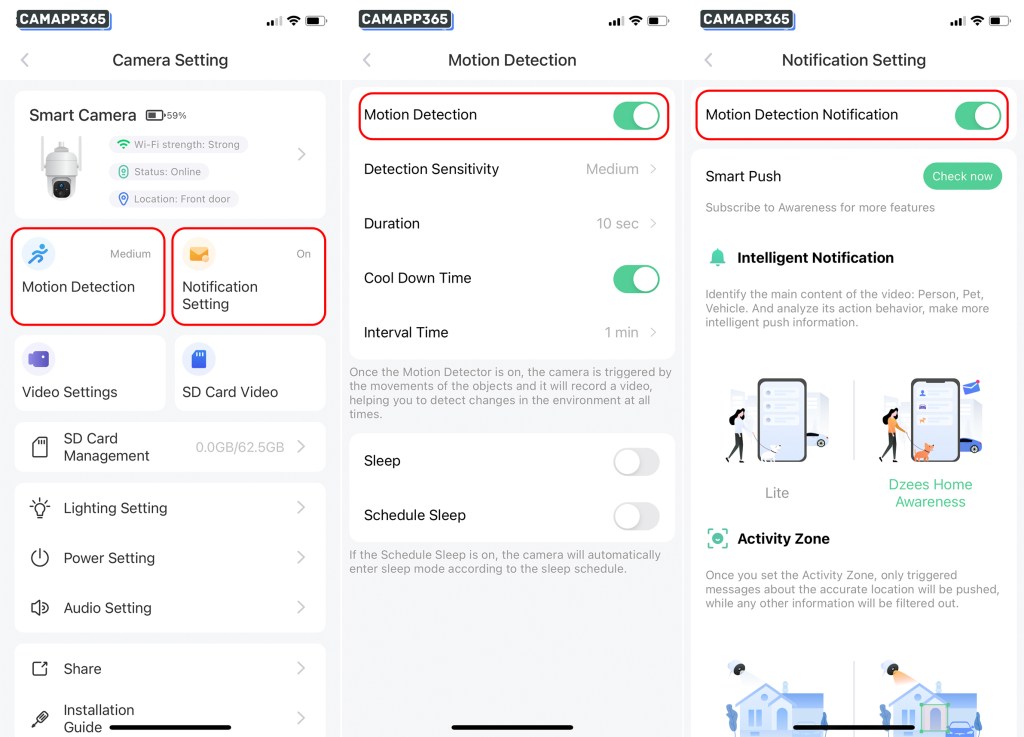
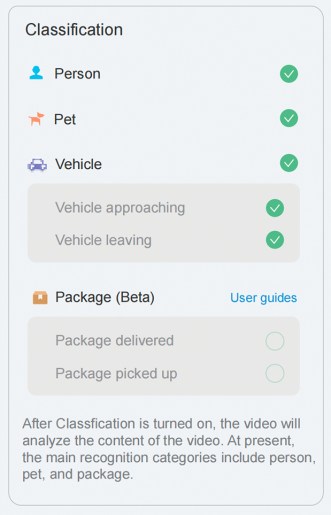
If you subscribe to the VicoHome Premium service, there are intelligent settings for Person, PetVehicle and Package.
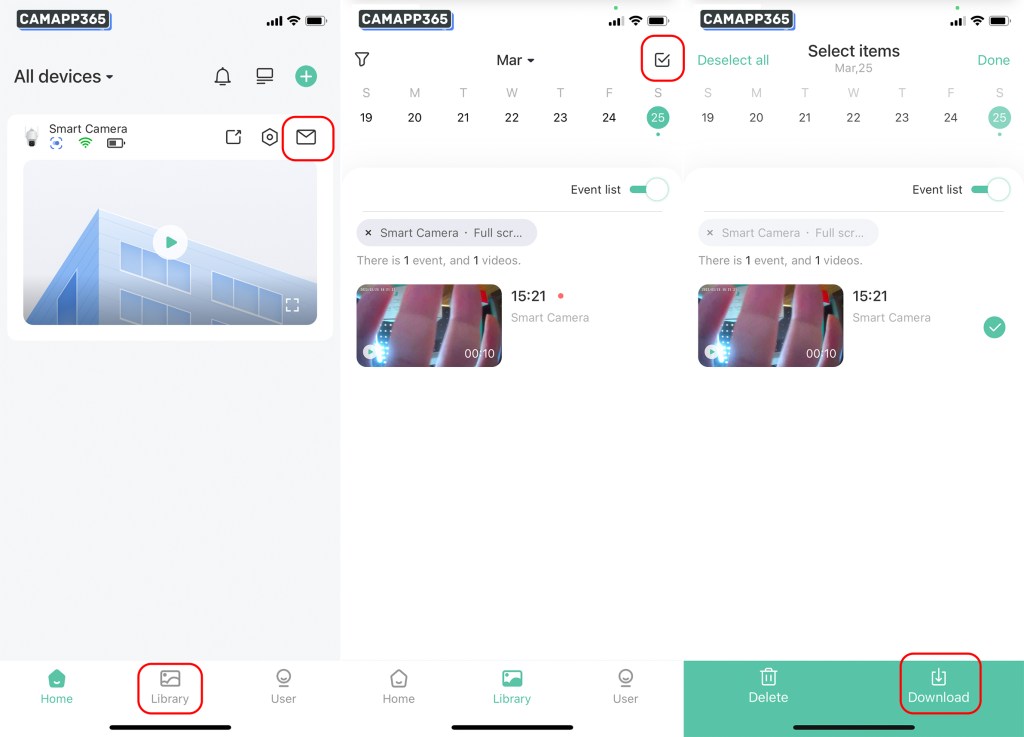
View alarm notifications
Click on the Library or “ ” icons to view alarm messages and click on a message to view a video. VicoHome cameras offer free cloud storage and recorded videos will be deleted after 7 days. If you have an important video, you can click “Download” to save it to your phone.
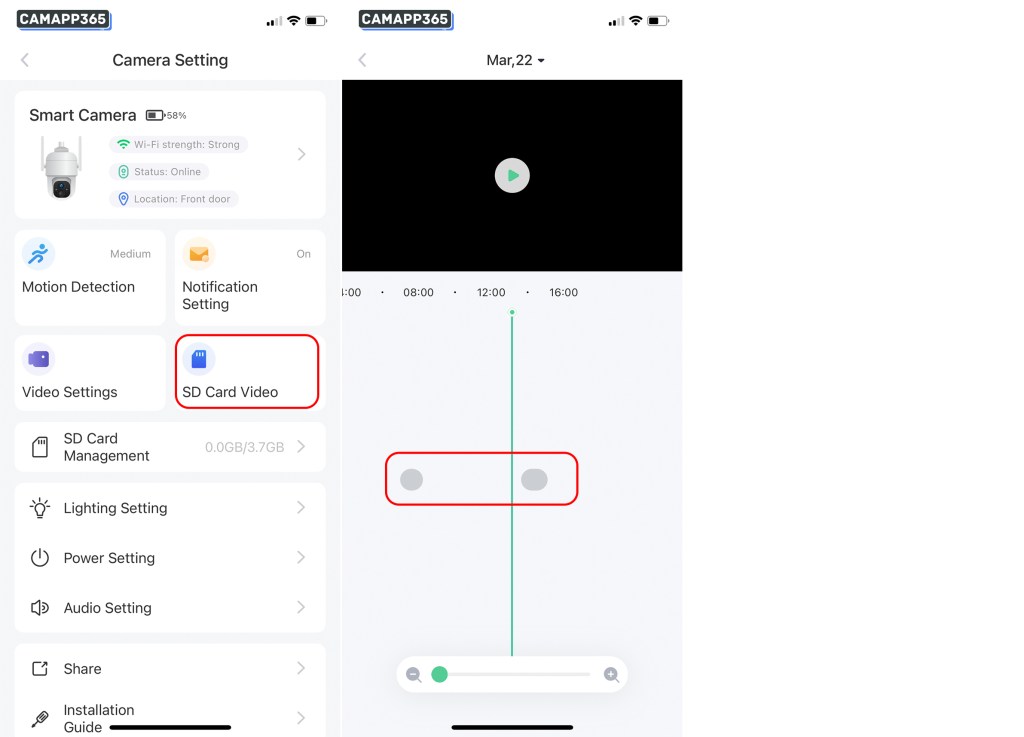
Local recording settings
To use local recording, you need to insert a memory card, which will only display SD Card Video when inserted.
VicoHome cameras only support alarm recording, you cannot set up continuous recording. The recording settings are in Motion Detection.
Click on SD Card Video to view the video stored on the memory card. The grey colour indicates that video time is available. If you have just inserted a memory card, you will need to wait until motion is detected before you can view the video.
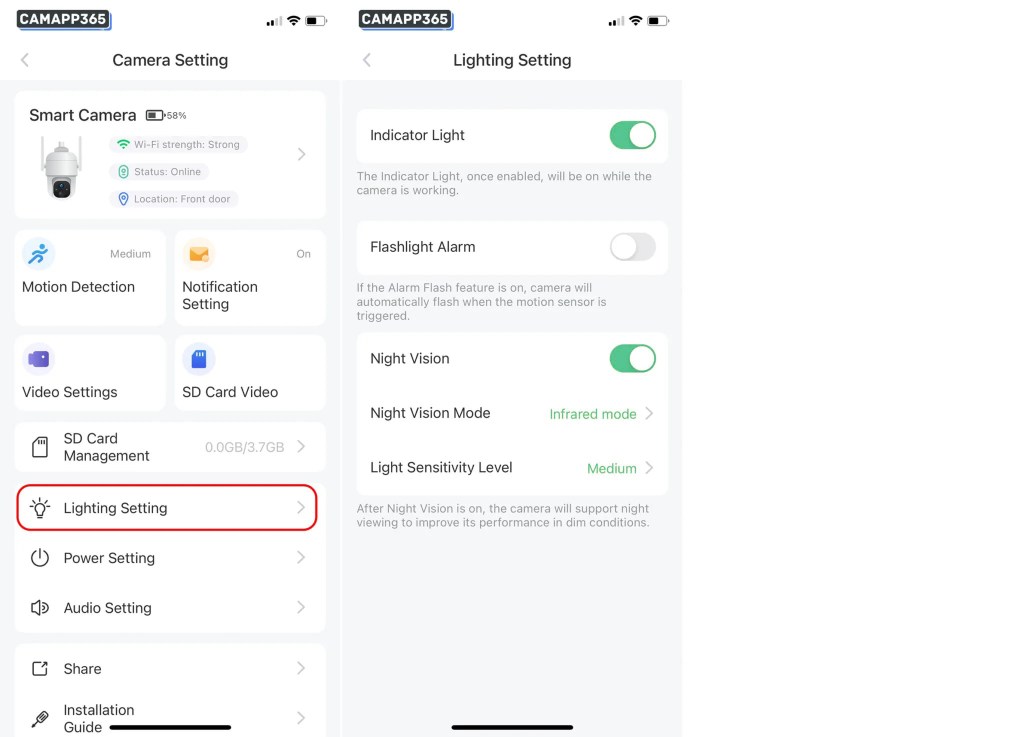
Night vision settings
You can set the night vision function in Lighting Setting to improve the camera’s performance in dark environments.
(White light mode is only available for VicoHome cameras that support white light or colour night vision.)
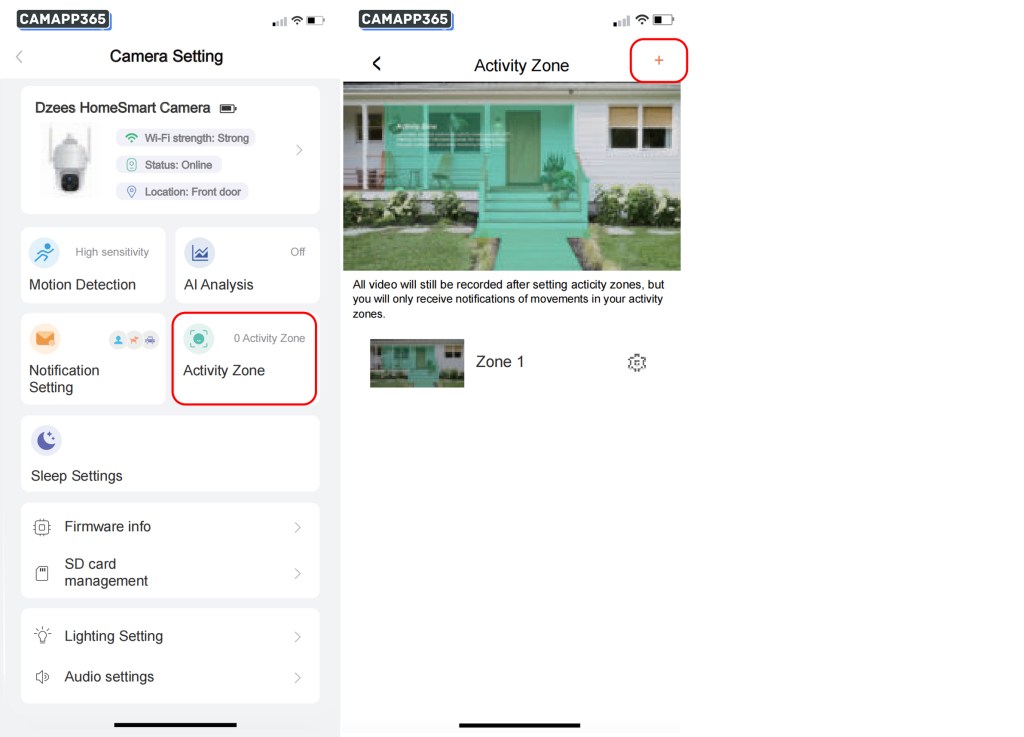
Activity Zone settings
All videos will still be recorded after setting activity zones, but you will only receive notification of movements in your activity zone(This feature requires a subscription)
The principle of Activity Zone is to judge the objects activity in pointed area with combining intellegent analyse on cloud.
Therefore it’s a cloud-based AI.
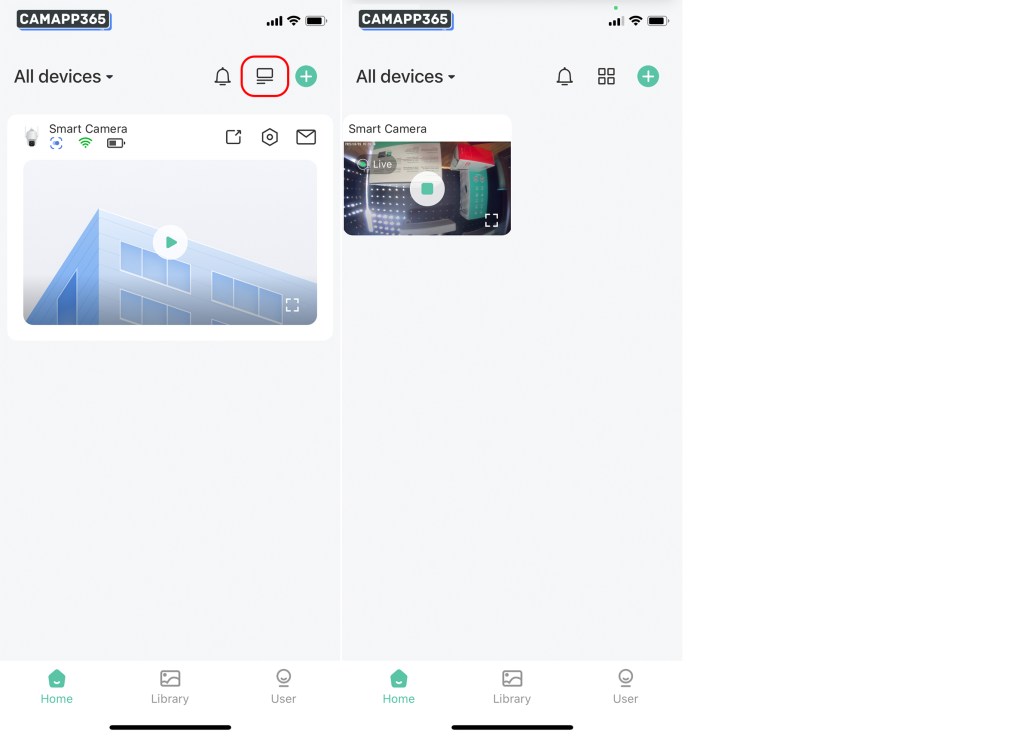
View multiple VicoHome cameras at the same time
By clicking on the ‘ ‘ icon, you can watch multiple VicoHome cameras at the same time.
How To Reset VicoHome camera?
When you want to sell your VicoHome camera or if the camera is faulty, you can try resetting your VicoHome camera. Resetting the camera will return it to factory settings and you will need to reconnect the VicoHome camera.
Press the power button twice to reset the VicoHome camera. (Sometimes, if you double-click the power button too quickly, it may not respond, so you might need to try a few times.)
.
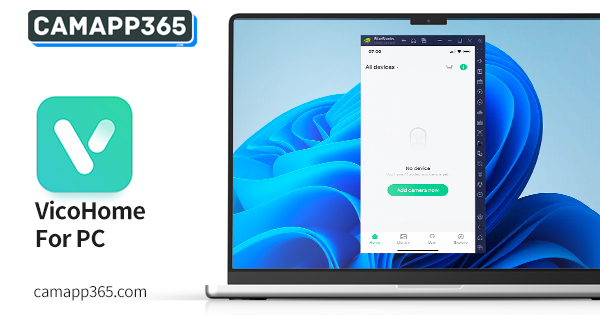
VicoHome for PC – Using VicoHome on your computer
.
VicoHome is a security camera app that allows you to monitor your home or office from your smartphone. But did you know that you can also use VicoHome on your PC? Using VicoHome on your computer can give you a bigger screen and a more convenient way to monitor your security cameras. In this article we will show you how to use VicoHome on your PC.
Although VicoHome does not come with computer software, you can download the app to your computer using an Android emulator, such as Bluestacks. Once you have installed the emulator, you can download the VicoHome app from the Google Play store or by using the VicoHome APK file. With VicoHome on your PC, you can view your security cameras on a larger screen and access all the features of the app with ease.
Whether you want to keep an eye on your home when you’re away or monitor your office when you’re at work, VicoHome can help. By using VicoHome on your PC, you can make monitoring your security cameras even more convenient. So let’s get started and learn how to use VicoHome on your computer.
System Requirements
If you want to use VicoHome on your PC, you need to make sure your computer meets the following system requirements:
If your computer meets these requirements, you can proceed to download and install VicoHome on your PC using an Android emulator like Bluestacks or LDPlayer.
Please note that the performance of VicoHome on your PC will depend on the specifications of your computer. If your computer does not meet the minimum system requirements, you may experience lag or other performance issues while using the app.
Downloading and Installing VicoHome on PC
If you want to use VicoHome on your PC, you need to download and install an Android emulator first. There are several Android emulators available, but we recommend using Bluestacks or MemuPlay. Here are the steps to download and install VicoHome on your PC:
Method 1: Using Bluestacks
Method 2: Using MemuPlay
.
After installing VicoHome on your PC, you can use it to monitor your home security cameras, view live feeds, and receive alerts for any suspicious activity. With VicoHome, you can keep your home and family safe and secure, even when you’re away.
Using VicoHome on PC
If you want to use VicoHome on your PC, you can do so by following these steps:
Navigating the Interface
Once you have installed VicoHome on your PC, you will be able to navigate the interface using your mouse or keyboard. The interface is user-friendly, and you can easily access all the features and functions of the app.
Controlling Devices
You can control all your VicoHome devices from your PC. You can view live video feeds, turn on/off devices, and adjust settings. To control devices, simply click on the device you want to control and select the action you want to perform.
.
Add Comment