
A network camera, also known as an IP camera, is a digital video device that captures and transmits footage over an IP network or the internet.
Unlike old analog cameras, a network camera acts as a smart, standalone device. It has its own IP address, a built-in computer chip, and a web server. It turns video into digital data and sends it over Wi-Fi or an Ethernet cable. [1, 2, 3, 4, 5]
How It Works
Key Benefits
If you want, let me know:
I can help you choose the right type for your needs.
[All cameras] How to troubleshoot when the camera’s web UI is not functioning properly?
Question
How to troubleshoot when the camera’s web UI is abnormal?
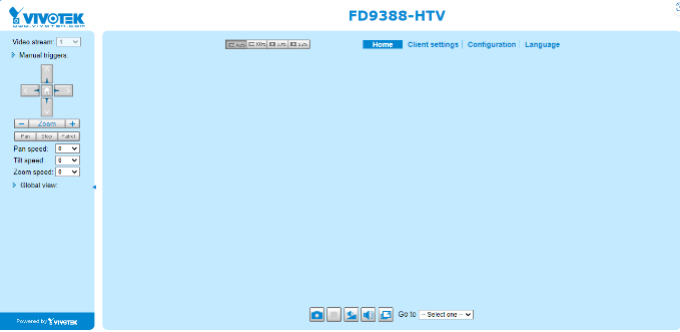
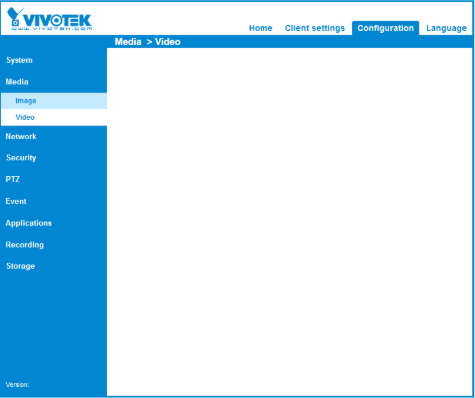
Below are two snapshots of the abnormal web UI.
Answer
This problem commonly arises after a camera firmware update or if the camera’s IP address was previously assigned to a different camera. The browser’s cache persists with outdated webpage data from the camera’s pre-update state or from the prior camera, which leads to the camera’s webpage failing to display properly.
Kindly follow the instructions below to troubleshoot the issue:
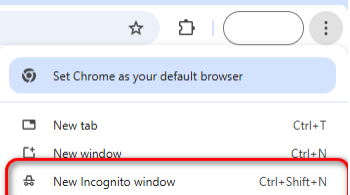
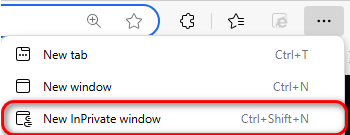
Step 1. Please try using the Incognito mode on Chrome browser or InPrivate window on Edge browser.
1.1 On your computer, open Chrome.
1.2 At the top right, select More 
 New Incognito window.
1.3 A new window opens.
1.4 On the right of the address bar, you’ll find the Incognito icon 
1.1 Open Microsoft Edge.
1.2 Click on the three dots  (more options) in the top-right corner of the browser.
1.3 Select New InPrivate window from the dropdown menu.
Step 2. If you’re able to see the normal web UI while using an Incognito or InPrivate window, please follow the instructions below to clear the browser cache:
2.1 Open Chrome Browser: Launch the Google Chrome browser on your computer.
2.2 Open the Menu: Click on the three dots (menu) in the upper-right corner of the browser window.
2.3 Go to Settings: In the menu, select “Settings.”
2.4 Privacy and Security: In the left sidebar, click “Privacy and security.”
2.5 Clear Browsing Data: Click on “Clear browsing data.”
2.6 Choose Data to Clear: A new window will pop up. Ensure “Cached images and files” is checked. You can also check other options like “Browsing history” or “Cookies and other site data” if needed.
2.7 Select Time Range: Choose “All time” to clear the cache.
2.8 Clear Data: Click the “Clear data” button.
2.1 Open Edge Browser: Launch the Microsoft Edge browser on your computer.
2.2 Open the Menu: Click on the three dots (menu) in the upper-right corner of the browser window.
2.3 Go to Settings: In the menu that appears, select “Settings.”
2.4 Privacy, Search, and Services: In the left sidebar, click “Privacy, search, and services.”
2.5 Clear Browsing Data: Scroll down to the “Clear browsing data” section and click “Choose what to clear”.
2.6 Select Data to Clear: A new window will pop up. Make sure “Cached images and files” is selected. You can also select other types of data (like browsing history or cookies) if needed.
2.8 Choose Time Range: Select “All time” to clear the cache.
2.9 Clear Data: Click the “Clear now” button to delete the cached data.
Step 3. If the issue persists, we may need to gather additional information before you contact technical support. Please refer to the following article for guidance on collecting network camera information:
[All Cameras] How can I check if the camera IP is used by another device?
Question
How can I check if the camera IP is used by another device?
Answer
IP conflicts occur when two devices on the same network are assigned the same IP address. This can lead to connectivity issues, and it’s essential to resolve such conflicts to ensure smooth network operation. If you suspect your camera’s IP address might be used by another device, here’s how you can check and resolve it.
1. Disconnect the camera from the network.
2. Connect a PC to the same network as the camera. Then, open the Windows Command Prompt (cmd.exe).
3. Execute the ping command followed by the camera’s IP address:
ping <Camera IP>
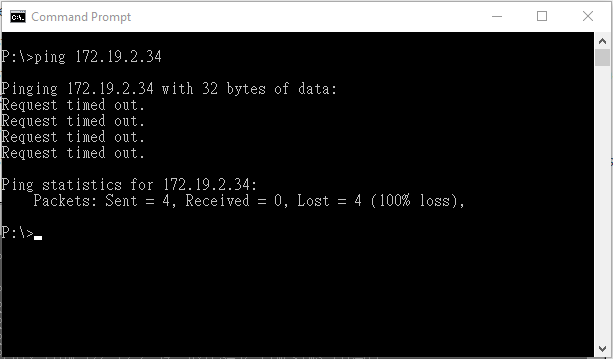
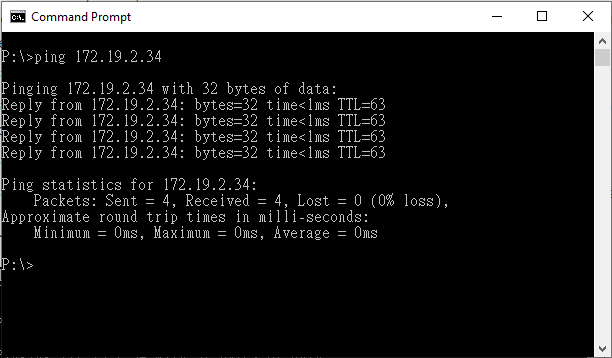
If you are unable to locate the device or computer using the originally designated IP, consider setting a new IP address for the camera to avoid IP conflicts.
[All cameras] How to use PowerShell to test if the camera IP and ports can be accessed?
Question
How to use PowerShell to test if the camera IP and ports can be accessed?
Answer
There are several ways to test if your camera IP can be reached, one of the most used is the “ping” command:
Unfortunately, the ping command has its limitations and wont be able to verify if the ports of the pinged IP are open (ping commands are sent using random ports). In order to check the port connectivity you can use the “Test-NetConnection” command in power shell which can test connectivity to a specific IP and port. To do so please follow the next steps:
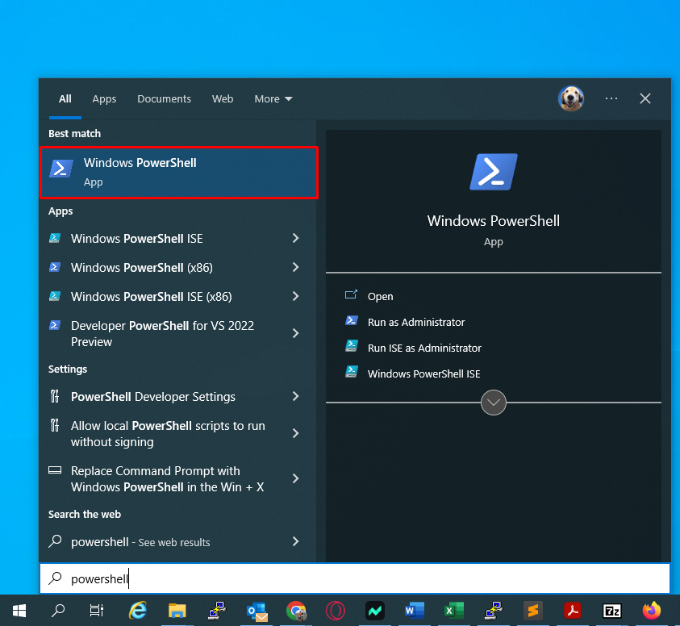
Step 1. Open the Windows PowerShell, you can do it by typing “PoweSheel” in the start menu search:
Step 2. Type the following command:
Test-NetConnection -ComputerName [IP address] -Port [port number]
Where the [IP address] is the camera IP and the [port number] is the port that you are trying to verify.
Step 3. Press enter to run the command and the following will appear:
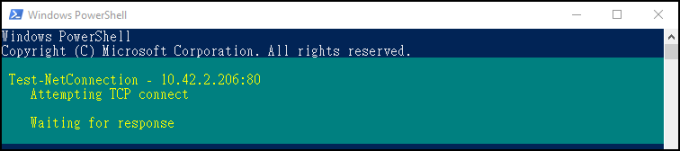
The process will take a couple of seconds and once finished it will display the connection status as follows:
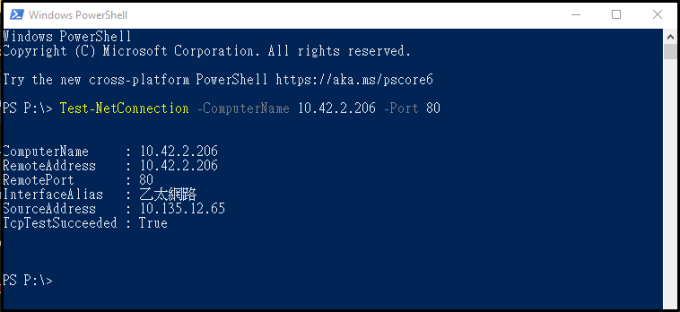
If the connection cannot be stablished, the following error will appear:

Note: the same process can be used to check ND/VAST2/VSS connectivity (all of those devices/software uses different ports to communicate).
If there is a connection error you can do the following to ensure that the camera port can be accessed:
If after checking the points mentioned above you are still unable to access the camera using its IP and port please contact Technical Support for assistance.
[All cameras] How to reset your camera to factory defaults?
Question
How to reset your VIVOTEK camera to factory defaults?
Answer
All VIVOTEK cameras possess a reset button which can allow you to reset the device to factory defaults. To reset the camera to factory defaults please follow the next steps:
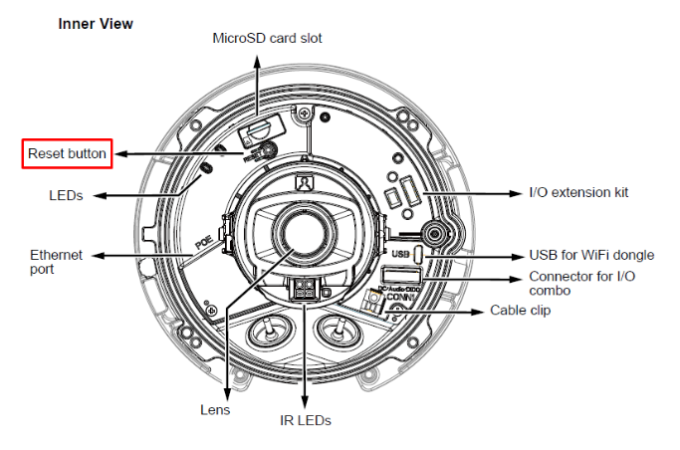
1. Locate the camera reset button, if you are unfamiliar with its location please go to our website and search for your camera model.
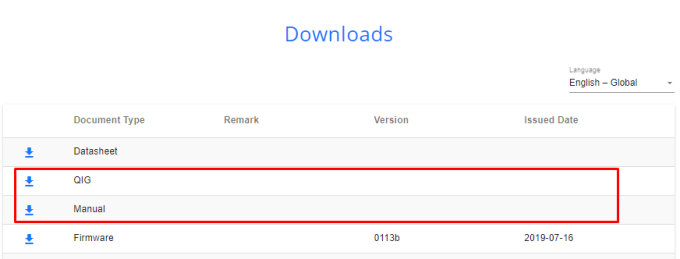
In the download section you will be able to find the “User manual” and the “Quick installation guide”, both documents have information regarding the location of the camera reset button.
2. Press and hold down the reset button for 10 seconds, the camera LEDs will start blinking rapidly.
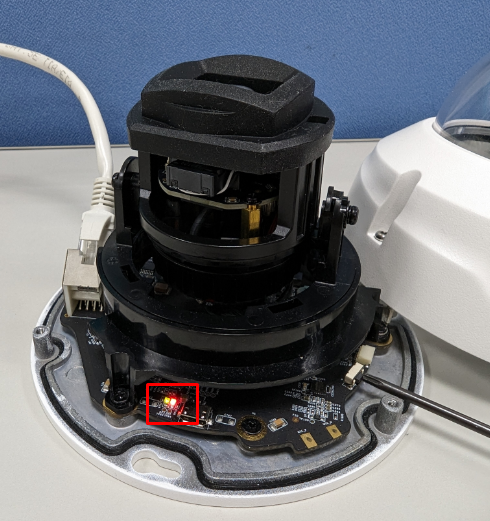
The camera will reboot (LED will stop blinking), after rebooting it will begin the reset process (LED start blinking again).
3. Wait until the camera finish resetting. After 1~2 minute the process will be over.
Please note that resetting your camera to factory defaults will reset all the settings and configurations applied to the camera. So once the camera finished the process you will need to configure the device again to your needs.
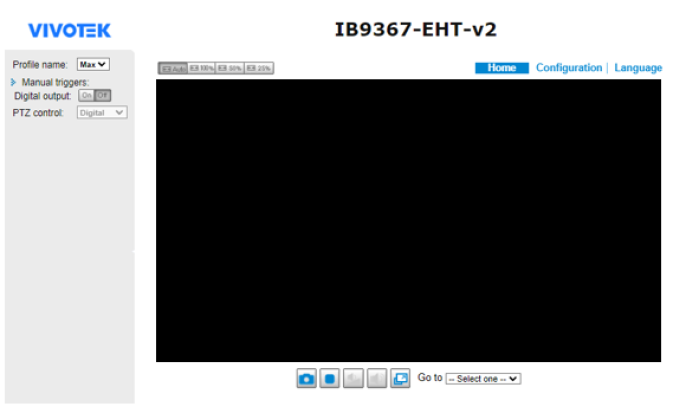
What should I do when the camera’s live view or video stream fails to display?
Question
How to troubleshoot when the camera’s live view or video stream fails to display?
Answer
When you’re unable to watch video streaming from a VIVOTEK camera, there are several troubleshooting steps you can follow:
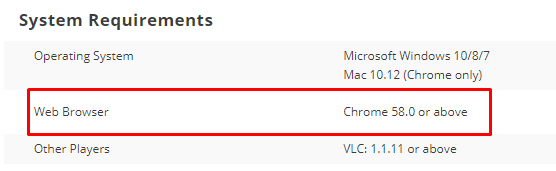
1. Check that the browser is compatible with the camera:
VIVOTEK cameras are compatible with Internet Explorer for the 8000 series or older, and with Chrome and Edge for the 9000 series. Be sure to use the appropriate browser to access your camera.
2. Upgrade the camera to the latest firmware available.
VIVOTEK constantly keeps improving camera firmware to increase product reliably and resolve know issues which might be related to the video stream. Please be sure to upgrade your camera to the latest version available:
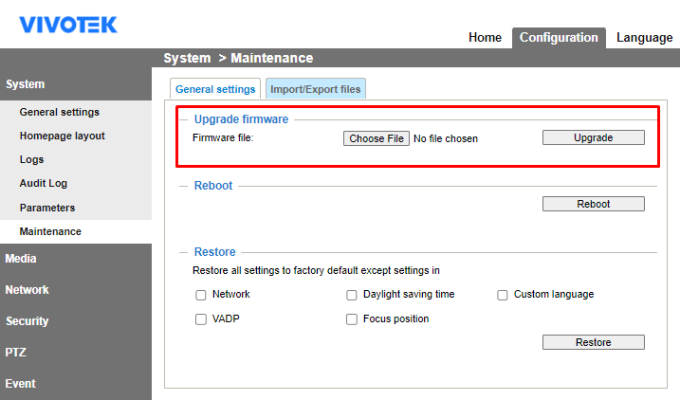
Following the firmware upgrade, kindly clear your browser cache to confirm that video streaming is visible.
3. Check if the camera sensor is still generating images
VIVOTEK cameras include a snapshot feature that operates separately from the video stream, allowing you to check if the image sensor is functioning properly. If your camera is not displaying video, you can try using the following URL in your browser to retrieve a snapshot:
Before sending following URL to the camera, please ensure that the CSRF feature is disabled.
If you need guidance on how to disable the CSRF feature, please refer to the following link: [All cameras] What to do when you cannot send CGI command to the camera after upgrade the camera firmware to the latest? – VIVOTEK Support Center
The URL command as below:
http://{Camera_IP_address}/cgi-bin/viewer/video.jpg
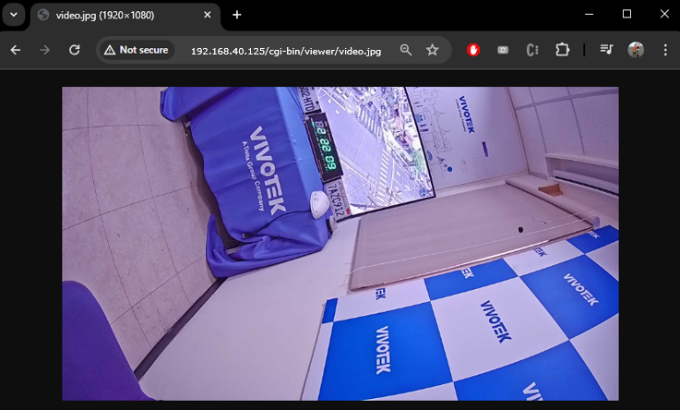
For Mutiple sensor camera, please use the below URL command to check camera streaming.
http://{Camera_IP_address}//cgi-bin/viewer/video.jpg?channel=0&streamId=0&qulity=quality
Channel 0=first lens.
If there is no image displayed, this will mean that the video sensor might be compromised.
4. Use and RTSP Player to verify if the camera can send data through RTSP
Try to use an RTSP player like VLC Media Player to verify if a VIVOTEK camera can send data through RTSP, you can follow these steps:
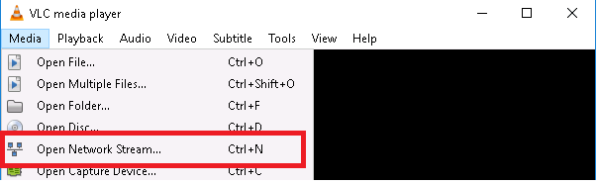
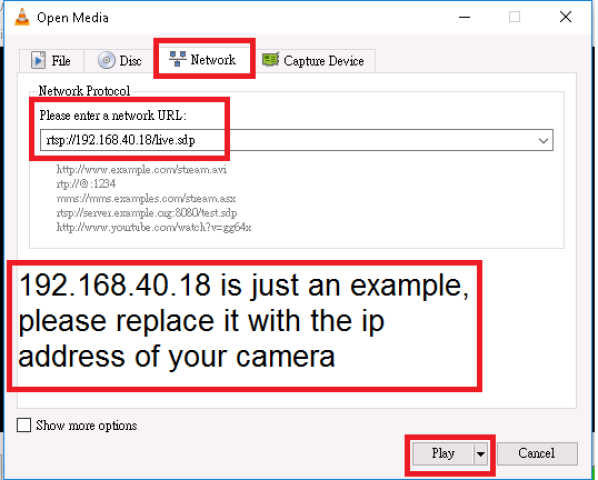
If the player cannot play videos, this could mean that the camera’s RTSP module is having trouble sending videos.
4. Reset the camera to factory defaults
Resetting the camera to factory defaults will return it to a state unaffected by any new external configurations. If you are experiencing video issues, please try resetting the camera to factory defaults to see if the problem can be resolved. The following guide explains how to reset your device to factory defaults: [All cameras] How to reset your camera to factory defaults?
If these steps do not resolve the streaming issue, contacting your camera vendor might be necessary. They can provide more specific guidance based on the exact model and configuration of your camera.
.