

2MTECHNOLOGY NVR Setup Guide, 2M Technology Inc. is a leading provider of comprehensive end-to-end low-voltage audio and video solutions tailored to the needs of the institutional and commercial sectors. Our company provides a complete suite of integrated security solutions encompassing intrusion detection, cutting-edge video surveillance, and advanced audio security technologies. As a trusted industry leader, we ensure unparalleled protection and peace of mind for a diverse range of applications and environments.
How can I reset the password for the 2M old 8000 Series and 7000 Series NVR?
This is valid for older models of 2MN-8000 NVR’s and 2MN-7116.
If you have forgotten the password, connect the NVR to the network. Using a computer on the same network, please download SADP Tool and make sure the NVR can be found on the tool. Select your device and a menu will show on the right side. At the bottom, click Forgot Password and a reset password window will open.
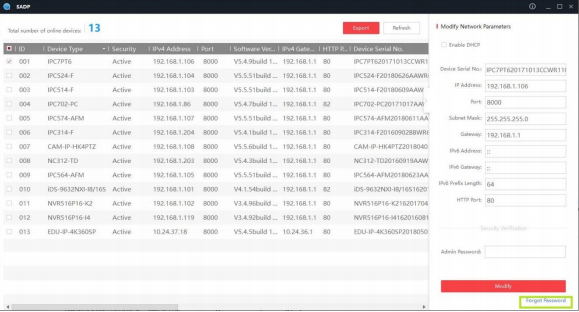
Click on Export and email the file to tech support. We will send a file back to you that you will Import File and then create a new password. Make sure you create a Strong password.

This process takes a couple of hours, but the files will be valid for 24 hours. Please make sure the NVR and the computer never disconnect from each other at any time during this process or the process will have to begin again.
2MTECHNOLOGY NVR Setup Guide
Read Also : Lorex Wireless Cameras and Monitors guide 2024
What is the default password for the 2M Essential NVR?
The default username and password for the 2M Essential NVR is admin/12345abc. It is highly recommended to change the password once you receive it.
This is valid for 2MN-7116
How can I reset the password for the 2M 8000 Series NVR?
This is valid for models 2MN-8004-P4, 2MN-8008-P8, 2MN-8116-P16, 2MN-8232-P16
There are two very similar ways you can reset the NVR password if it has been forgotten, but both methods begin the same way: obtaining the serial number of the device. It can be found in different areas: the sticker on the side of the box, the sticker on the bottom of the device, or when you click Forgot Password on the NVR local screen, and it will begin with “210..” and be 20 characters long (a mixture of numbers and letters).
By clicking on Forgot Password it will open a new window that will show the serial number and ask for the security code. Contact tech support for the security code. Make sure you are in front of the device at the time of calling because it will need to be entered within a frame of time. Once the correct security code has been entered the window will change to enter a new password. It is recommended to create a strong password.
The second method to reset the password begins the same. Obtain serial number → contact tech support → enter security code into the password box. After entering the code another window will open asking for the security code again and the new password.
How can I reset the password for the 2MN-8XXX Series NVR with the new firmware?
This is valid for some NVR models, it depends on the firmware version of them. If they do not have this new password reset method, please go to our other guide for password reset.
There are two possible ways to reset the password with the new firmware. However both need the person to access the NVR either by being in front of it or by access in on the computer (entering the IP address on the browser). The screenshots shown on this guide will be the ones we can get on the NVR itself:
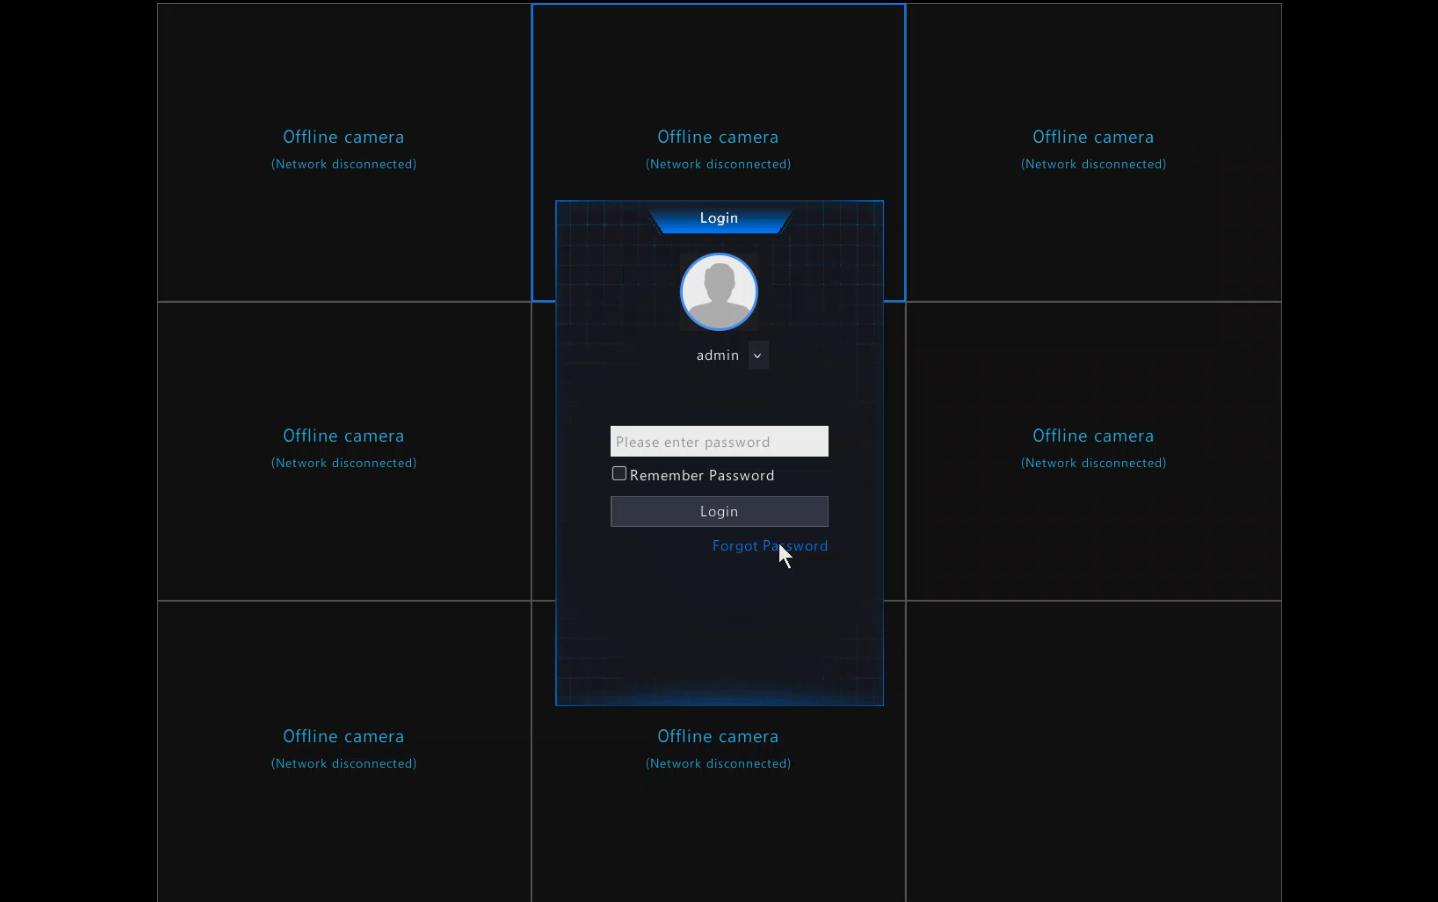
Bring up the login screen by right-clicking anywhere and clicking on the “Menu” option. When you see the login screen, click on the “Forgot Password” link:
After that, either 2 types of screens will come up: The first one is to enter an email address to get a new temporary password:
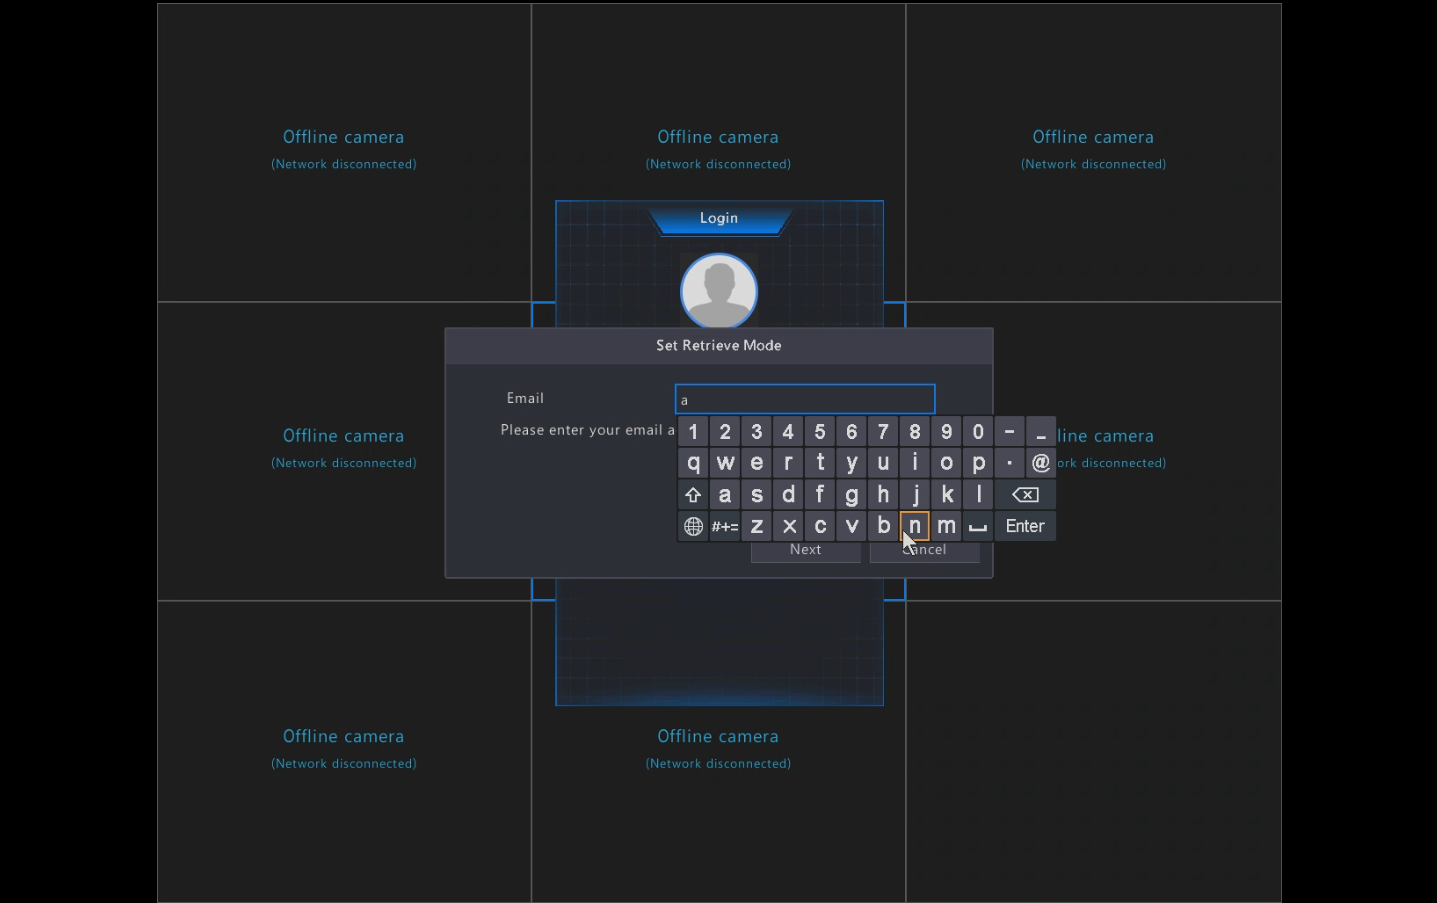
Please enter a valid email address to get your new temporary password:
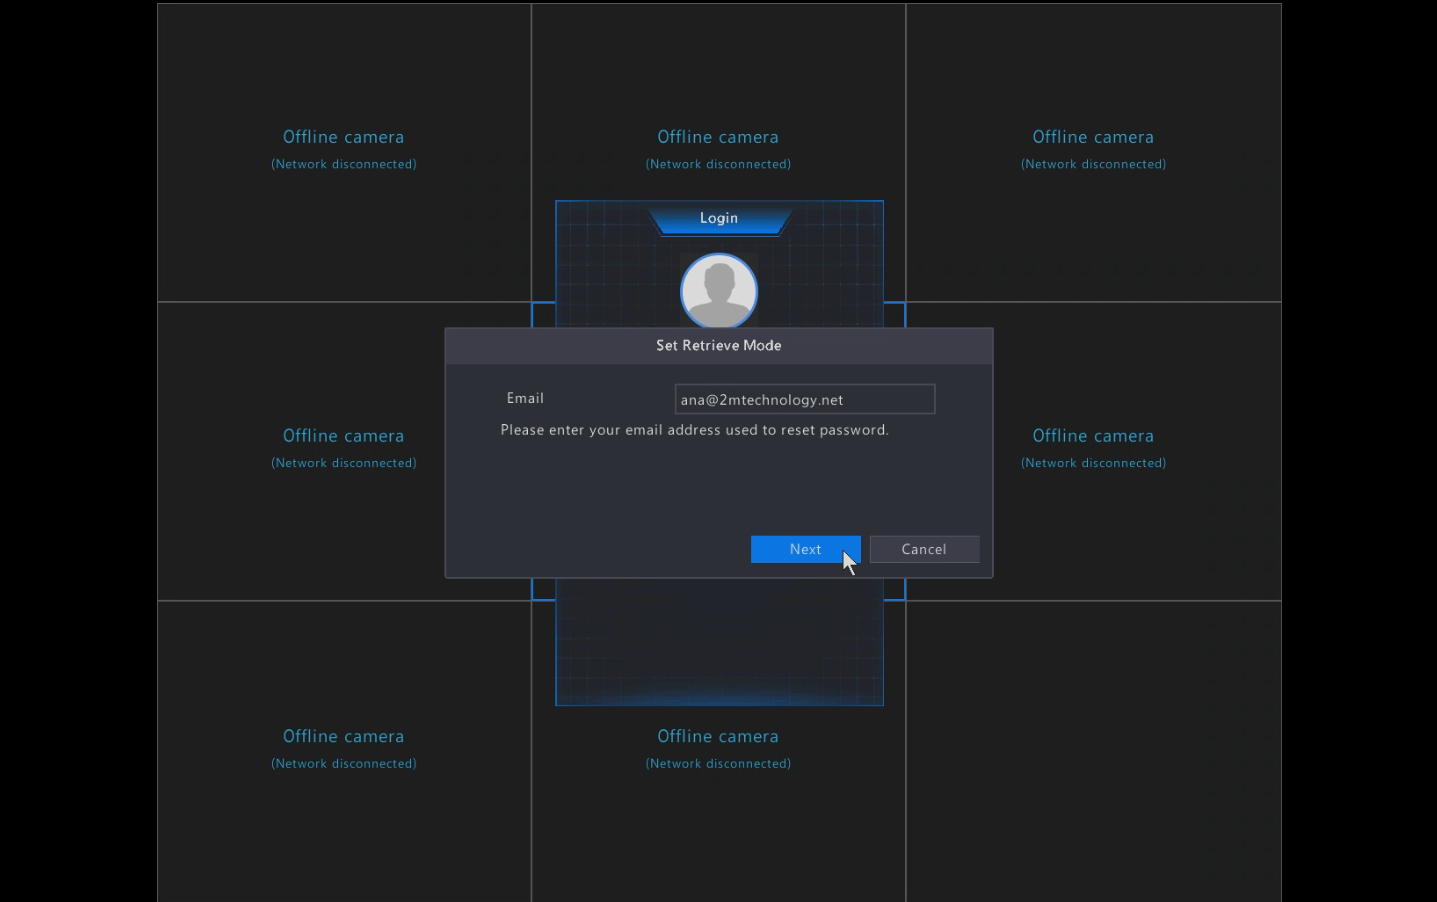
The second type of screen is the same as the one it will show when we click “Next” after entering the email address:

When you reach this screen, you can follow one of the following options:
Option 1:
If you have downloaded the 2M Guard App for your phone, you can do the password reset yourself.
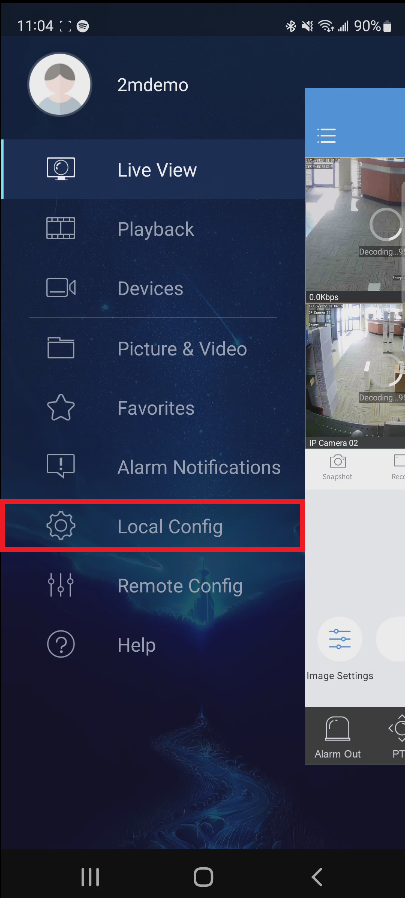
Click on the “Local Config” option:
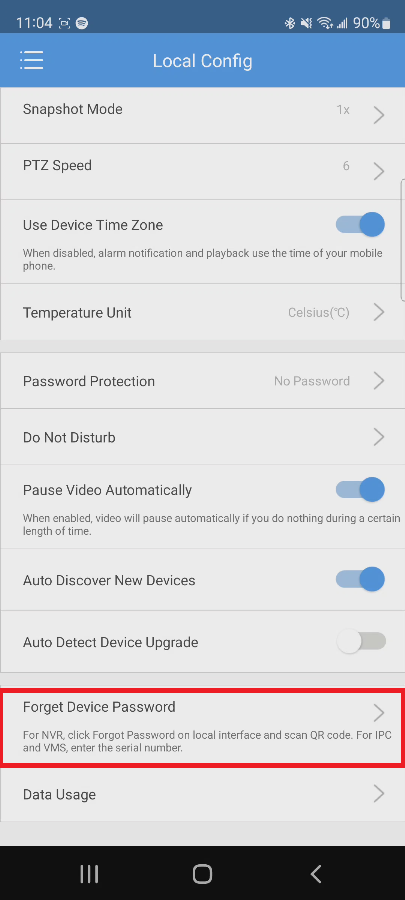
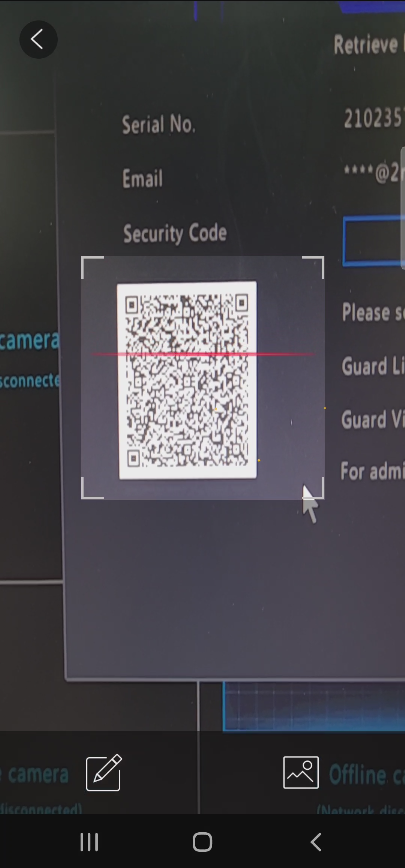
Click on the “Forget Device Password” option and scan the QR code on the NVR screen:
After that, a message will appear saying that the temporary password will be sent to the registered email address:
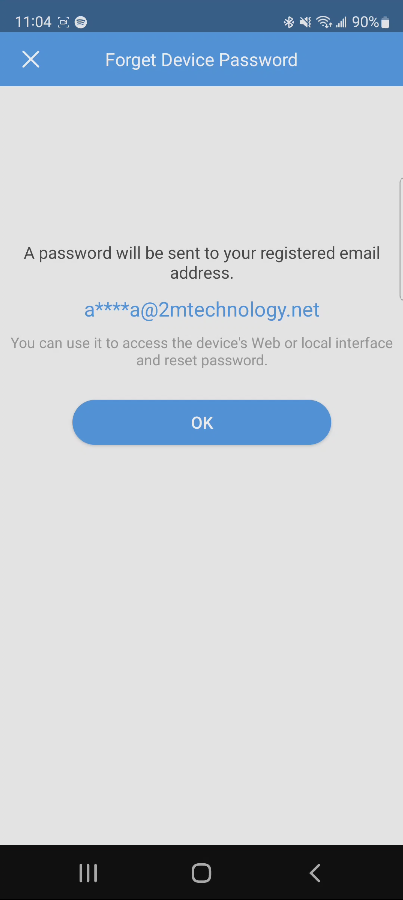
Click on “OK” to send the password and wait for the confirmation page:
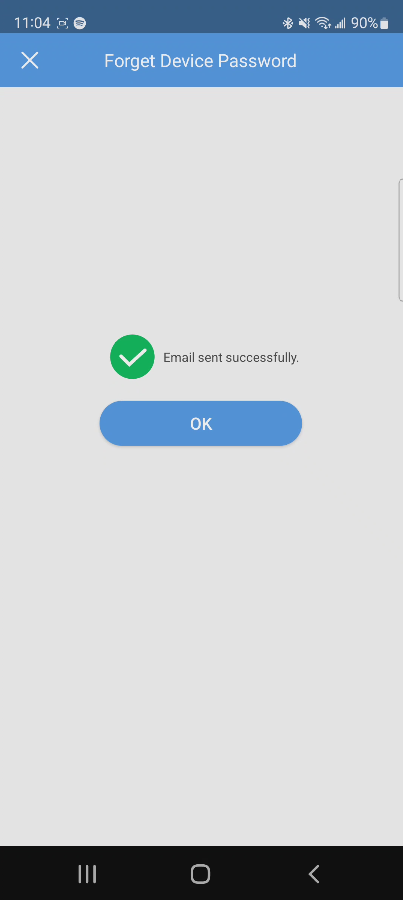
Click “OK” again and wait. The email will look like this:
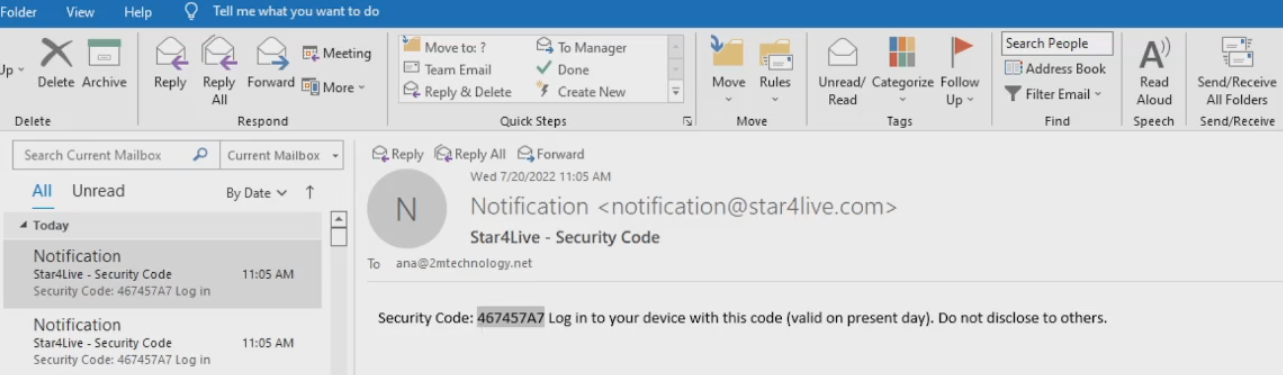
Take note of the security code and enter it on the “Security Code” field of the Retrieve Password screen (The security code is case sensitive, this means that upper and lower case letters matter):
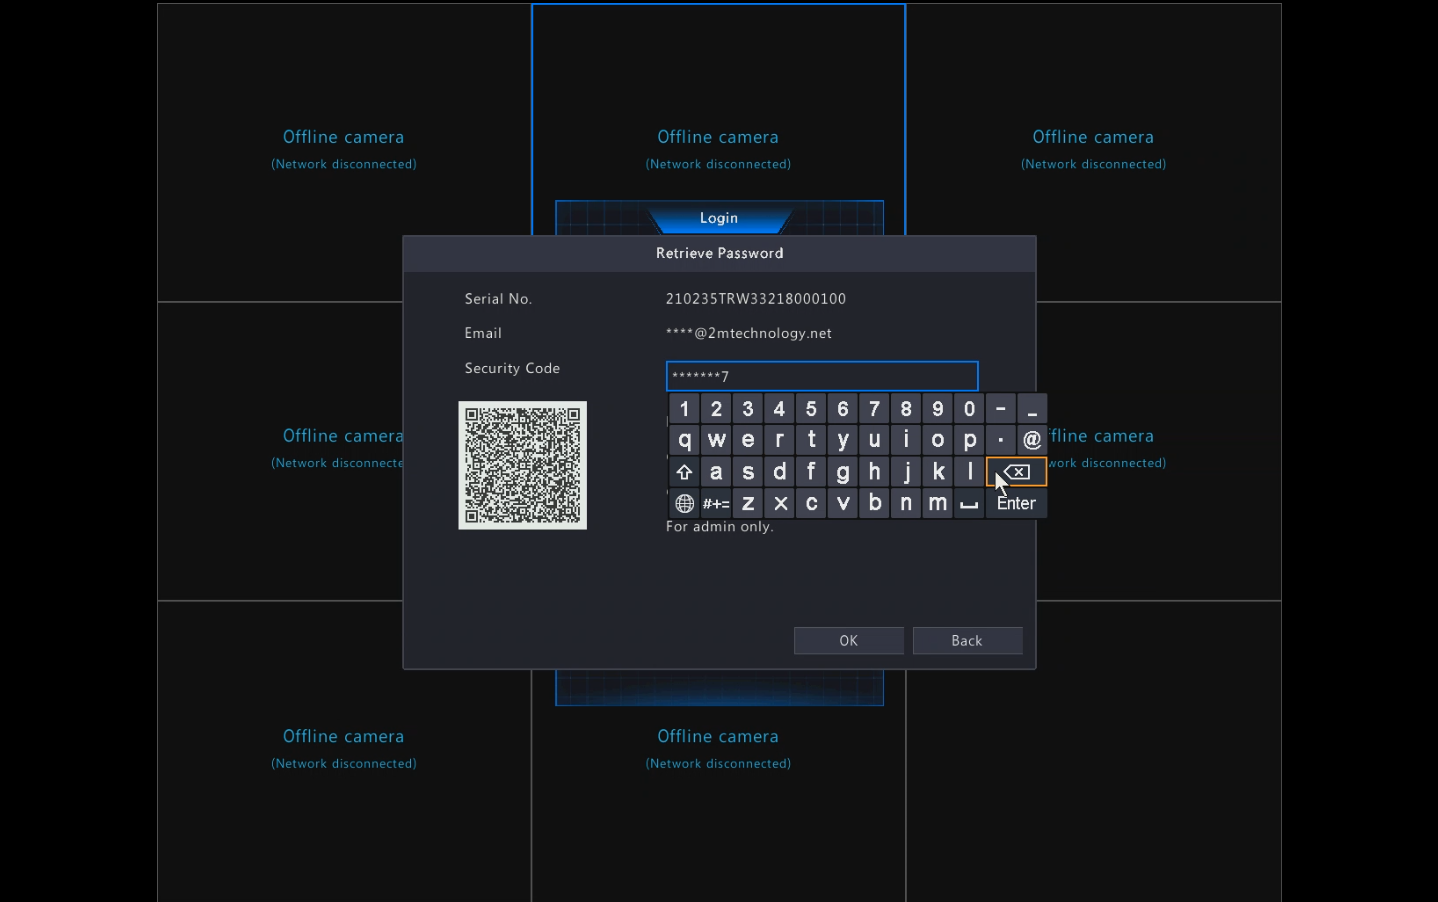
After entering the security code, press “Enter” and press “OK”. After that, a new pop-up screen will appear to enter a new password on the “Password” field. Don’t forget to enter the same new password on the “Confirm” field:
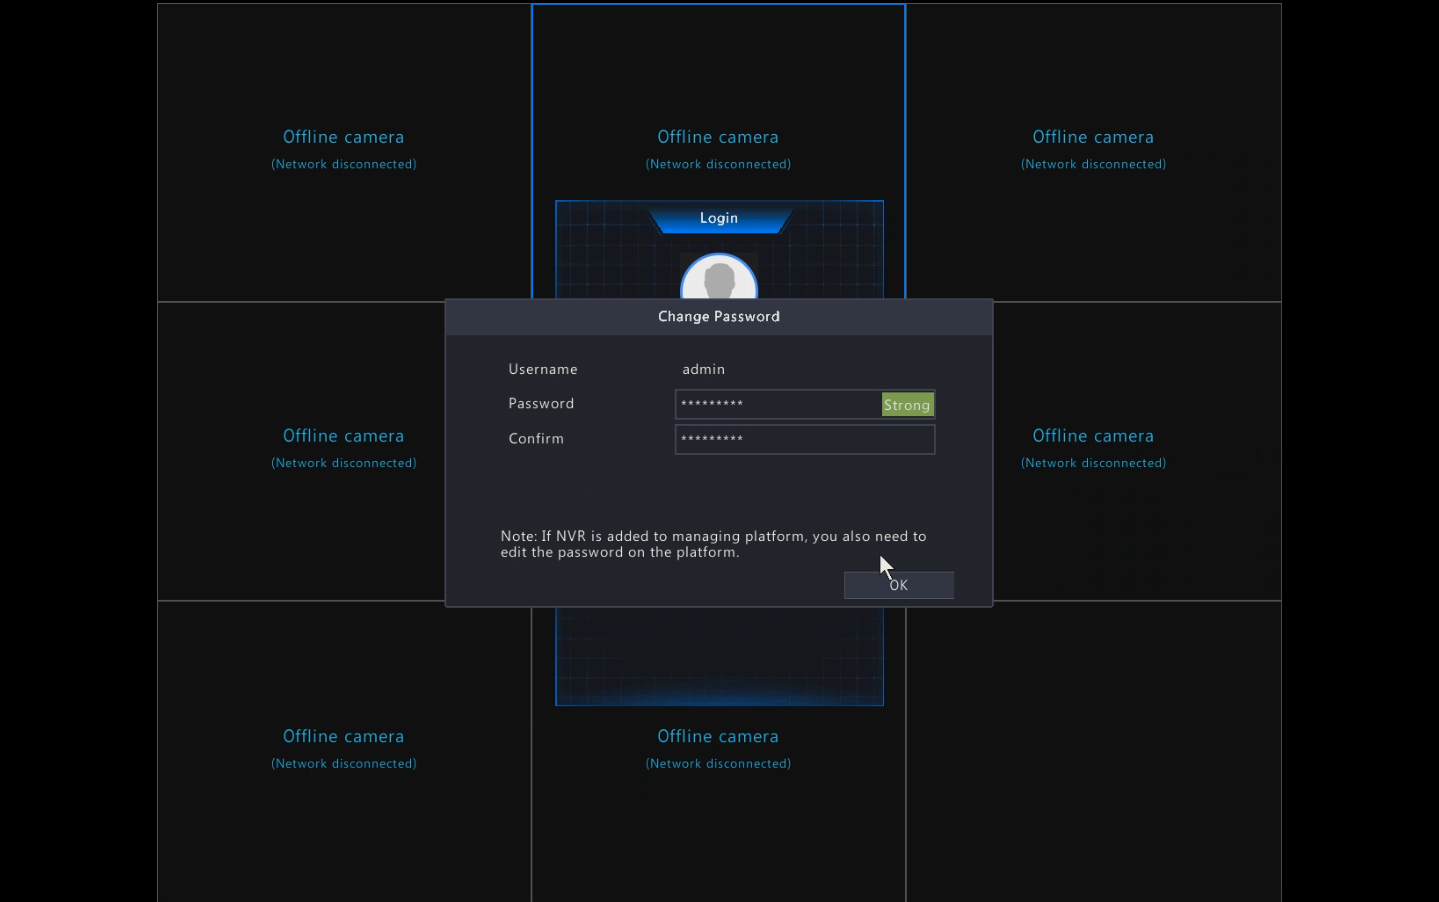
After that, click on “OK”.
Option 2:
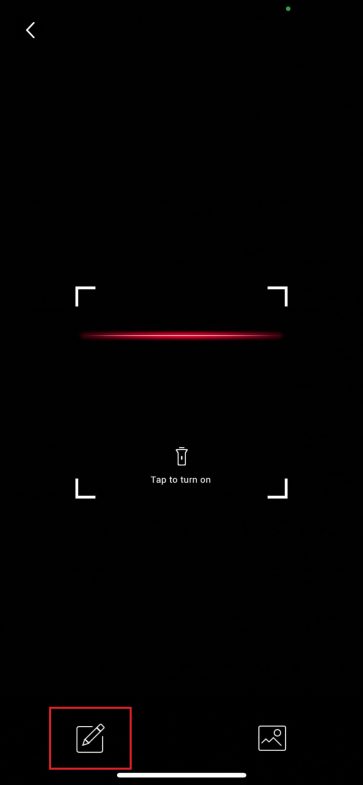
If you don’t have the 2M Guard App downloaded, you can take a picture of the QR code shown on the “Retrieve Password” screen. Here is an example of the picture you should take.

After you take the picture, please contact Technical Support to receive more instructions. We will do the password reset using the QR code picture taken.
NOTE: Please do NOT exit from the “Retrieve Password” screen after you take the picture of the QR code. The security code only lasts for a day, so please keep that in mind before starting a password reset process.
How to Access Device from Web
This guide is valid for models 2MT-4004, 2MT-4008, 2MT-4088, 2MT-4016, 2MN-8004-P4, 2MN-8008-P8, 2MN-8116-P16, 2MN-8232-P16.
When devices are connected to the network, they can also be accessible from a computer. The first thing you need to make sure of is that the computer you are using and the DVR/NVR are connected to the same network (network is coming from the same router for both devices). You will first need to obtain the IP address of the DVR/NVR from Menu → System → Network → IPv4 address.
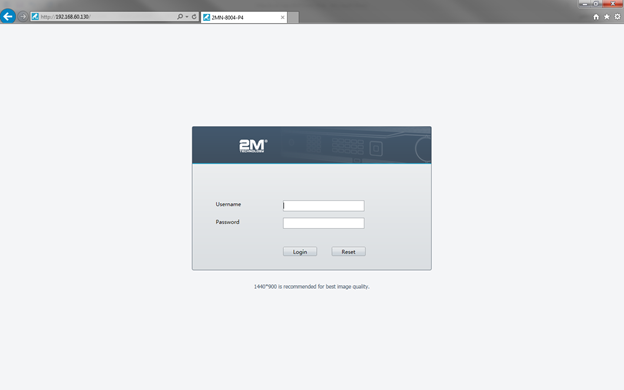
After noting the IP address of your device, open Internet Explorer and in the address search bar type in the DVR/NVR IP address. If the NVR and the computer are on the same network then it will pull up the login page of the DVR/NVR. The credentials will be the same as when you log into the local interface of your device.
How to Enable Audio
This article applies to our 2M NVR’s models: 2MN-8004-P4, 2MN-8008-P8, 2MN-8116-P16, 2MN-8232-P16.
With 2M NVR’s, you have 3 choices to connect audio with your device:
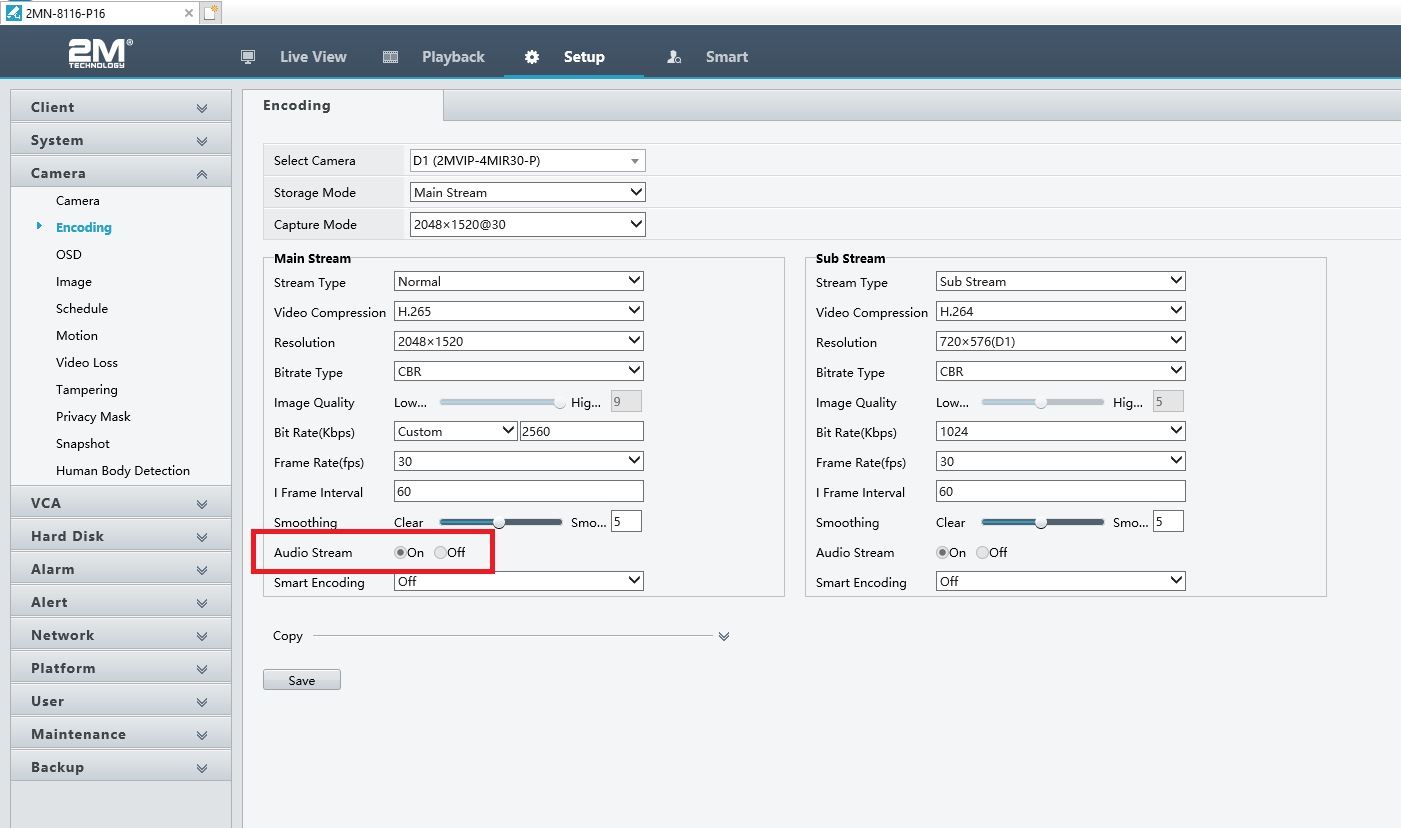
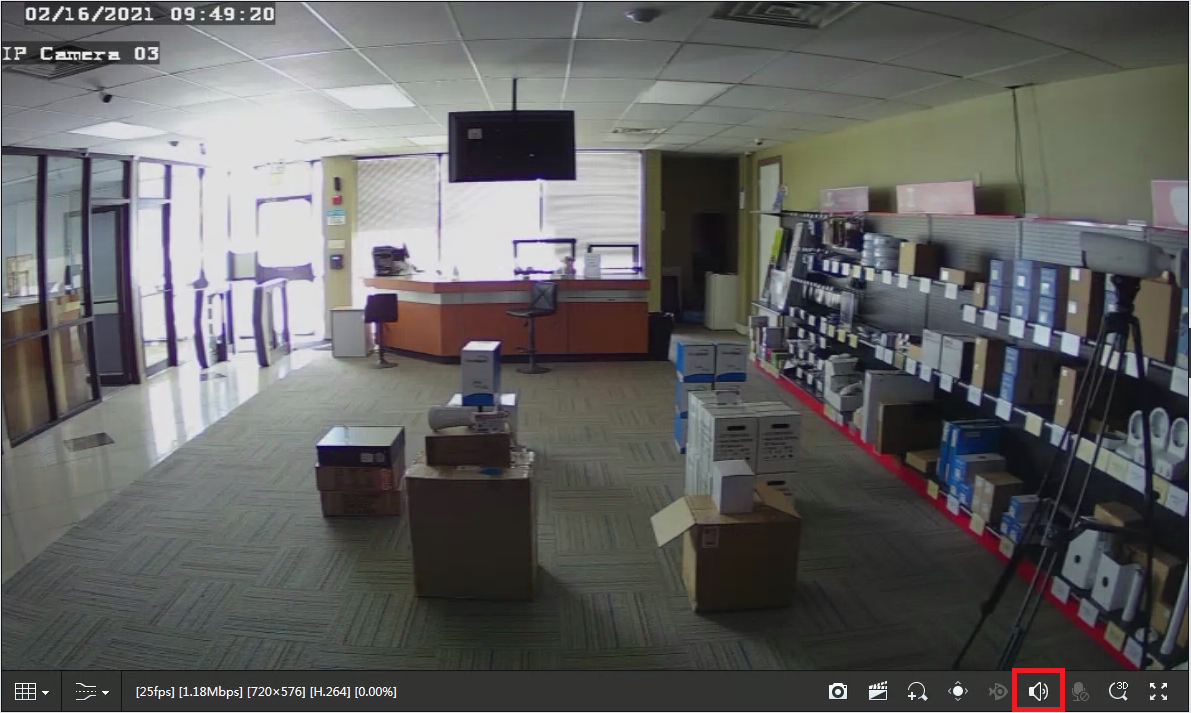
Once you have successfully connected your microphone in one of those three ways, go to Main Menu → Camera → Encoding → Audio Stream. Make sure the Audio Stream is On and Save. Go back to the Live View so that you can hear the live audio. From the Live View screen, go to the window for the camera that you enable audio for, and hit the Speaker icon. Note: please make sure that the device you are listening to audio from has a speaker (ex. NVR connected to TV through HDMI or viewing cameras from computer with speakers)
From web page:
How to Find the Serial Number Using 2M Tool
Click here to download 2M Tool
2M Tool is used to find the IP address of your 2M NVR, DVR, or IP camera, as well as limited management of its settings. You only need to make sure that the computer you are using 2M Tool on is connected to the same network as the device that you are trying to search for.
Why do we need the serial number? The serial number is mainly used in case of a customer needing a password reset on their device.
How do we find the serial number? There are a few ways to find the number:
In the case that you forget the password for you device in which you will not be able to access the web page, and the camera is too high up to reach to find the sticker, you can use 2M Tool to find the serial number. 2M Tool does not automatically show the number; you must force it to show. First, you will need to click on the Settings icon to show the options:

Then another window will open where you can select Serial Number to show.
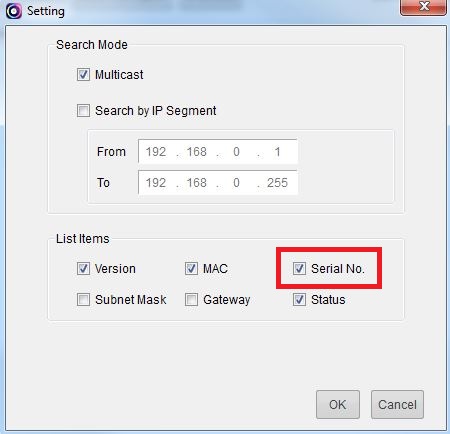
Once you hit OK, the serial number will then appear.

How to Install Plugin for Internet Explorer
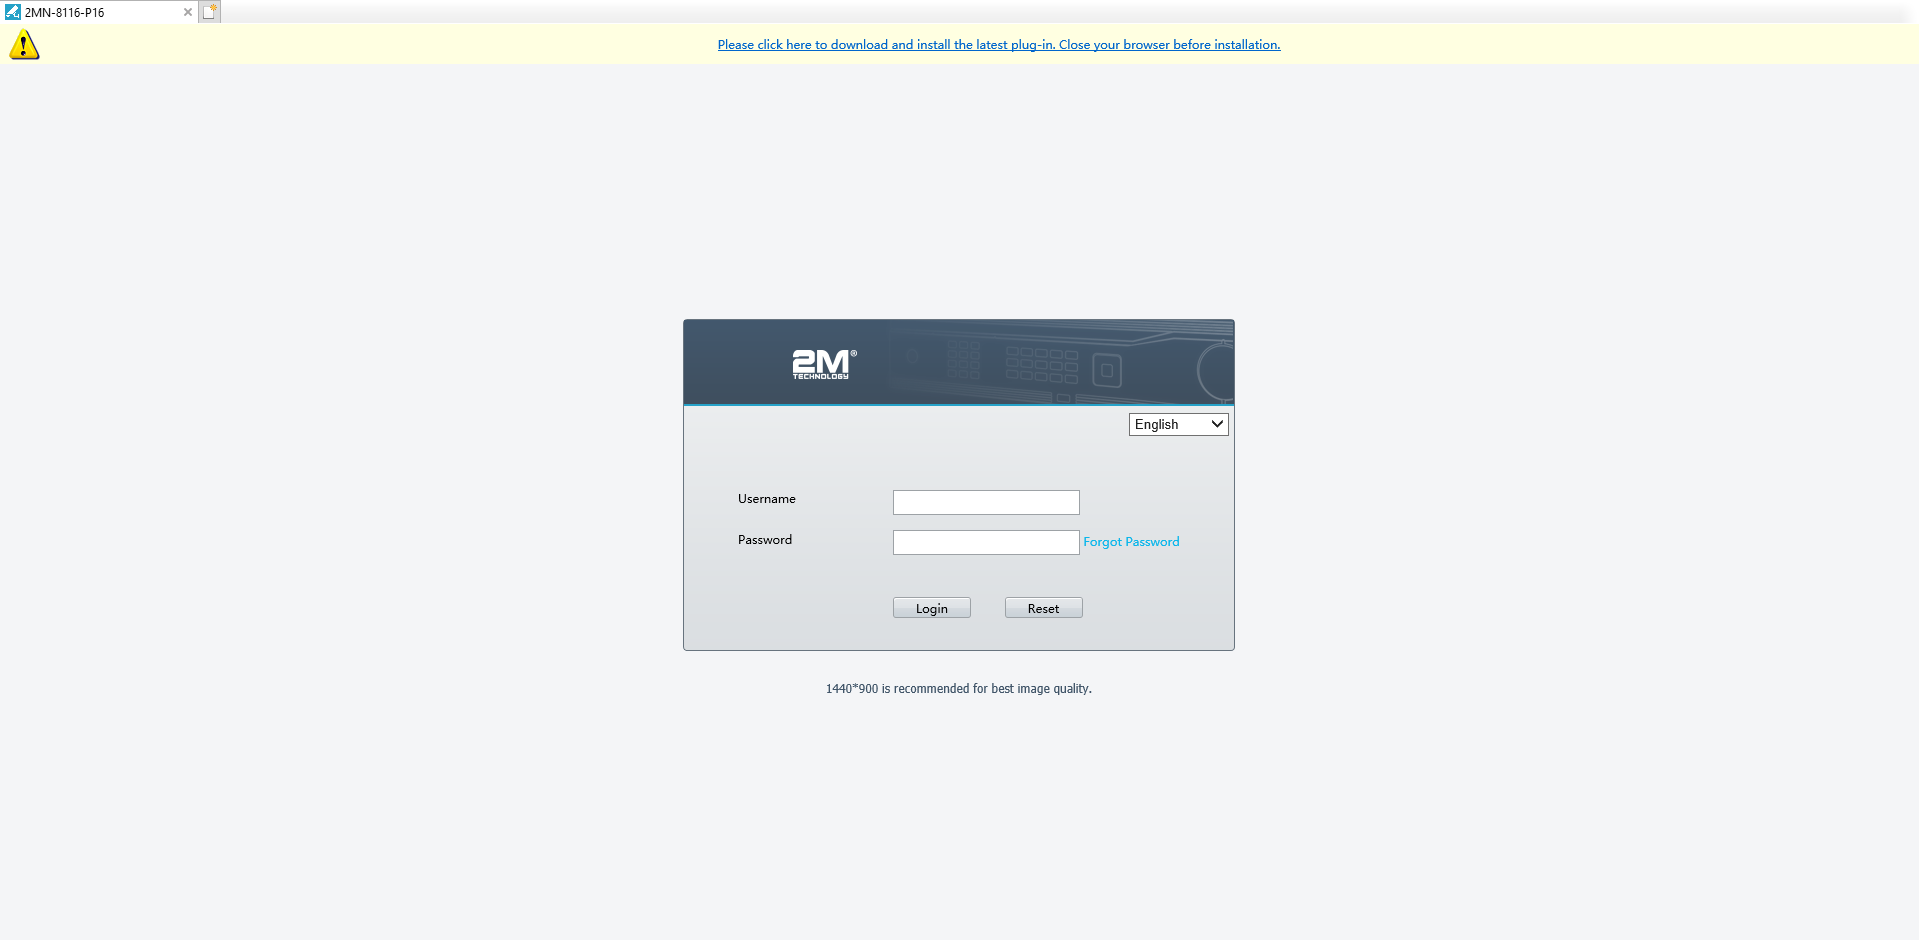
This article features screenshots from our 2MN-8XXX series NVR and our 2MT-4XXX series DVR, but the same principle will apply to any other recorder. This is because each recorder requires a plugin in order to view the cameras on the web page. You will have to manually install the plugin, but it is usually always provided as a link for easy access.
First, you must make sure that you are using Internet Explorer. Internet Explorer is the only browser that can support these plugins. It is possible for some devices to be viewed on Google Chrome or even Firefox, but then other functions are very limited so it is highly not recommended to use those browsers. Once Internet Explorer is open, and you navigate to the device’s web page by entering the IP address, there should be a link shown on the page. You can see on the picture below that the link is located on the top of the page.
When you click on the link, a pop-up will appear on the bottom of the page that will let you choose whether to Run the program or Save the program onto your computer. Note: Running the program will not save it. If you wish to save the program, please select Save. Once it has finished downloading, then you can run the program from the file location.

If you choose to Run the program, an error message will appear noting that the publisher couldn’t be verified. This is no issue; the plugin will not cause any harm to your computer. Hit Run, and run the installation. Some installations will require you to close out of Internet Explorer in order to complete the setup.

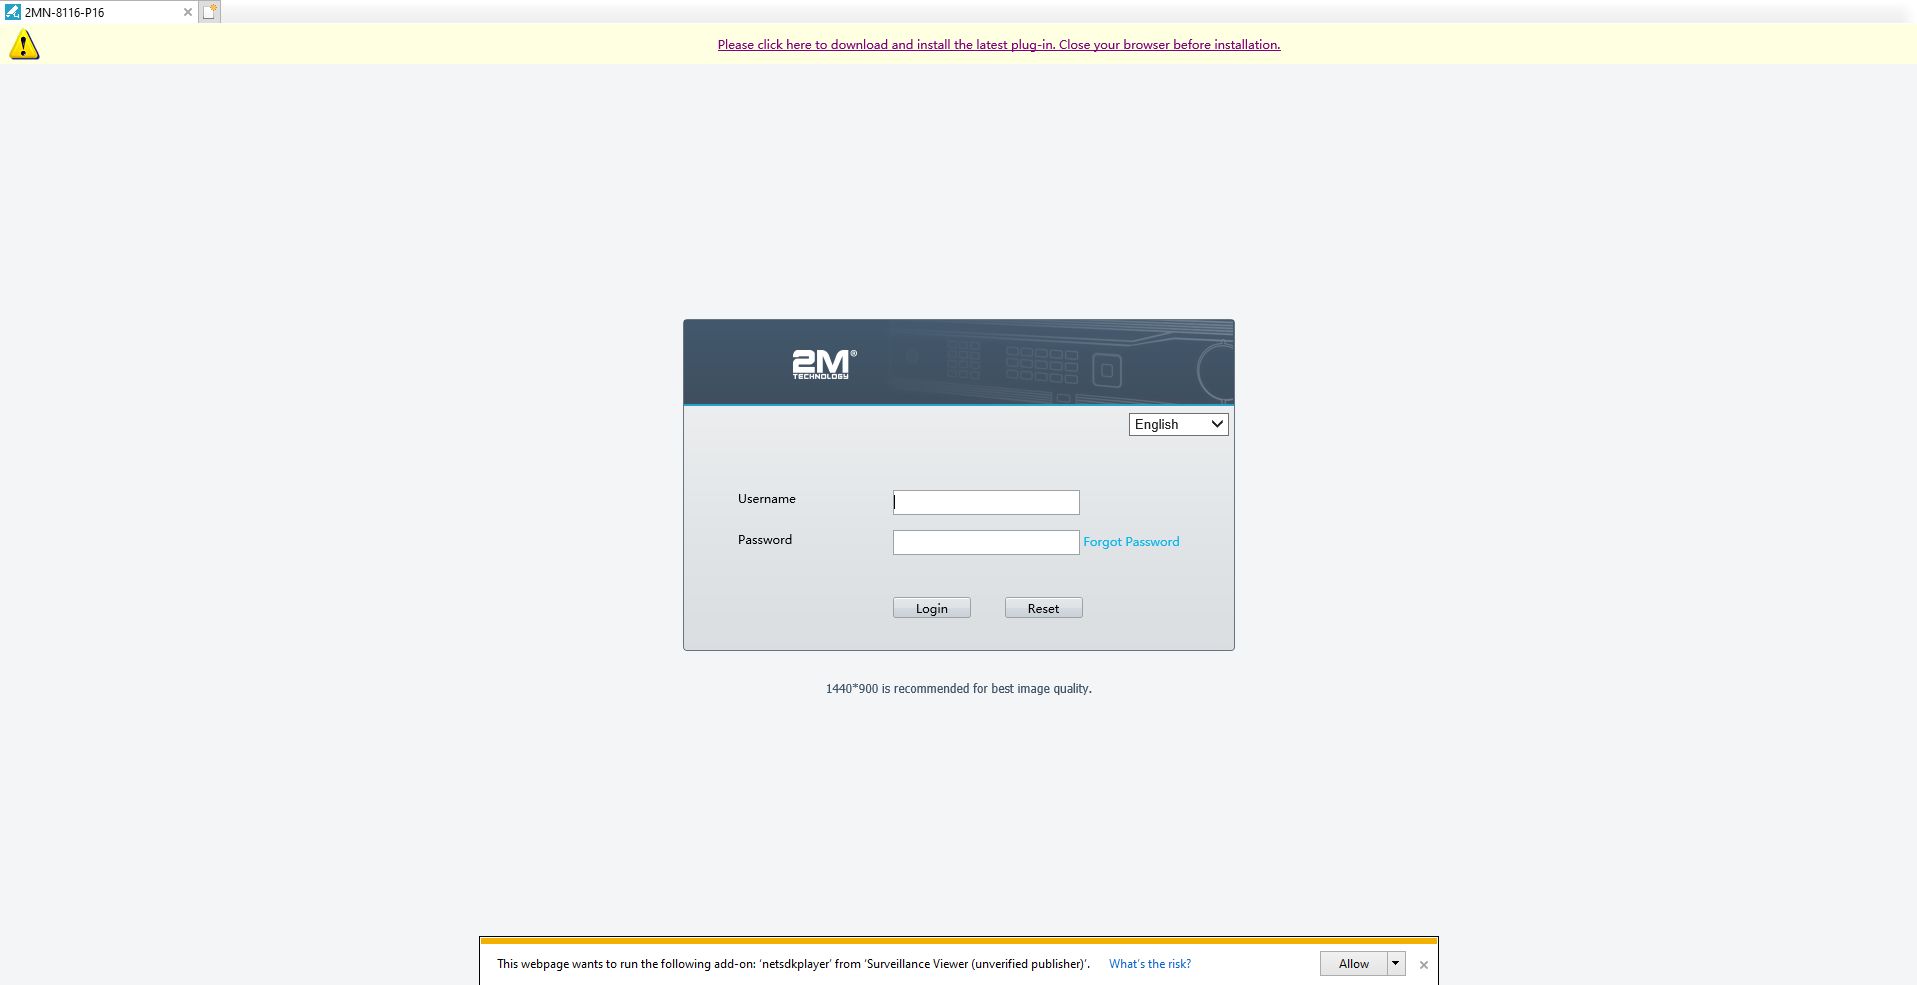
Once the setup is complete, refresh the page, and another message will pop-up on the bottom that asks you to Allow the add-on to run. Select Allow, and log into the page. Now you should be able to view your cameras on the web page.
How to Set Up 2M Guard
2M Guard is the phone app that we use for our NVR’s to view cameras from our phones offsite.
This app only works for models: 2MT-4004, 2MT-4008, 2MT-4088, 2MT-4016, 2MN-8004-P4, 2MN-8008-P8, 2MN-8116-P16, 2MN-8232-P16 and our IP cameras.
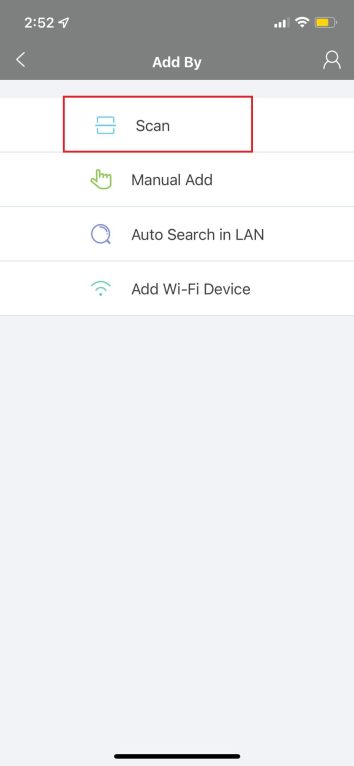
2. Two ways to add a device onto the app:
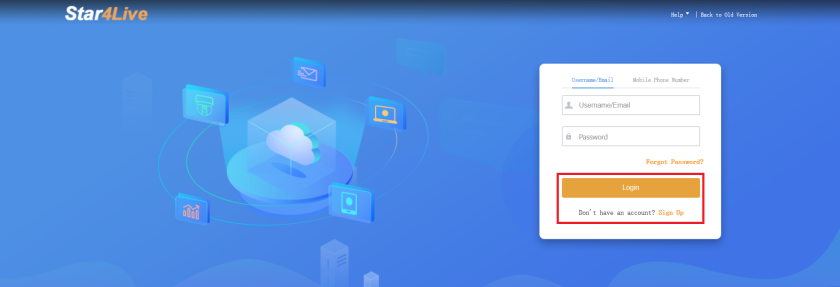
Method 1: Adding Device Through Star4Live
Method 2: Adding Device Directly on the App
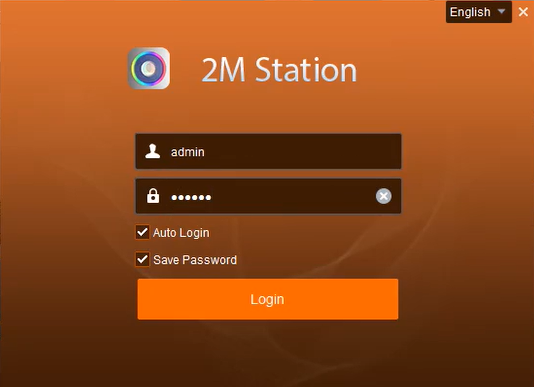
How to Set Up 2M Station
2M Station is the PC software to view your cameras on your computer on and offsite. This program only works with models: 2MT-4004, 2MT-4008, 2MT-4088, 2MT-4016, 2MN-8004-P4, 2MN-8008-P8, 2MN-8116-P16, 2MN-8232-P16, and our IP cameras
When first running the program, it will prompt you for a username and password which will be admin/123456 by default. It is recommended that you change the password after installation.
Once you are logged in it will show the menu. Click on Device Management to add any devices. On the left side make sure that Encoding Device is selected. It will show at the bottom of the screen any devices that are online as long as the computer is on the same network as the devices.
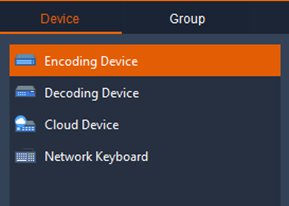
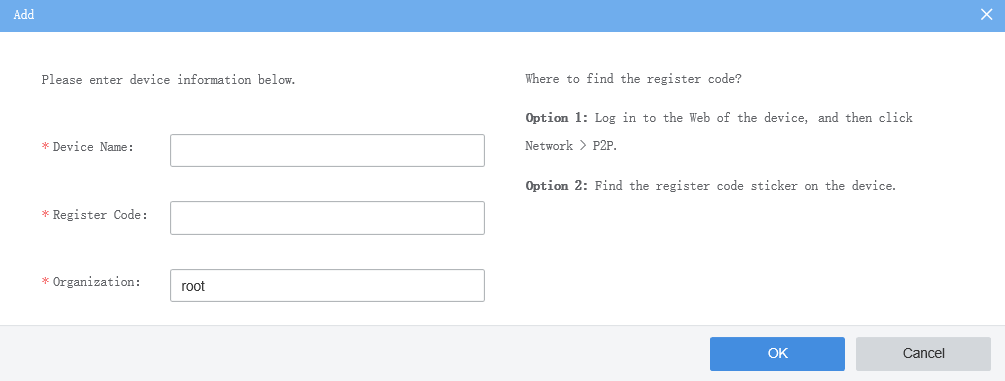
There are two methods to add an online device. The first method is fairly simple. All you need to do is check the box for the NVR that shows under Online Device and then click Add. The second method to adding an online device is to manually add it. First click on Add next to Managed Device, and it will open another window where you can input the details of your device. It will ask for:
After putting in all of the correct information of your device, click on Add and then the device should come online.
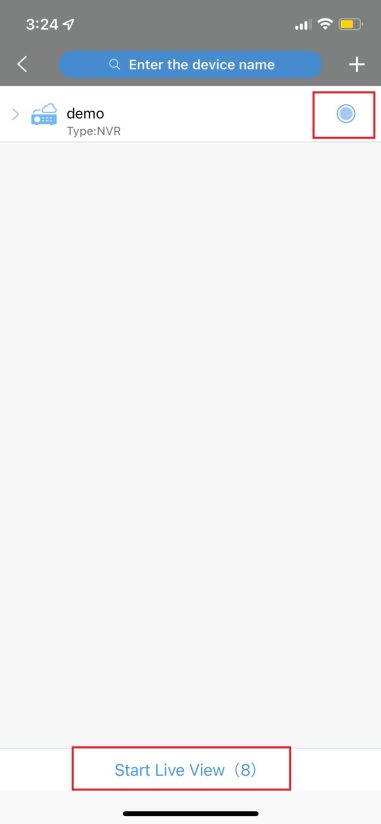
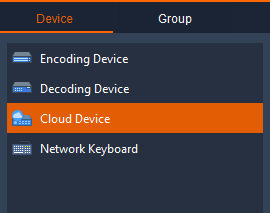
Another method to add a device is by using the P2P method which allows for a user to view their cameras offsite from any location. The device will be added as a Cloud Device instead of an Encoding Device.
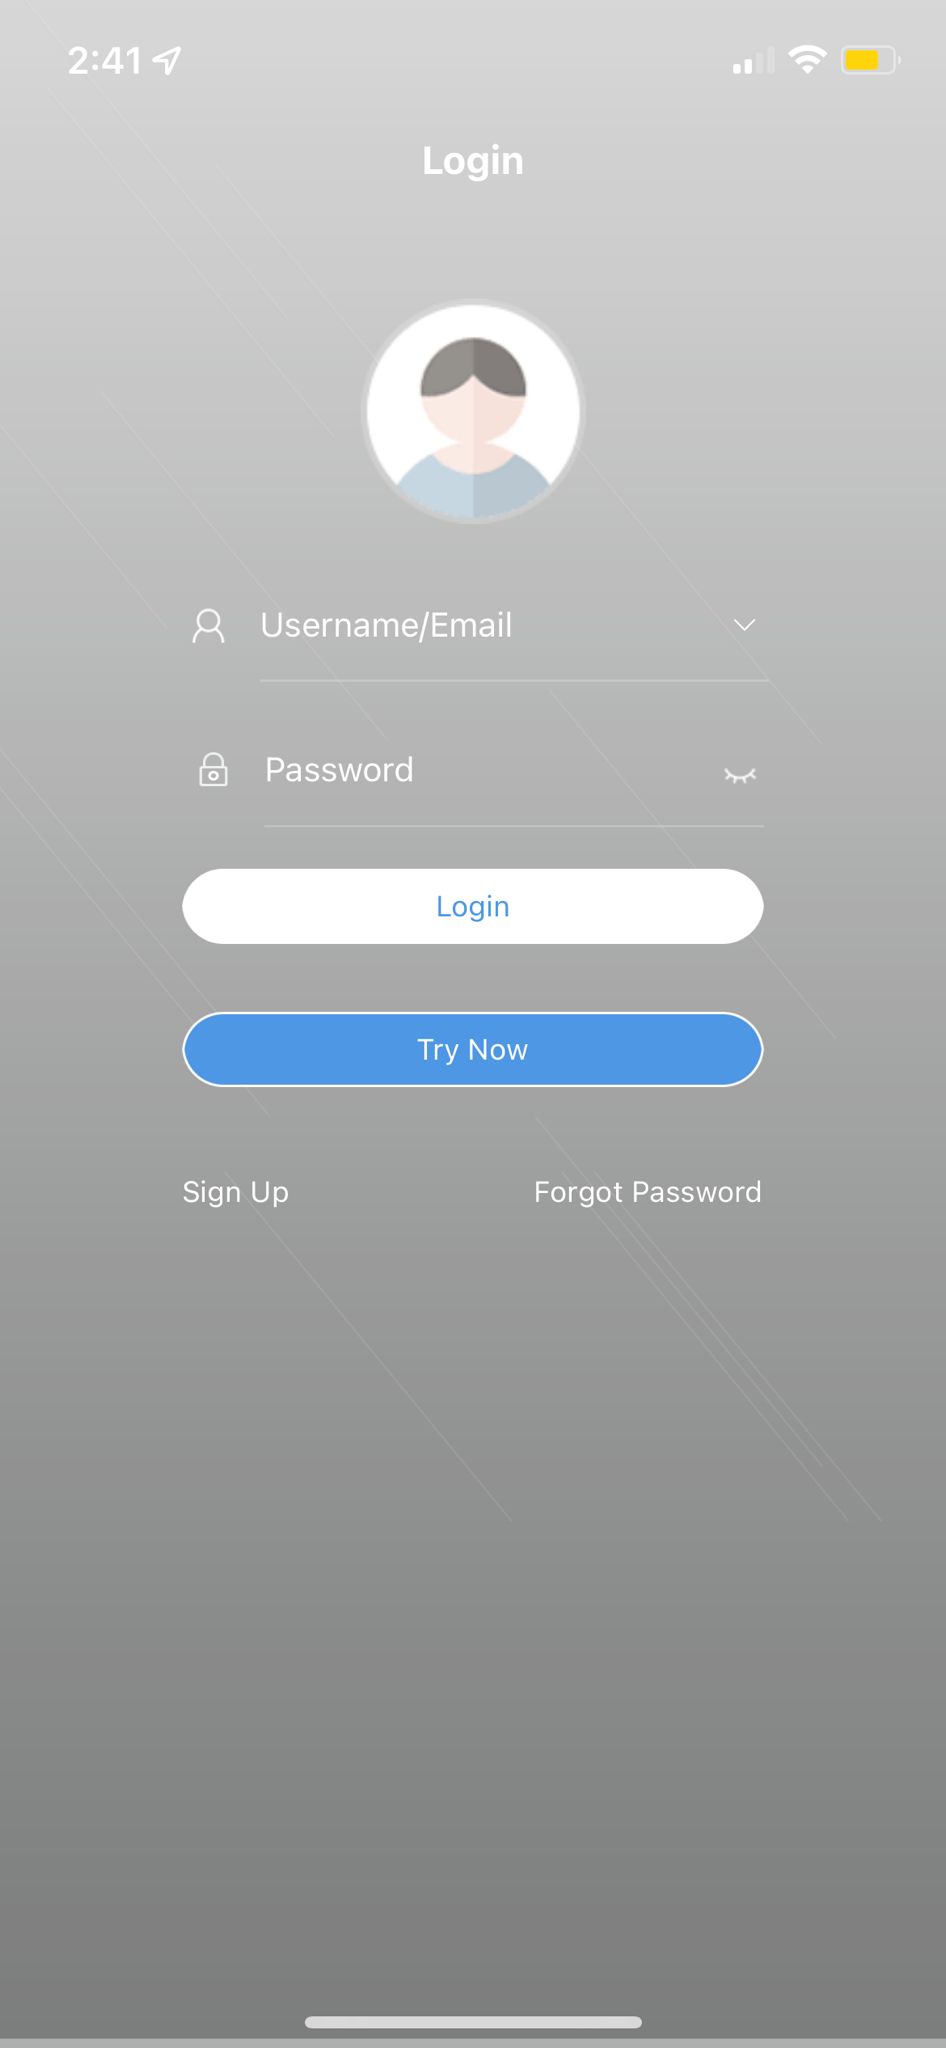
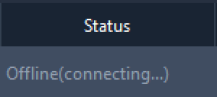
It will show Login and Register buttons that will link to your Star4Live account which will show the devices you have previously added. After logging in, it will take a minute or two for the devices to show online. At first, it will say Offline (Connecting…), but eventually the status will show Online.
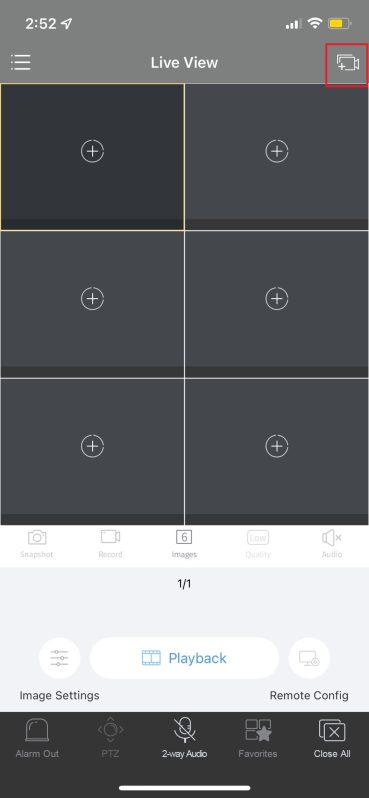
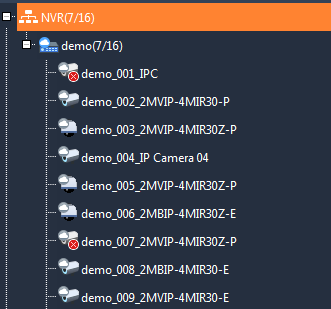
After successfully adding all of your devices, go back to the menu and click on Live View to view your cameras. A list of online devices will show on the left side of the window. Click and drag the device into the window view in order to load all of the video. If not all of the cameras are wanted in view, you can click on the plus sign next to your device and it will show a list of cameras connected to the NVR. You can click and drag specific cameras onto the live view screen.
How to Set Up Email Notifications Using Gmail
This is valid for models 2MT-4004, 2MT-4008, 2MT-4088, 2MT-4016, 2MN-8004-P4, 2MN-8008-P8, 2MN-8116-P16, and 2MN-8232-P16.
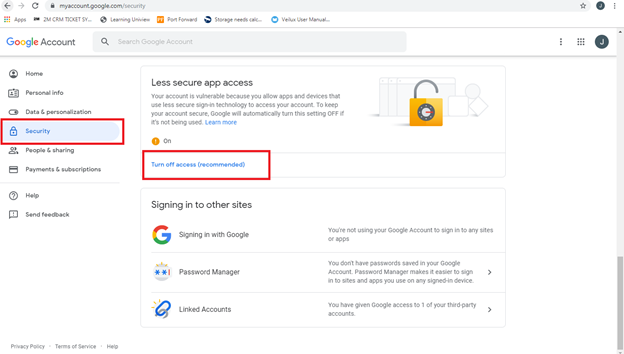
Gmail will have automatic security settings that need to be disabled before configuring email settings in the NVR. You will need a computer in order to edit these settings. First, log on to your Gmail account and then click on the square icon in the upper right corner of the page. Click on Account.

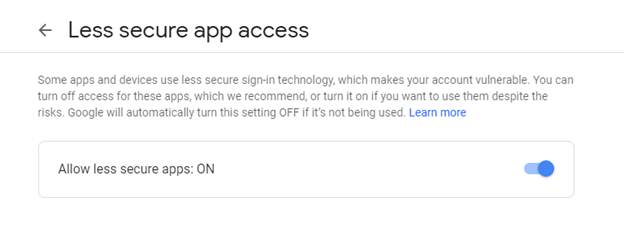
Security → Scroll to the bottom until you find “Less secure app access” → “Allow less secure apps: ON”
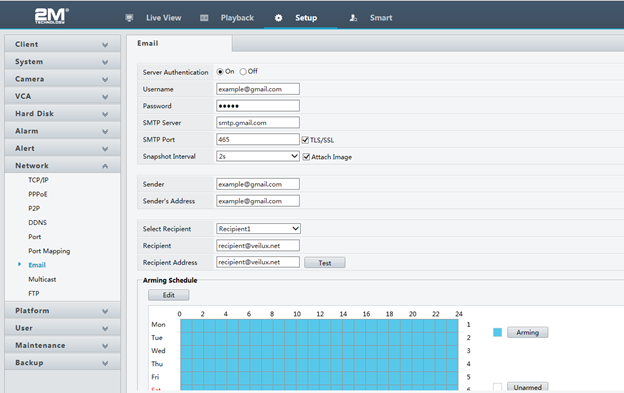
Now that Gmail has been set to allow app access, we can move on to the NVR settings. These can either be configured through the web page or through the NVR itself.
Through the DVR/NVR: Main Menu → Network → Basic → Email
Through the webpage: Setup → Network → Email
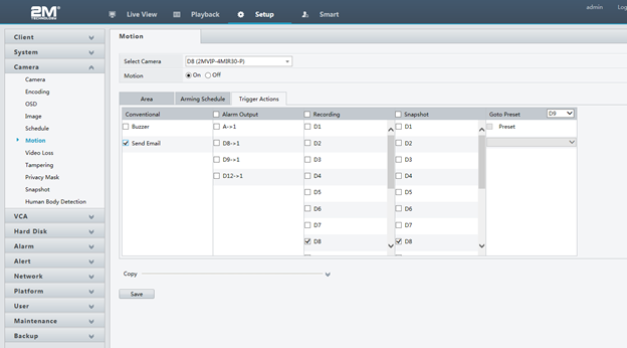
After you finish entering all of the settings and the test is successful go to Camera → Motion → Select Camera → Trigger Actions → Send Email
How to Share a Device
This is only valid for models: 2MT-4004, 2MT-4008, 2MT-4088, 2MT-4016, 2MN-8004-P4, 2MN-8008-P8, 2MN-8116-P16, 2MN-8232-P16 and our IP cameras
Each NVR can only be added by one account at a time, so if one wants to add a device onto multiple accounts they would need to share the device with one account being the “main” account. This means that one person will have the device added to their account and that person will share the device with other people. Each person still must have their own Star4Live account.
How to share the device is simple. First, you will need to log onto the main Star4Live account which the NVR has been added to. It can be done either through the computer or your personal phone.
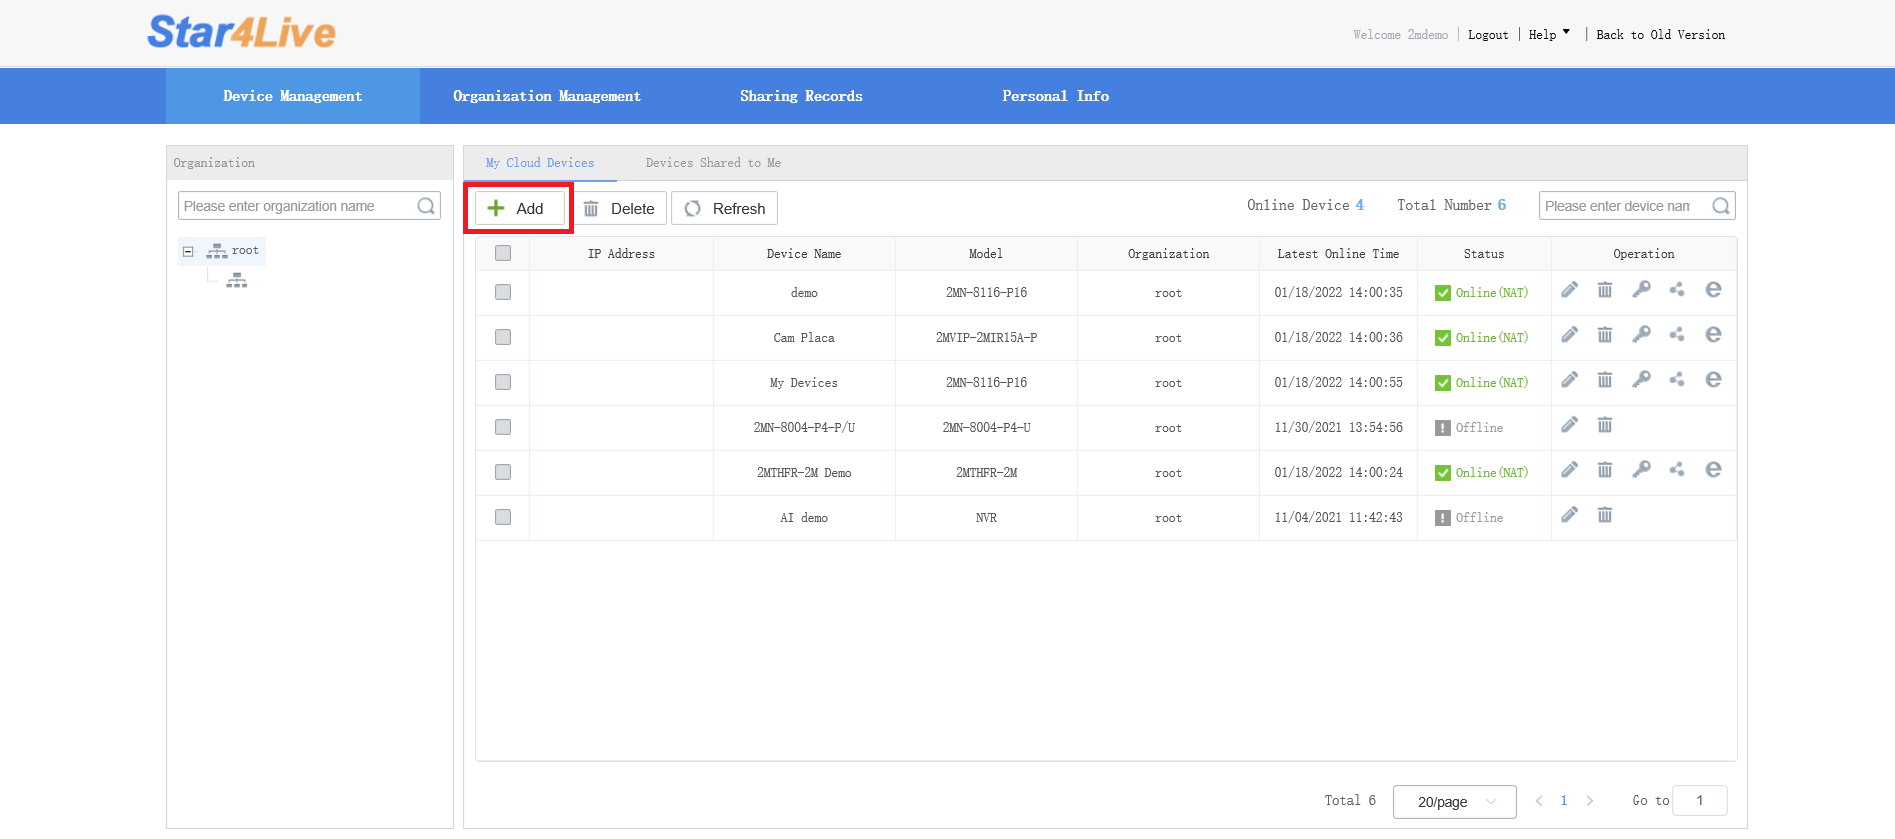
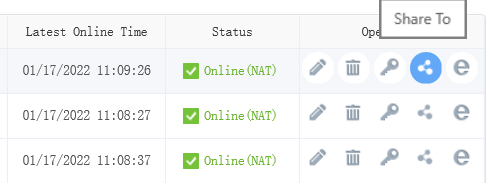
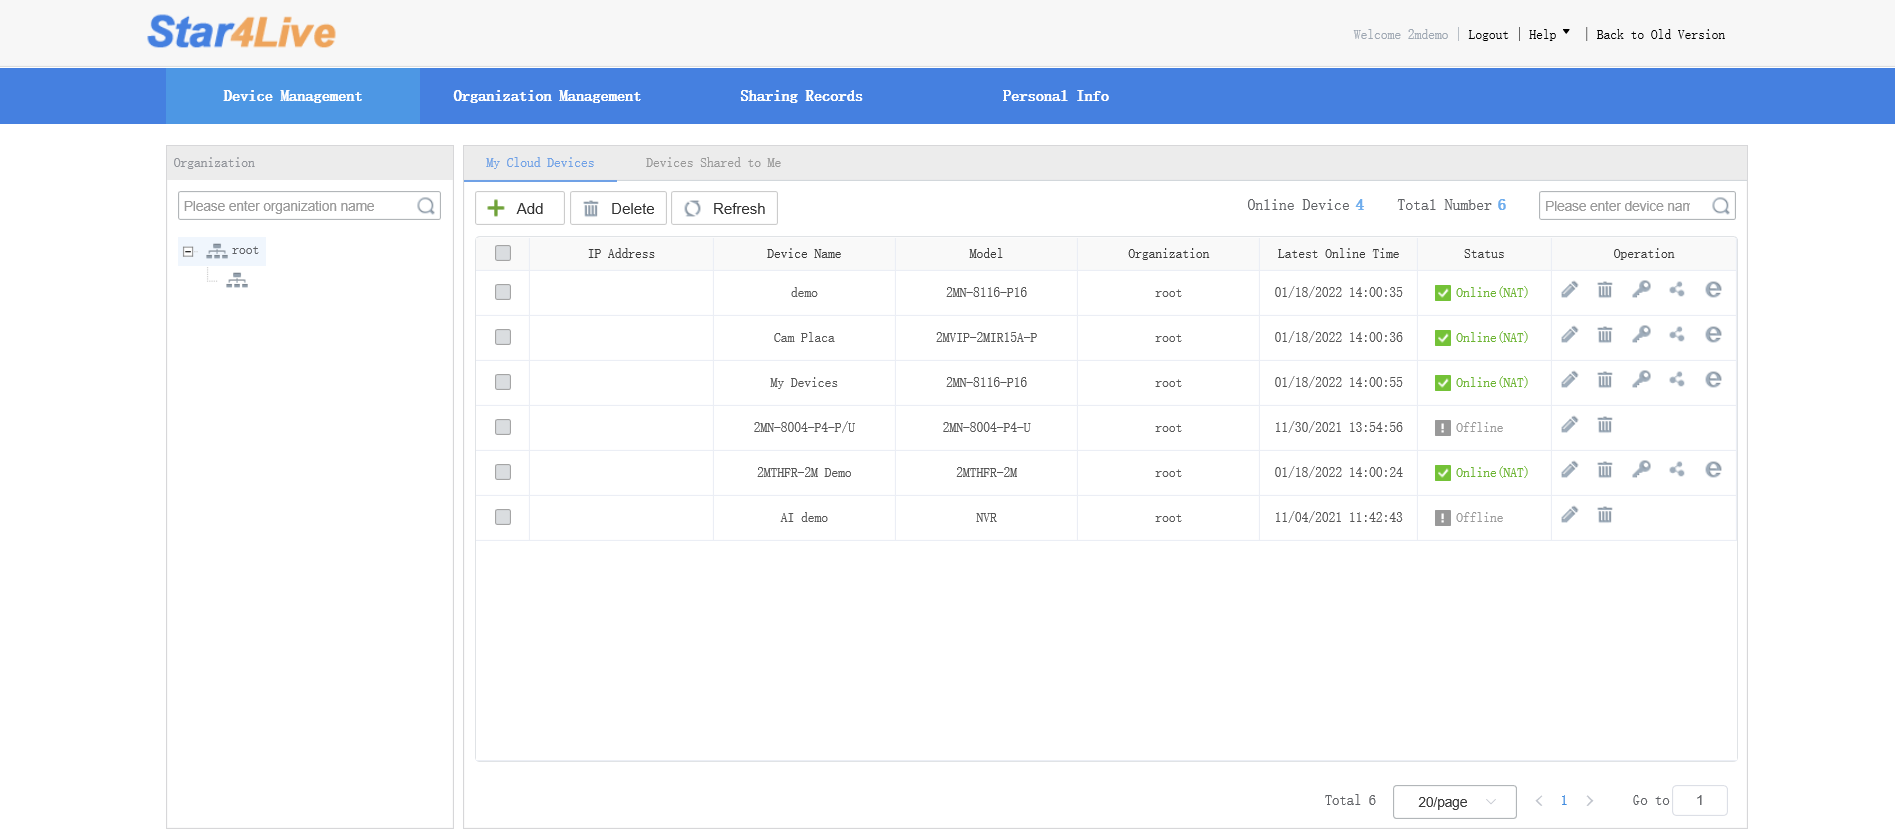
Sharing from Computer: after logging into the account your list of added devices will appear. Click Share on the row for the device you are wanting to share.
Then a menu will appear to enter the account you want to share to, the Valid Till date, User Rights, and any Description you want to give.
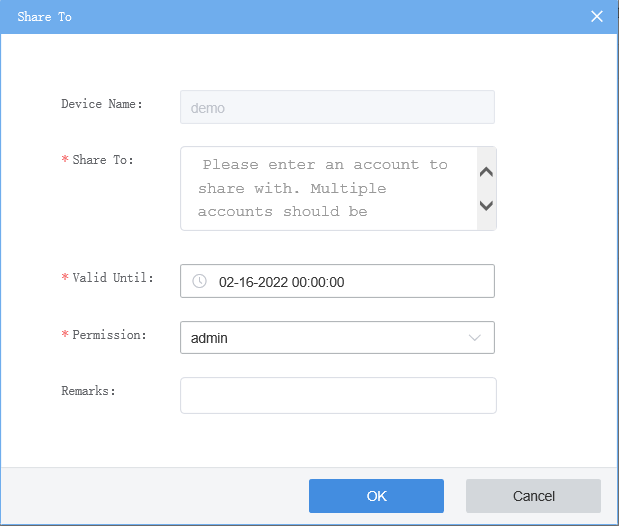
Once all of the information has been correctly filled out, click Confirm to successfully share.
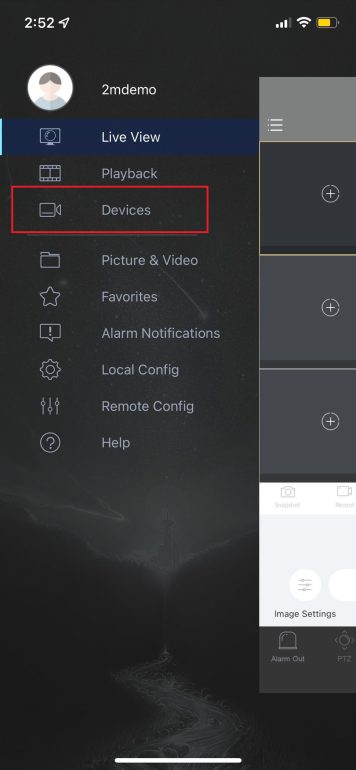
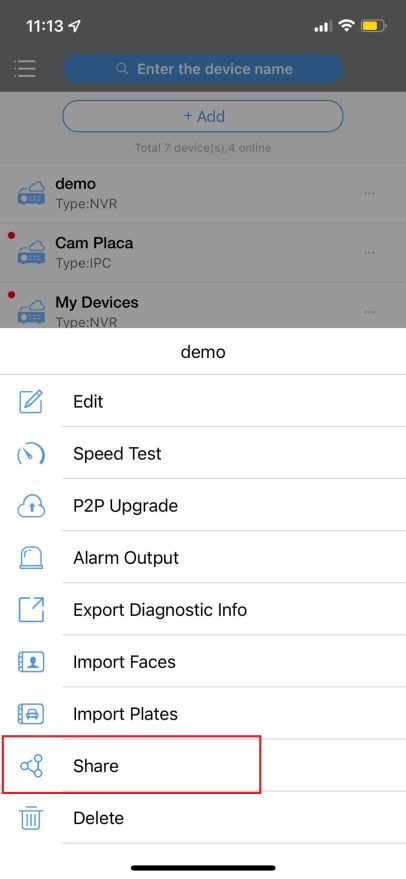
Sharing from 2M Guard Phone App: after logging into your Star4Live account on the 2M Guard app, go to your Devices and then tap on the device that you want to share. A small menu will appear. Then tap Share on the bottom of the screen.
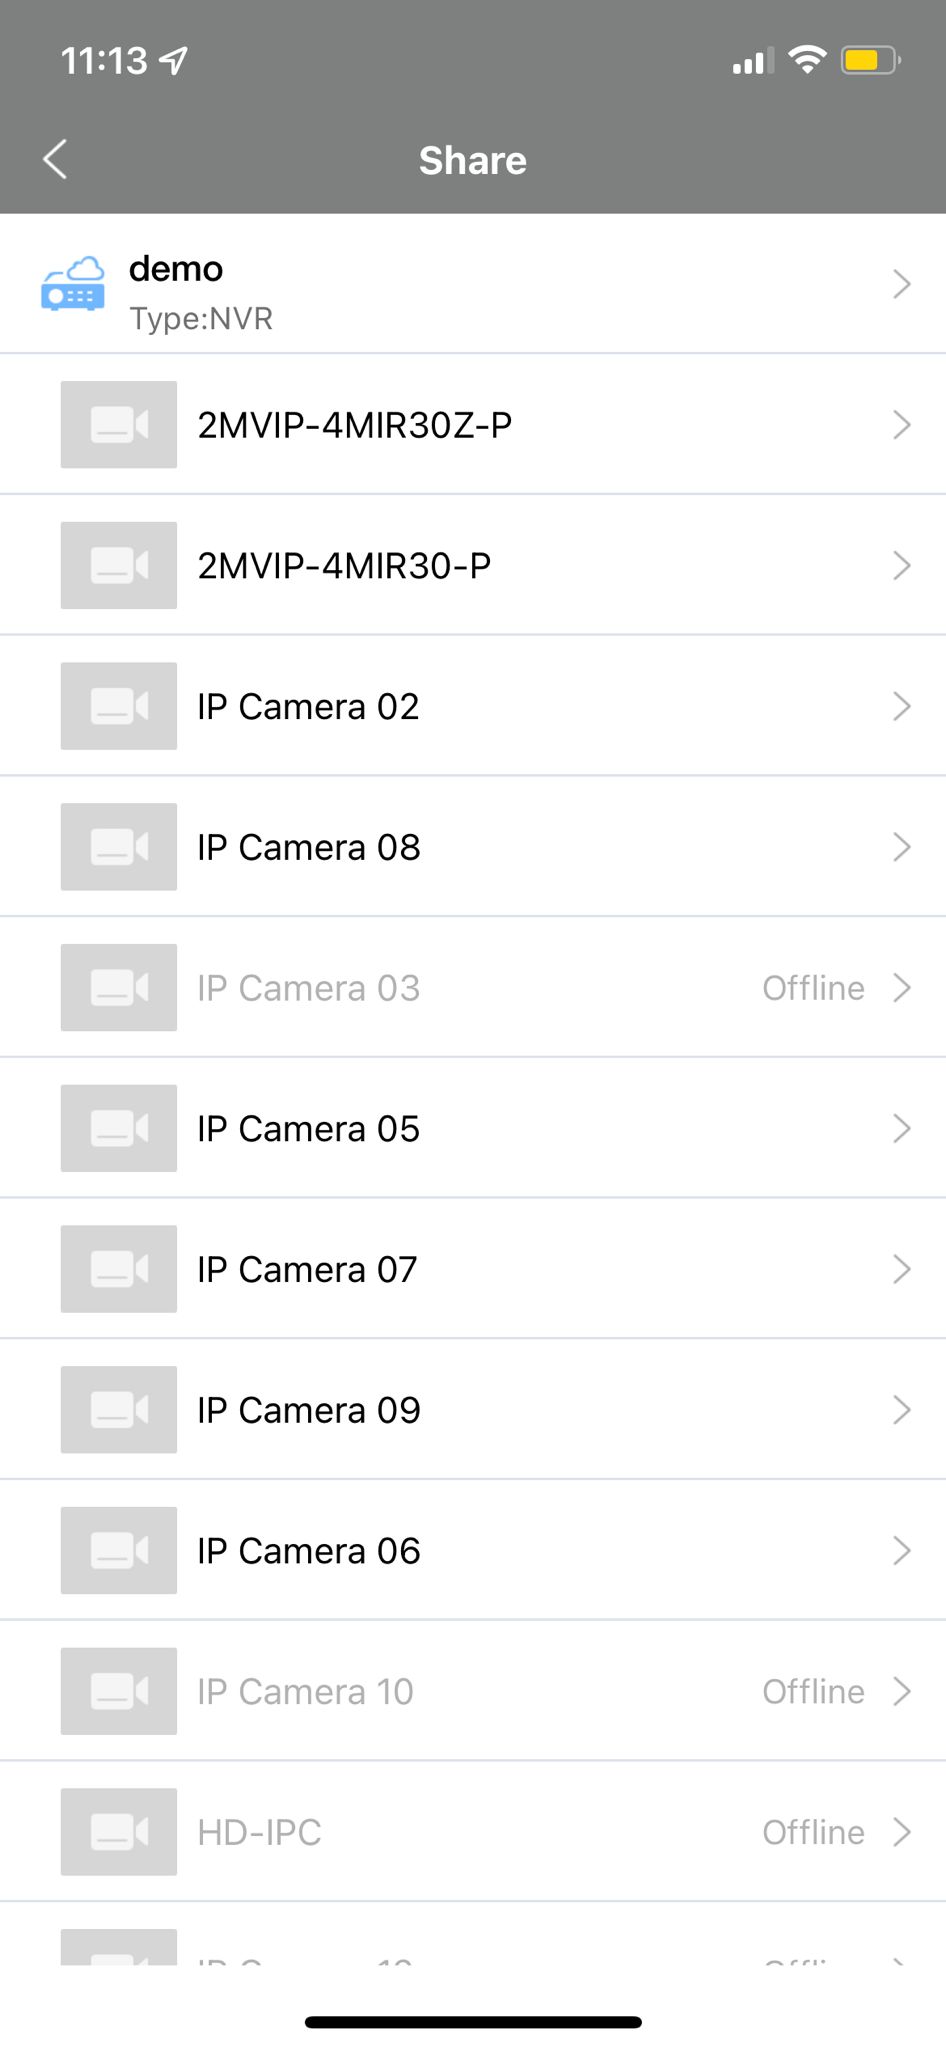
The next window will show the device and a list of the cameras that are connected and online. You can choose specific cameras, or select the device so that the entirety of its cameras are selected for sharing.
Once your device(s) has been selected, the Share menu will finally appear. The app will ask for the same information as the computer does, but it will not give a space to fill out a description. Fill out the Share To and the Valid Period the same as you would do on the desktop instructions written above. The only other difference between the Star4Live browser and the app is the sharing Type: you will be able to choose between Role or Function.
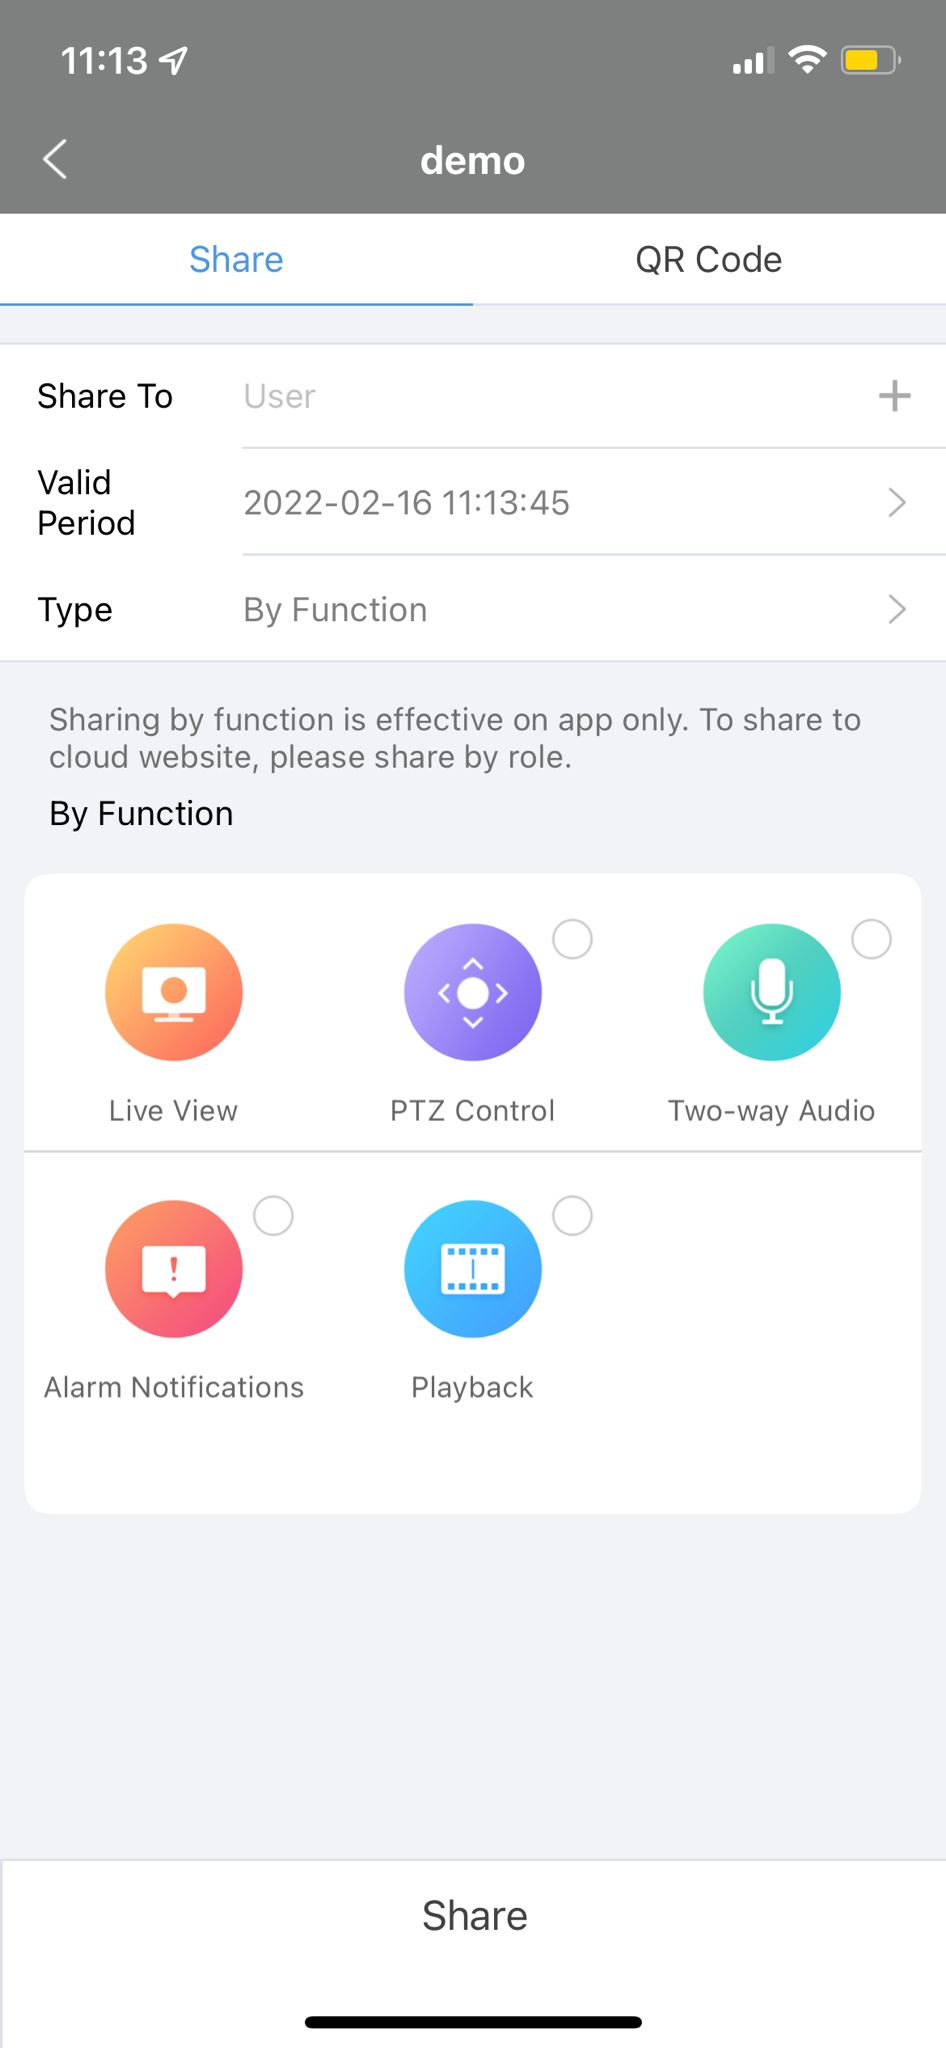
NOTE: Only admin rights will allow another user to access the device through the web browser or through 2M Station because they both allow a user to make changes to the device. If you do not wish for another user to be able to make any kind of changes (viewing only), please choose the By Function type.
Once one of these methods have been completed to share the device, the recipient only needs to log into their Star4Live account and the shared NVR should show automatically under their own device list.
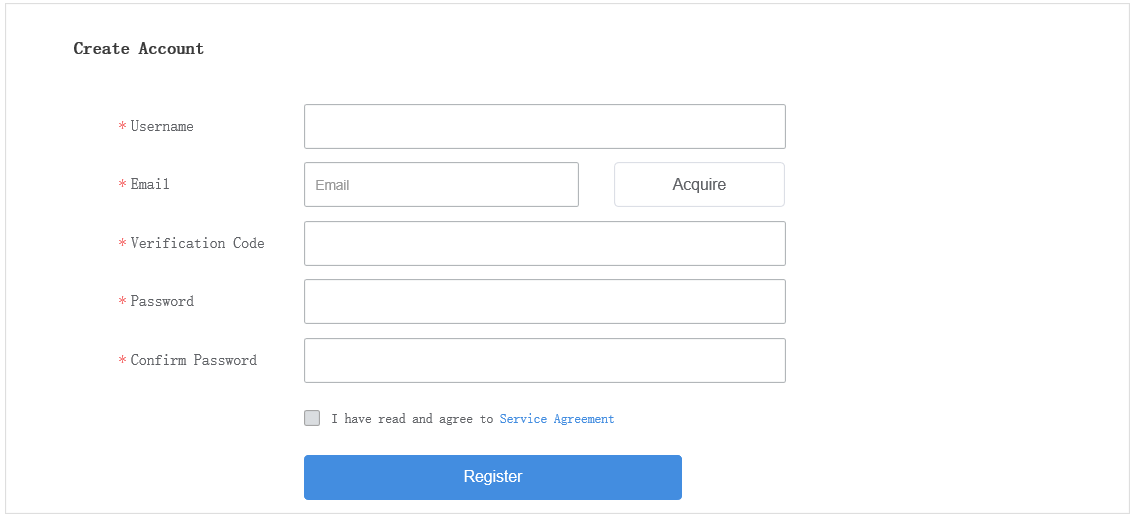
How to Sign Up for Star4Live Account
Star4Live is the server that we use to view NVR and camera footage over the web. Each customer needs to have an account to view and manage their devices.
This is only valid for models: 2MT-4004, 2MT-2008, 2MT-4088, 2MT-4016, 2MN-8004-P4, 2MN-8008-P8, 2MN-8116-P16, 2MN-8232-P16 and our IP cameras.

How to Upgrade the Firmware
This article applies to the models: 2MT-4004, 2MT-4008, 2MT-4088, 2MT-4016, 2MN-8004-P4, 2MN-8008-P8, 2MN-8116-P16, 2MN-8232-P16.
Every now and again, we will release a new firmware update that can either hold new features for your unit, bug fixes, or a bit of both. We have made it simple to request the newest firmware so that there is no need to wait for a file to be sent. First, you will need to make sure that your device is connected to the internet so that the NVR will be able to communicate with our servers.
Method 1: From the NVR Interface
Then you will go into the Main Menu and click on Maintain. There will be a section for Upgrade.
There are two options for upgrading:
You will most likely want to choose the Cloud Upgrade option unless you have received the firmware file from Tech Support beforehand. Click Cloud Upgrade, and wait for the device to finish its search. It will either notify you that the current version is already the latest, or it will show a newer version, and the Upgrade button will highlight at the bottom of the screen.
The upgrade time will vary between 1-5 minutes, sometimes lasting longer depending on the size of the update. Once the update has finished, the device will automatically restart. It will be ready to use again once it has fully finished the reboot.
Note: Please make sure that the device does not disconnect from the network or from power because it can cause a risk in damaging the unit if there is a failed update.
Method 2: From the Web Interface
The NVR can be updated from its web page if there is no monitor connected to the unit, or if it cannot be physically accessed. From the web page, you will navigate to Setup → Maintenance → Maintenance → Cloud Upgrade → Detect or Check for Update. The process is the same as it is from the unit itself, and the same rules will apply.
How to Use Star4Live
Star4Live is the server that we use to view NVR and camera footage over the web. Each customer needs to have an account to view and manage their devices. You must use Internet Explorer in order to access all of the functions of Star4Live.
This is only valid for models: 2MT-4004, 2MT-4008, 2MT-4088, 2MT-4016, 2MN-8004-P4, 2MN-8008-P8, 2MN-8116-P16, 2MN-8232-P16 and our IP cameras.
![]()

What is the default password for the 2M New Professional NVR?
The new 2M Professional series NVR default username and password is admin/123456. It is highly recommended that you change the password once you receive it.
This is valid for models 2MN-8004-P4, 2MN-8008-P8, 2MN-8116-P16, 2MN-8232-P16.
Add Comment